Sunday, March 30, 2008

Sanding Cardstock with a White core (Enabler alert!! New nifty cardstock)


This technique operates similarly to making a rubbing. I bought this hand-carved wooden block (stamp) from India at Maiwa on Granville Island ages ago, figuring I'd try my hand at block printing to do batik. My Mom used to do it and I love how it looks. I haven't gotten around to it, since I've yet to figure out how those gorgeous blocks are really supposed to be used. :0)

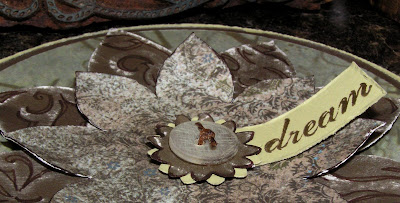
However, I did find another use for the beautiful wooden stamp. It involves cardstock from Close to my Heart which has a snifty white core, and a nail file. Of course, this doesn't capture all of the detail, but it makes an interesting texture. And it gives you an idea of where to add doodling. :0)

It's EASY! I just did this schtuff:

1) Printed and Cut a mirkwood flower
2) Laid it over the block
3) Sanded it
4) Doodled in marker

Supplies:

  • Mirkwood flower template
  • Cardstock with a white core
  • Batik stamp
  • Nail file or sandpaper/block
  • Marker (I used a Chocolate Chip Stamp'n'write)
  • Clear button (this is an S.U. button sanded)
  • Waxy flax/hemp/embroidery thread
  • River Rock Cardstock
  • Basic Grey paper (Bordeaux from Periphery)
  • SU Boho blossoms punch
  • dream stamp from Bella Brush (fancy pants)
  • K & Co Life's Journey 6x6 paper pad

This button is a plain clear Stampin' Up! button. I sanded it with a nail file and rubbed in Very Vanilla craft ink to give it some colour.

I'm so glad you stopped by &
I hope your crafting is a blast!

P.S. Here is what the Close to my Heart Cardstock looks like after you run it through the cuttlebug & sand it:

Close to my Heart has textured cardstock too (also with a white core--I think, though I haven't tried it yet.) Love the variety of stuff out there, hey? :0)

P.P.S. Speaking of white core paper, Check out Kim Hughes's blog Paper Hugs for an innovative cardstock & a design team call for Core'dinations Card Stock. Great video on it at their site (complete with cheesy announcer voice.) ;0) It's textured & available here. Their Black magic collection is unbelievable (It's black that reveals colours with sanding/tearing...) I think they have a million colours.

Wednesday, March 26, 2008

Glue pen embossing: I can't resist!

Another glue pen embossing card. :0) I can't stop! There are so many gorgeous patterns that I'm going to run out of glue pens in no time.

Supplies to make it:

Textile Pattern (find patterns here, instructions for how to alter & print it here)
Patterned paper cut to fit printer (I used 7gypsies Paperie "Quadrant tablet" 12x12)

Glue pen embossing supplies:

Sakura Quickie Glue pen
Embossing Powder (I used black)
Heatgun
Tutorial here

Other supplies:
To paint flower pattern: Black & River Rock ink wash; To make punched flowers: boho punch (S.U.) & hodgepodge brads; Cardstock: Basic Gray, Black. "Happy Birthday" sentiment: Birthday Whimsy (S.U. saleabration 2008 set); Other accessories: Eyelets "making memories, black hemp S.U. Black poly grosgrain ribbon (got it at a fabric store) :0)


Thanks for taking time out of your day, :0)

Glue pen Tracing-embossing & Distressed Stamp Embossing

The white embossing on this simple card is done without stamping. I'm thrilled to be doing glue pen embossing with these gorgeous patterns I found. Feels like a whole new world of crafting without spending money! (You just need a little cardstock & printer ink, a gluepen & embossing powder.)

Glue pen Tracing-embossing

The first step to making this pattern into a template for embossing in white (or any other embossing powder) is to lighten it. These particular patterns start out very dark:

If you want to emboss in white or save ink & you lighten them, then they end up like this:

This looks like a fuzzy picture, but really it's a photo of the printed out lightened version I made.

How to lighten an image for white embossing:

1) Save picture as a jpeg or other suitable file.
2) Open in imaging software. (I love Microsoft Picture Manager.)
3) Rotate, crop & lighten it & print. (I chose the 4 pictures to one page setting to get this size for a 4 2/8" card) This is printed on Naturals White cardstock.

Then you can just go over it with a glue pen and emboss it. Here's a glue-pen embossing tutorial. After I embossed the textile pattern, I just used a little River Rock ink on an aquapainter to paint the darker areas for interest.

Distressed heat embossing technique:

To make this texture on the card, I just used a distressed embossing technique.This is White Craft ink with Clear embossing powder on plain River Rock cardstock. I used Paisley Print (a retired Stampin Up! background.)

To get the deeper tones of the hue around the embossing all you have to do is over heat it. (Blasphemous--I know--of course, we normally avoid overheating embossing powder...) However, you can get some really interesting effects by heating a lot. Super-heating silver e.p. for instance allows you take the shine off and get a distressed pewter look. Lots of fun!

Happy Craftin' :0)


P.S. The little paper flower is a prima from Close to my Heart.

P.P.S. If you'd like me to email you the lightened pattern, just let me know: mmmccart@sfu.ca

Embossing Embroidery Patterns!!! for Cards/Scrapbooking (With Easy Tutorial)


I'm SO excited! This is not a finished project (no time!)--but just had to share this, since it's so very easy and super fun (also very affordable.) This isn't a stamp, but it opens up a whole new plethora of embossing opportunities. You can use beautiful free embroidery patterns (or any line-image) for glue pen embossing!

Simple How to:

1) Print the pattern/image you like onto cardstock (You can use any image you like. Your own drawings, Clip art or any line drawing--This is a great way to immortalize Children's creations.) You can also do google image searches to find things you like...

This pattern is from this Ladies in Red site.
You can print on fast to save ink (it gets covered.)

2) Wipe cardstock with an anti-static bag (embossing buddy...)

3) Take a Sakura Quickie Glue pen and trace over it's lines. Really easy--just work in batches so the glue doesn't dry.

4) Sprinkle embossing powder over the wet glue lines. (You can work in different colours of embossing powder too--here's an example) Glue pen embossing is also great for detailed emboss resist or for custom sentiments or on the inside of cards.

5) Heat gun it. I've found it stands up to the heat nicely.

6) Colour your image (if desired), or do emboss resist. This also looks great on dark cardstock (just use a white pencil crayon or white transfer paper to put the design onto your dark cardstock.)

Some sources for embroidery patterns:

flower designs
free patterns
embroidery pattern
free patterns
McCalls patterns
Patterns from Honey Bee
Flower pattern
Patterns courtesy of Ruth
Needlecrafter patterns
Patterns on flickr
Kid's colouring pages
many templates
backgrounds
textile patterns

Happy Craftin!


P.S. Much thanks to Mary Corbet (who's Needle'n'thread site helped me find a lot of these)
P.S.S. I'm not sure what to make with this (It's large: 6" by 7" or so)
Any ideas??? :0)

Being Spoiled Rotten--Thank You Becky!


I'm lucky enough to belong to SBS (sisterhood of the blogging Stampers!) I'm in group 2, but you can join too (here). They're on group #15 now and I'll tell you why... It is such a joy to have an online group of friends and you really feel like you are friends.

The ultra-talented Becky is a super example. She was my Big Sister in our secret sister draw & she showed me how it's done for next time! (I blew the secret, sorry Maria!) ;0-) Becky set up an email account so we could chat and it was a blast.

Her super-generous spoiling was just an extra bonus added to the fun of being part of my first swap (She really went above and beyond.) Check out this beautiful card and gorgeous goodies. Thank you SO much Becky; you're so generous! :0)


Becky made this gorgeous card. I LOVE the rich detail: the layered flowers, the glazed heart, the satin ribbon, and lush layered mats. It's even more stunning in person. And she sent me all these goodies in beautiful colours. I can't wait to play. Feels like Christmas!


Thank you so so so so so so so so so so so so much Becky!!!!! :0)

(((hugs)))

Friday, March 21, 2008

Three-inch-square Spring Note cards & Matching Daisy Box (with templates)

This 3 inch square gift card set & matching box was inspired by these crazy pretty tulips. I love their white petals against the green: it's so simple and it feels so fresh. Come on Spring!!! :0)


I had the template for this box saved to my computer from a while back and I printed it for the first time this week. It's an absolute joy to make. Stacey (whoever she is, she's wonderful) has made the template light enough that you can print it lightly onto your cardstock (by using the fast setting.) Searched everywhere for the template online, and here it is: Stacey's three inch box

To make the box:

1. Print box onto Certain Celery cardstock
2. Masking it with a sheet of regular printer paper, stamp with a background stamp (I used Paisley Print in White craft ink)
3. Let the ink dry & score the box (where the template indicates)
4) Assemble it! :0) (The rounded part forms the lid at the side)

To make the Belly Band:
1) Cut a strip of cardstock (about 1 and 1/2" wide)
2) Score so it folds & fits over the box (I placed the box on top of it & scored with a paper piercer)
3) Adhere band in middle and...
4) Add ribbon ( I stamped white organza with the Paisley Print background stamp and White craft ink; surprisingly enough, it shows up nicely!)
5) Cover seam with a scallop or a circle (punched out)
6) Make flower and adhere.
To make the flower:
1) Print this daisies template (<---third attachment down at that link) I used Naturals white cardstock. 2) Cut daisies out, punch a little hole in the middle 3) Layer the daisies so that any template lines are facing down. 4) Add a brad. (This one is from the new S.U. hodge podge & it has a daub of Crystal Effects in the middle with Dazzling Diamonds) To make the cards:

For 3" cards (that fold really well):
1) Cut a standard sheet of cardstock so it measures 6 inches x 11
2) Cut strips 3" x 6" from that
3) Fold the strips in half to make the cards

(P.S. I used Stampin' Up! square mini envelopes with them, but you can make your own with this envelope template if you like)

For the image:
1) Cut 2 6/8" square pieces of Naturals white cardstock
2) Stamp Riot of Petals with Gable Green craft ink & emboss with clear e.p.
3) Paint leaves with ink wash (I use an aquapainter & the ink left on the stamp)
4) Add glitter to flower centers (A Sakura quickie glue pen & Dazzling Diamonds works well)
5) Add white organza ribbon

Thanks for lookin' :0-)


P.S. Here's a different but fabulous 3" gift box

and here's the whole fantabulous flower arrangement:

Dahlias---or Mums!---for Mom (with multi-sized template & tutorial)

This 3D Dahlia looks detailed but is easy to do. It just involves a little bit of straight-forward cutting. I made three PDF sheets of templates to resize it (a lot) and to conserve paper. :0)

How to:

1) Download or print templates (PDF & instructions are here.)

2) Cut a piece of patterned paper to 8.5 x 11 inches or use cardstock

3) Print on your cardstock or the back of your patterned paper; it will look like something this:

4) Cut the dahlias out (Cutting a circle and then cutting out the little triangles takes a little while but it's easy since it involves only straight cuts) :0)

5) Punch the center if desired and use a brad to layer them. I sponged on a little bit of Certain Celery ink for dimension, layered 5 flowers & shaped them to get this 3D dahlia:


The templates are Martha Flowers that I scaled and printed and then pasted on one sheet of paper and scanned. (For more details on how to do this yourself, please see this post. To make the ribbon slide under the leaf, I just cut around the leaf with an exacto blade and slid it through. (TIP: if you have white paper fraying showing along the cut leaf edge, you can just take a marker to it.)


These are the 3 templates PDFs <---link here; the other 2 types of flowers are daisies & cornflowers. There are also leaves with tabs.
Other card supplies:


Cardstock: Certain celery and Chocolate Chip, & patterned papers by Basic Grey (Urban Couture Poplin URB-375 & Stella Ruby Drinks at the Savoy STE-714)
Accessories: Printer, Close to my Heart long reach punch, Hodge podge brad, Silver Wire & eyelet, brads, white gel pen (faux stitches), Sakura quickie glue pen & Silver embossing powder (to freehand emboss the "Mom" sentiment on the leaf tag), S.U. 5/8" grosgrain ribbon Vanilla.

Tip to get the leaf for the tag: I didn't want to use a whole section for just one leaf, so
I just photocopied the leaf by covering the remainder of the patterned paper with white printer paper (to save printer ink.) I printed it on Naturals white cardstock and coloured the back of the leaf with a Mellow Moss marker

Happy Easter (if you celebrate it) & Happy Crafting! = :0-) <--(bunny)

Wednesday, March 19, 2008

Resized Mirkwood Flower Templates


Sorry for the lack of posts on here lately. It's temporary and I'll be back to regular posts and tutorials soon, promise. I haven't been feeling well lately, so I've been to a whack of Dr's appointments (nothing serious, just time consuming) and I'm swamped with homework for the end of the semester...blah...blah..blah :0)

Here is a couple of pages of resized Mirkwood flowers. I got a question from a fellow scs'er about how to resize them. There's a technical computery way to do it, I'm sure but everyone's computer is different, so I wasn't sure how to answer her. I also wanted to conserve time and paper for me & you. :0)

Want to try this at home with other templates?
Here's how to do it: I scaled them (on the net when you're looking at a page with the template, just click the file tab, select print, then select properties and click the page set up tab. finally choose scaled printing and pick the percentage you'd like) Then I printed them, cut & pasted them onto paper, then scanned them & saved 'em as a pdf. And SplitCoastStampers is an incredible place to upload your templates so you can share them. The link is here. There are 2 PDF attachments (3 pages all together.)

I'm thinking they'd make cute homemade primas. You could do all kinds of schtuff with them:

  • Trace them on cardstock or patterned paper
  • Laminate them and use them as a paper piercing template
  • Layer them and shape 'em to make 3D flowers
  • Dry emboss them with a cuttlebug or by hand using a mousepad and a stylus
  • You could use the wet & wrinkle technique
  • Stamp them or emboss 'em
  • You could use heat'n'stick powder to cover them in glitter or microbeads
  • Trace them onto acetate or pin the template to felt and cut out...
Thanks for reading
& thanks to Ruthann Zaroff who designed the original Mirkwood flowers (and retains copyright) :0)

Friday, March 14, 2008

Mother's Day Ensemble (Gift Cone & Card) With Embossed Faux-Ribbon, Easy Sparkly Rain Background


Template for this cone is here. The edges are scalloped using S.U.s corner rounder (and then punched with the 1/8 " hand-held punch to create a pattern.) I stamped the Perfect Plum cardstock with Almost Amethyst craft ink. The card is made with Close to My Heart stamps. I love this set called Finding Beauty. Here, it's stamped in Perfect Plum craft ink and embossed with clear e.p. The leaves are actually ribbon from May Arts. I got it here. Charles actually asked me if they were real leaves! :0)

I've been making cut grass strips, but I wanted something a little more artsy fartsy for this card, so I just painted some grass (using Certain Celery and Mellow Moss ink and an aquapainter.) Then all you have to do is cut the blades. A little finicky but fun. I added glitter pen details to the grass and flowers so they looked kind of dewy. :0)

To make the "grass" stuffing for the cone, I used a strip of designer series paper (it uses a fair bit of paper and you lose the design, so in hindsight I would have used cardstock instead...) Anywho, to make it you just fold in an accordion fashion and cut. It is super easy with tissue paper or thin paper. To make it easier with d.p. or cardstock, just score lines on your paper (I scored at 3/8 of an inch apart.) It makes it SO much simpler.

Embossed Faux-Ribbon (click on the pic to see the texture)

The bottom of the card is a strip of Close to my Heart adhesive linen paper. It ends up looking like embossed ribbon. To make it just:

1) Cut a strip of the linen paper
2) Stamp on it & emboss (I used Perfect Plum craft ink on Stampin Up's Paisely Print stamp & clear embossing powder)
3) Paint the remaining white area with ink wash (I used the leftover ink on the stamp & an aqua-painter)
4) I've mounted it on cardstock to make an edge. You could also use it the way you would ribbon.

Easy Sparkly Rain Background:

1) Stamp S.U.'s Polka Dot background stamp (I used White craft ink)
2) Emboss it (I uised clear embossing powder)
3) Draw around each dot (I used a Sakura stardust glitter pen)

You could make more prominent rain in blue (using blue ink & clear e.p. and a marker) or white... using (white e.p. and a signo gel pen)

Other card details: Cardstocks--> Certain Celery for the main card stamped with Stitched background, Mellow Moss, Soft Sky, naturals white (for flowers & grass). Finishing accents gem from Mary (thanks Mary!)

Happy Craftin! :0)


P.S. For how to do the Soft Sky scalloped edge on the card please see this tutorial


Mary Made me Cry! Thank You Mary! :0)


In a very good way. I received these treasures in the mail from Mary. How incredibly thoughtful is she!?! I just sent her some templates and she spoiled me rotten. A gorgeous purse with all of these goodies. Three homemade cards even! Mary, you're a super sweetie; you made me so happy that I blubbered, heehee. :0)

BIG cyber (((hugs))) and SO much thanks,
:0)

Tuesday, March 11, 2008

DIY Faux -Stitching Template (And The Object of my Desire: the Wondrous Stampamajig!!) :o)


You can paper pierce any pattern you like without buying any templates! Simply draw a pattern & pierce it. I drew these curly cues & leaves; then I scanned and printed them. (The scanning & printing allows me to have a fresh template whenever I want, but you could skip those steps.) You could just print this one below. (Click the pic or the link to go to the downloadable pdf of this template):

Faux Stitching template

The template above also includes the middle-sized mirkwood flower to make the white lotus card in the picture and some leaves. The Lotus flower tutorial is here.

To use the template you can simply:

1) Print it (or draw a pattern of your own)
2) Trim the pattern to size
3) Use Dotto or repositionable adhesive to tack it onto your project (I took some of the stickiness off of the dotto by patting my hand on it because it can tear the paper a little otherwise)
4) Place your project on a surface that will allow piercing (I use a flexible cutting board from Ikea; you could use a wooden cutting board or mouse pad (with no gel in it.) :o-)
5) Follow along the lines piercing the paper
6) After piercing, you can highlight the stitches with white gel pen or marker. You can also leave them, of course. (I added a little painty kind of touches with white craft ink on an aquapainter.)
7) The raised leaves are done by: using an exacto blade/ hobby knife to cut around them so I could tuck my image underneath.

The Time Well Spent flower is embossed in black on Naturals paper and watercoloured with River Rock & Elegant Eggplant inks. The center is layered on black cardstock using this easy method:

1) Emboss the flower on cardstock
2) Colour the flower as desired
3) Trim roughly around the flower (1/2 inch or so away from the stamped image)
4) Layer this on top of a scrap of cardstock (I used black) You can stick it on with a little adhesive to prevent shifting.
5) Trim the two layers at once
6) Adhere the flowers & shape, if desired

Here is a back view of the center with the ribbon and slider (from the new Hodge Podge kit):

To add the slider to a layered flower:

1) Position the slider on the ribbon (Melting the ends of your ribbon gently with a quick flash over a lighter flame will seal the ends from fraying & make it easier)
2) Lay the ribbon over the flower to decide which way you want it to sit (ie; so that one petal points up or otherwise)
3) Cut 2 slits into the layered flower with a hobby blade (all the way through.)
4) Use an implement to make the slits wider (such as a paper piercer)
5) Slide the ribbon through, adjust it, & adhere it.

The main card is layered. I used a piece of Perfect Plum card stock (cut with a flap) and sandwiched it between the paper-pieced River Rock front (I used an identical size of River Rock on the back to hide the mess) :0)

The card was front heavy so I added layers of cardstock on the inside:


The Wondrous Stampamajig:

I used this handy little tool to make sure the positioning of the leaves was even. It was a joy to use and I can't believe how long I waited to try it. If you've forgotten about the Stampamajig, it might be time to remember it. :0) (It's really affordable and I'm finding it indispensable.) Even stamps that're mounted crookedly can be stamped perfectly with this little thing.

Wondering how to use it? Check out Kristina Werner's glorious Stampamajig tutorial (Six videos down)


Thanks for taking time out of your day,


ETA: Some options for making permanent templates:

P.S. Some amazing suggestions from Susan G: "I might add one thing--once you've printed out the design on paper, place it on a piece of clear plastic like quilting template plastic, prick your design into the plastic, and then you have a permanent template to use over and over. Also for those of us who are artistically challenged, quilting books are a great place to find patterns for making swirls, flowers, etc." Thanks Susan; just brilliant! :0)

ETA: P.S.S. Twiglet on scs had the awesome idea to laminate stitching templates to make them permanent. TOO smart! :0)