
Edited to Add this pic:

Hopefully this gives you a better idea of it. This other pic was so dark:

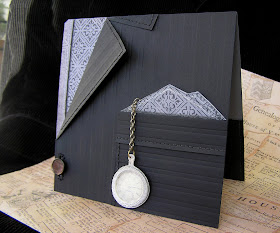
Happy almost Valentine's Day! In the spirit of love, here's a card for the fellas. Gotta love a man in a suit! I was aiming for dapper. It looks kind of somber in the photo, maybe? It does feel more GQish in person. A tricky card to photograph, but it was SO fun to make.
Hopefully you can see the details. That GQ-lookin' pattern on the shirt & the silver pocket watch charm were both made with a new Innovative Stamp Creation set. ISC just released this great set called "Men of Wisdom." It's perfect for those tricky to make Men's cards, but me also likey that gorgeous graphic pattern for any card.
Tailoring the Suit Jacket:

Step 1) Start with a 6x6 piece of cardstock & mark it at 1 & 3/4 (from the left) on two sides. This is fantastic cardstock by Paper Temptress, called Classic Columns and it has a true rich black. It has raised stripes that make the perfect suit!

Step 2) Score from mark to mark & fold it to create a collar

Step 3) Punch twice with a horizontal slot punch to make button hole. Here's how it should look when you're all punched...

(It's two horizontal slot punches repeated on the ends of each other)

Step 4) pierce along suit & button hole & pocket

Step 5) Stitch the suit. I stitched around the button hole and along the collar. (I didn't stitch the collar down though since I wanted it to sit like a real jacket.) :O)
Making a Patterned Dress Shirt
& Handkerchief:

Step 1) To create a fabric look, I stamped some Grey Basic Gray paper (from the Urban Prairie 6x6 pad) with that yummy ISC stamp: the Men of Wisdom pattern.

Step 2) To get it even more textile-y, I stamped the ISC stamp "Little Specks" (sweet lil' dots) for a fabric weave look. I stamped both in Craft inks (black & white) for a matte look so I had to heat set it. Here's a trick you might like for heat setting safely:

You can use a metal tray to heat set ink with your heat gun. I use a paper piercer to keep bits from flyin' away.

Step 3) Adhere the the shirt to the back of the jacket

Step 4) Cut the pocket to measure 3 and 1/2 inches wide by 3 inches high. Cut a pocket fold strip 1 inch tall by 3 and 1/2 inches wide. Adhere the handkerchief pieces to the back of the Pocket (i faux stitched them first.)
(The pieces for the handkerchief were hand drawn, but if anyone would like a template, just let me know & I'll make one.) :O) There's a little bit at the top of the card that is the next part of the collar too:

Step 5) Add a shadow with a gray marker along the handkerchief

Step 6) Add a strip for the shirt & a shadow along it too

I wanted to use a vintage button in the button hole, but it had a big ol' back on it, and it was a little brash, so this is the schtuff I did to it...
Altering a Button:

Step 1) Cut back off button with wire cutters (so it will lay flat in the button hole)

Step 2) Age the brass. You can colour metal with Copic Markers (they just take a little while to dry.) This brass clashed with my pocket watch, so it's been "aged" with a Black Copic.
Lil' Tip: pliers can make a handy lil' stand for colouring brads or anything that will sit in there. :O)

Step 3) I erased my Copic colouring mistakes with a colourless blender. Then I glued it in the button hole with a generous amount of Crystal Lacquer. and that was it...
Tomorrow, my attempt at punch art:

A double-sided 3D pocket watch. It feels like heavy chipboard or even metal, but it's only made with embossed stamps, paper & Lacquer.
Edited to Add:3D 'glass' covered Pocket watch tutorial here.
Hope you have a lovely weekend! :O)

Quick Links:
You can find the Men of Wisdom set here at ISC
You can see some great cards with "Men of Wisdom" here. (There's a gorgeous Antique Car in the set too.)
You can see some great cards with "Men of Wisdom" here. (There's a gorgeous Antique Car in the set too.)
This is absolutely gorgeous what a cute card... Perfect for a guy's birthday or Fathers day
ReplyDeleteWow this is gorgeous!
ReplyDeleteLindastamps
Oh, that is a wonderful card for a men. I like that idea.
ReplyDeleteThanks for it!
This is just to awesome. I'm going to try make this for my nephews b-day. Thanks for a very easy to follow tutorials. Thanks for the inspiration.
ReplyDeleteWhat an awesome card! I'll have to make one next time I need a masculine card.
ReplyDeleteMel, this is BRILLIANT!!! I love the 'pocket watch'.
ReplyDeletewow very cool!would also make a great graduation /newjob /
ReplyDeletegroomsman etc card
This project stopped me right in my tracks! Absolutely fabulous! Thanks for sharing the deets so I can make one for my Pop.
ReplyDeleteDdd
That is a great card, would do for wedding cards for the groom, anything men.
ReplyDeleteI love, love, love this card absolutely perfect for a man for any occasion.
ReplyDeleteBaukje
very different but still a lot of work,love it as usual,lady
ReplyDeleteMel, this is fantastic! I will definitely be trying one of these -so original! Thanks for the fab tutorial! Have a lovely w/end.
ReplyDeleteHugs, Danielle x
Mel, you always come up with such extremely creative ideas for men! You've done it again!
ReplyDeleteSwedie
You are so creative! You hit this out of the ball park! Awesome job!
ReplyDeleteWow! That is brilliant!!! I love the jacket and the watch!!! Awesome!!! Thank you for the tutorial!
ReplyDeleteI have an award for you Mel - best blog comments award. If you don't feel like passing it,I will understand it!
Wow this is sooooooooooo great! Love everything about it.
ReplyDeleteAs always, you just blew me away!! I love that paper and this is such a fantastic use for it!! Since you did this I am going to put that paper on SALE!! Is 40% off ok??? Enter Mel in the promo box and you will get 40% so be sure to thank Mel!!
ReplyDeletePatricia
www.papertemptess.com
you amaze me with all these brilliant things. Do you have a quad 4 processor instead of a brain? lol
ReplyDeletelooks great! this is similar to a suti card I amde years ago, that pocket watch is fantastic, so inspired1 :)
ReplyDeleteHi Mel great card perfect for many occasions. where did you get the plastic gadget for stitching + eyelets. thank you
ReplyDeleteamazing card!!!
ReplyDeleteWOWZER, Mel, this is SO AMAZIN' - TFS!
ReplyDeleteBook, book, book. . .OK enough of the subtle hints. . . You are the queen of details. I'm simply astounded. Best, Curt
ReplyDeleteWow! This is amazing! You always have the best ideas! Hope your day was filled with love! Big hug!
ReplyDeleteAmazing card!
ReplyDeleteLove this men's suit and the pocket watch! Awesome! Thanks for the tutorials. I will definitely try this one day.
ReplyDeleteAppreciating your clever ideas so very much!
ReplyDeleteGreat, really great. I'll share this at my blog with your link(without "how to make" )Thanks a lot :)
ReplyDeleteTotally awesome card. Thanks for sharing.
ReplyDeletewow your card is amazing! I love it! thanks for sharing xxx
ReplyDeleteTHIS IS FABULOUS!!!!!!!!!It's those DETAILS you've paid attention to.... that make it look SOOOO REALISITIC & FANTASTIC!!!!!! YOU ARE A GREAT ARTIST!!!!!!!! :) THANKS FOR THE TUTORIAL!!!!!!!
ReplyDeleteThis card is so unique! What a clever idea! Thanks for the inspiration and the amazing tutorial!
ReplyDeleteOh my word - that is one of the most amazing cards I've seen! And you are so awesome to share the tutorial with us - thank you!!!
ReplyDelete