If i was a crafting computer, my programming would look like this:
So, when Silvia came up with a Little Paper Shop 3D challenge, I thought that I'd really challenge myself & make a box for fellas. (I'm late on the uptake, but better late than never?)
1-Images for fellas (LPS's specialty)
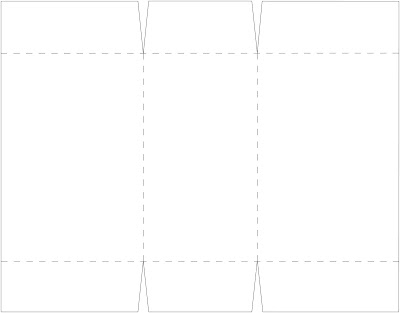
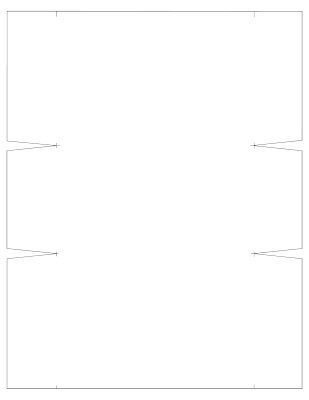
2-New box Template (for a simple rectangular box)
3-How to assemble & embellish the box
4-Techniques: Layered digital images on thinly painted gesso & pouncing Copic technique
5-Cheap tricks: for 3D sentiments (shrink plastic & alphabet stamps)
-1-
If you're not familiar with the original concept that Little Paper Shop was started with, it may interest you to know that Julia especially wanted to offer stamp sets that were tailored to men & boys. (There are some really amazing stamps for the fellas in your life in the LPS store.)

(for a simple rectangular box)
This is a template from SU. It measures:
- 5 and 2/8 inches wide
- 3 and 1/2 inches tall
- 2 and 7/8 inches deep
Click this link to Download Templates
(or click these pics for JPG versions)


Please note: The only way I could figure out how to make this SU template assemble (there were big gaps in the side panels) was to add side panels. It's super easy:
1) Create side panels (cut to measure 2 and 7/8 inches by 3 and 5/8inches.)
2) Dry fit & trim them if needed
It seems a pain but it's actually kind of neat-o since you can stamp, emboss, and/or embellish the side panels if you like & cut some to line the box as well...
-3-

...assemble & embellish the box


- 1 sheet of standard cardstock for the box & extras for panels (I used SU's Basic Grey cs)
- Template to print
- scissors, & Scor-Pal (or other tools)
- Good double sided tape
- Optional: Cuttlebug or other embossing folder
- Paper piercer
- Brads
Step 1) Print template, cut, score & fold box.
Step 3) Create side panels: cut to measure 2 and 7/8 inches by 3 and 5/8inches. Emboss them if you like.
 Dry fit your side panels (hold em up to the side of the box) and trim them if they need it-- You can cut 4 if you want to line it, just trim 2 a little to fit inside box & set aside)
 Dry fit your side panels (hold em up to the side of the box) and trim them if they need it-- You can cut 4 if you want to line it, just trim 2 a little to fit inside box & set aside)
Step 5A) To pierce the second panels without measuring, just layer the pierced panel over the second one...
Step 7) Adhere side panels to the box
Step 8) Adhere the front image panel:
-4-

Layered digital images (on thinly painted gesso) &
pouncing Copic technique (stipple effect)
If you click this pic you can see the Copic stipple effect up close:
A thin application of gesso on your paper lets the paper resist the ink
enough to get really cool results (& I find it WAY easier to colour this way)

- Gesso (acrylic primer--you can read all about gesso in this post)
- Patterned paper (Cosmo cricket Girl Friday Wednesday grid paper)
- Printer (to print digi) & clear embossing powder +heat gun
- Copic markers
Layered embossed digis: As you know since I'm always rambling on about it, gesso lets you emboss digital images when you print--but layering digital images can be fun too, especially if your resize between printing. :O)
These robot digis were printed twice:
the first time: off the edge of the cardstock (using photoshop & changing the image orientation in print settings)
&
the second time: at a smaller percentage & over top of the first image a little. (The gesso lets the ink stay wet long enough to emboss the two images. My printer didn't smudge, but you may wanna experiment.) Printing on Gesso: To get nice printing on gesso: try using a thin coat of gesso applied with a very good quality brush. (That will minimize brush strokes and should keep the printer ink from running.) Wet copics will have a looser look than drier ones.
If you're not worried about your printer (mine was 50 bucks Canadian so I don't baby it) ;o) then you can emboss the first one and run your paper through again to print & emboss the second one. Then there are no smudges for sure. :O)
Stippled effects with pouncing Copics:
After you print & emboss on the gesso paper, then it's SO quick to colour. It's not only way easier than traditional colouring (since blending is simple & you can lift colour off too or erase), but it also lets you get funky effects.The hammered metal look in that pic up there is one look (click for a zoomed view, if you like) Just pounce your markers to get the stipple effect. (I used the chisel end of the Copic. Saves your brush tip & it makes nice dots of colour.) It's handy since you don't need to sully your colourless blender to get texture. :O)

Letting the Gesso cure overnight (or dry quite well) will reduce
any transfer of gesso to your Copic markers.
-5-

for 3D sentiments (shrink plastic & alphabet stamps)

3D embellishments can be so pricey and hard to find in original sayings (not that "hi" is even the slightest bit original, lol, but you can stamp anything you want to say & use any alphabet stamp style that you like. :O) Shrink plastic sayings are easy to make. I made a bunch to have as a little stash. :O) The plastic comes in black, clear, white, and colours...

- Shrink plastic
- Sand paper
- Alphabet stamp
- Stazon (or other solvent ink)
- Oven or heat gun
Step 2) Stamp sentiment onto it
Step 3) Cut to size & add a hole if you like
Step 4) Follow package directions to shrink it
Step 5) Adhere to paper (covering the whole back with adhesive keeps it from showing)
Step 6) Trim paper & stick your custom sentiment thingy to your project...
Thank You so much for visiting me--
You are the best blog buddies ever!
P.P.S. Want some Copics? Paper Garden Projects has loads of colours on sale for 20% off


That box is going to make some fella happy and VERY lucky, to receive it! Very cute Mel! Love the robots . . . you've done some great "output" on that one!! :o)
ReplyDeleteThat is so cool,love it :-D Juliet
ReplyDeleteWOWZERS! I love this! My youngest son would love it too. I am going to have to order that digi image and make one of these. With so many males in the family this will be perfect!
ReplyDeleteThanks for sharing!
Awesome project, Mel! Wow! I love your idea with new use of digi-images! Thank you for sharing tutorial, templates and your wonderful inspiration!
ReplyDeleteDefinately going to have a go at this one Mel thanks for sharing you are so talented with your ideas.
ReplyDeleteWowm, Mel! This would definitely make a great masculine gift set. Don't you just love using grid paper? I am too cheap and use actual grid paper for my cards and just back them with cardstock for stability since they are so thin to begin with. Love this project and the robots! Thanks again for sharing the box template!
ReplyDeleteHugs,
Alma =)
Great guy project. So hard to make things and find decent things for guys. I like the metal strip at the bottom. Great details as always!
ReplyDeleteThis was a great post! The box that you made is absolutely adorable, in a boyish way of course! I will definitely try making one of these soon.
ReplyDeleteWonderful! i like this blog. Thank you for sharing tutorial, templates and your wonderful inspiration! more templates http://www.itemplatez.com
ReplyDeleteOooh, I want to try your box out! Thanks for the template. I love the depth of the box. . .a lot of stuff can be put inside!!
ReplyDeleteOkay those robots are cute! I never thought I would ever say robots are cute but you made them look cute. LOL! Awesome job on the coloring!! You brought those robots to life!!
Maria
Love your robot box. Lots of interesting techniques to try here. I am going to filch a little gesso from my daughter's art kit and give it a try. Thanks for sharing!
ReplyDelete