So, how do you feel about
embossing techniques?
(Secretly, they make me feel like a magician!)
Pressure embossing does seem like some kind of magic, doesn't it?
That raised loveliness appearing out of nowhere, just from
rolling through a machine... Poof! ;o)
And heat embossing is too thrilling: melting that powder
to transform it into gorgeous glassiness instantly.
When you add ink-resist to the mix
doesn't it all feel some kind of crazy-fun alchemy?

"First, I wave my magic wand & say the magic words:
À la peanut butter ink-resists!"...
Pressure embossing does seem like some kind of magic, doesn't it?
That raised loveliness appearing out of nowhere, just from
rolling through a machine... Poof! ;o)
And heat embossing is too thrilling: melting that powder
to transform it into gorgeous glassiness instantly.
When you add ink-resist to the mix
doesn't it all feel some kind of crazy-fun alchemy?

"First, I wave my magic wand & say the magic words:
À la peanut butter ink-resists!"...
...and we turn this piece of
pressure embossed patterned paper...
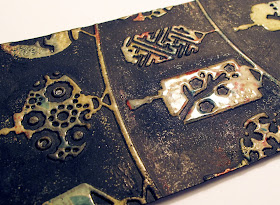
...into this inky textured piece:
Here's

Pressure embossing resist
technique:
This technique combines:
1) pressure embossing (using a Cuttlebug, BigShot,
Vagabond, Wizard whatever machine you have, and embossing folders)
with
2) Heat embossing (and the resist technique).

- Embossing folder
- Pressure Embossing machine
- Cosmo Cricket Early Bird patterned paper
- Versamark ink or other clear embossing ink
- Clear embossing powder (fine/detail)
- A heat gun
- A brayer, if you have one
- Temporary adhesive or rolled pieces of scotch tape

Step 1) Pressure emboss a piece of patterned paper in an embossing folder. (The one shown here is a Stampin' Up folder Vintage Wallpaper. A gift from the world's best BFF).

Step 2) Apply clear embossing ink.
Some Tips: I like to temporarily affix the paper to keep it flat Temporary adhesive or rolled pieces of scotch tape. Then brayer Versamark clear embossing ink onto the raised areas (or carefully dab the Versamark pad directly onto the paper, if you don't have a brayer).

Step 3) Apply Clear embossing powder to the wet ink (I like fine or detail embossing powder best).

Step 4) Pour off the extra embossing powder.

Step 5) Brush away any spots of unwanted embossing powder, if there are any.

Step 6) Heat set the embossing powder with a heat gun.

Step 7) If you want high contrast to your resist (where the bright areas are nice and bright) then you might like to reapply more Versamark & embossing powder for even coverage. I find that 2 or 3 layers is good.

Step 8) Then just heat set those second or third layers of embossing powder.

Step 9) You could simply stop here & use the embossed piece as is for shiny pressure embossing or...
Add colour:

Step 10) Apply ink for a resist.
Some Tips: Be sure to let the heat embossing cool completely before inking for the best results (only takes a minute or so). I like to work with an ink dauber or sponge in circles to get in the little grooves. Dye-based ink works well but Pigment inks or Distress inks will work as well.

Step 11) Remove excess ink from the clear resist areas with a cloth.
and it should end up looking something like this:
If your resist areas look a little muddy or dark after you apply the ink...

there is a fun solution:

To get very high contrast, you can put the embossed piece
between paper towels and iron off some of the embossing powder
until it looks bright (This is a thrill!)

Any of the black ink that tinted the embossing powder
will transfer to the paper towel with ironing,
leaving you with lots of lovely contrast:

And pretty patterns revealed where you did the clear heat embossing:


there is a fun solution:

To get very high contrast, you can put the embossed piece
between paper towels and iron off some of the embossing powder
until it looks bright (This is a thrill!)

Any of the black ink that tinted the embossing powder
will transfer to the paper towel with ironing,
leaving you with lots of lovely contrast:
And pretty patterns revealed where you did the clear heat embossing:
A Tip: If you don't want to remove all of the embossing powder and you don't want the texture of the paper towel to imprint itself into the clear heat embossing, you can sandwich your piece in copy paper and then iron.
If you find that you've hit areas of your paper with
clear embossing powder & it resists leaving patches of pattern where
the black "should" be, like this one:
clear embossing powder & it resists leaving patches of pattern where
the black "should" be, like this one:
Don't sweat it. Enjoy the serendipity!
That natural messy artistic look is so hot right now.
(By the by, this folder is Provocraft's Birds & Swirls)
That natural messy artistic look is so hot right now.
(By the by, this folder is Provocraft's Birds & Swirls)

It's so fun to see which parts of patterned
paper show up on your raised image
And it's a stash-buster. You can breathe new life into old papers that
you might be bored with or not sure how to use.
The patterned paper above was
BasicGrey's Marrakech 6x6 Paper:
You can also stamp over it:
This one has a definition stamp stamped over it in white ink
& heat embossed in clear embossing powder.
(This is Provocraft's Skeleton Scroll folder).
And if you find that working the paper so much causes the pressure
embossing impression to disappear, you can put it back in the folder
line it up & re-emboss it:
Re-embossing like this works even after heat embossing.
(If your embossing folder is perfectly symmetrical you could even
re-pressure-emboss it to reverse the embossing
from concave to convex...)
Contrarily, if you want less of an impression
(more flatness) You can squish it!
This was done on printed digi paper
(from Cosmo Cricket's Clementine digital paper pack)
& instead of black ink, I used a paint wash of white acrylic paint & water.
(from Cosmo Cricket's Clementine digital paper pack)
& instead of black ink, I used a paint wash of white acrylic paint & water.
Surprisingly with paint, the heat-embossing retains a lovely shine
(if you wipe as you go with a damp cloth) and the pattern pops.
(if you wipe as you go with a damp cloth) and the pattern pops.
I thought the digi paper might bleed from using the paint wash,
but it didn't! (The snowflake folder is from
Provocraft's Cuttlebug Winter Wonderland Set).
but it didn't! (The snowflake folder is from
Provocraft's Cuttlebug Winter Wonderland Set).
This piece was clear embossed on white cardstock
then inked with Soft Sky ink:

(The folder is Small Alphabet from Crafts Too).
(I cut it up & punched out the letters 'h' & 'i' to spell "hi" on a card)
In place of patterned paper, you could also use:then inked with Soft Sky ink:
(The folder is Small Alphabet from Crafts Too).
(I cut it up & punched out the letters 'h' & 'i' to spell "hi" on a card)
- plain white or coloured cardstock;
- or stamped papers;
- watercolour painted paper;
- or shimmer sprayed paper;
- digital paper; book or magazine pages
- or whatever you like...!
If you don't have heat embossing supplies, you could experiment
with brayering on (or painting on) any of these instead:
- acrylic paints
- gesso
- gel medium/multi medium/glazes
- crayon/wax (you can iron it off later, if you like)
- But I don't recommend peanut butter! ;o)
Hope you found this as much fun as I did:

"One! One kind of embossing! Ah Ah Ah!
Two! Two kinds of embossing! Ah Ah Ah Ah Ah AH!
Oh, I love it! Ah Ah Ah AH!"
(Shhh... Don't tell, I'm the world's biggest craft-nerd.)
Thanks for putting up with my insanity! ;o)
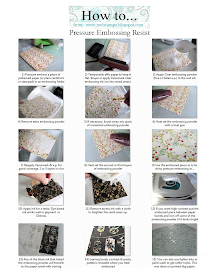
P.S. Here is a one page reference sheet for
how to do this pressure embossing resist:

Downloads:


Thanks for the great tutorial. I have done a little of this, but you have taken it further. I shall be doing some more experimenting. I particularly like the idea of using up patterned paper.
ReplyDeleteWOW!! this is a GREAT tutorial! Thanks so much for sharing and I will have to give this a try :)
ReplyDeleteIf this is insanity, I'm with you Mel. Thanks for a great tutorial, much apreciated, I have the day to myself so will give it a try.
ReplyDeleteAWESOME!! I think I like the first best though...I think because of the high contrast between them.
ReplyDeleteMel this is really fantastic, thank you so, so much for taking the time to do this tutorial. Not only one tutorial, but all the wee extras and tips. I cant wait to try this. Lee xx (Ps I am having a big blog give away on my blog if you fancy a peek)x
ReplyDeleteBeautiful! Really appreciate the tutorial. I'll have to give it a try. Luv your little helpers from Sesame Street.
ReplyDeleteOh my~~!!! Simply gorgeous! You are the most brilliant magician evah! WOW!!!!!!! Love Counts, too. Hehe.
ReplyDeleteLove your "helper"! Thanks soooo much for this! You added all sorts of little tips that I'd either forgotten or never figured out. Brilliant! Another way to get rid of some of that ugly DP I've ended up with.
ReplyDeleteR/
thank you so much for enlightening us with this brilliant idea! Love the result and this experiment has opened up to so many possibilities with embossing folder and inking.
ReplyDeletehugs,
Heaney
This is beautifully awesome!!! Thank you so much for sharing this grand idea!
ReplyDeleteThanks for sharing this really bright idea! You are really a magican! Ly
ReplyDeleteThis is great. Thank you, you really are magician :)
ReplyDeleteBrilliant!
ReplyDeletebwahahaha...I don't know what I like more... your beautiful technique or your hilarious PS'd muppets! You goof!!
ReplyDeletehaven't done that technique in a while, you've got my creative juices flowing now!
hugs
I couldn't wait to see your tutorial for this type of embossing. I LOVE the effect and will be trying it myself ASAP! Thanks for sharing.
ReplyDeletehi melissa,lady
ReplyDeleteToo funny! Technique is great too!
ReplyDelete: )
oh god... i think i m fainting!!!! This is gorgeous!!!! :) Another one of your ideas on my TO DO list! :)
ReplyDeleteI hope all is ok on your side... been very busy here... I am going back home on the 2nd of October so I have a lot to pack and buy :)
Bug hugs!
Laura
Wow..I love, love, love this technique! Thank you so much for sharing this with us! Your tutorials are always fun, entertaining & very informative! Hugs, Vina
ReplyDeleteMel, this is stunning! Im trying this!
ReplyDeleteA la Peanut Butter turns into Razzle McDazzle! Love it Mel!
ReplyDeleteThanks for the tutorial. It looks like fun. I can't wait to try it.
ReplyDeletewhat a great technique! it looks fabulous! TFS!!
ReplyDeleteThank you for this great tutorial! Love the idea of using the patterned papers I don't like that much :)
ReplyDeleteHi Mel...blimey you do a whole load of stuff with paper that I never even knew existed. Anyway, I have now added your site to my reader so can stay in the loop....yippee!
ReplyDeleteYour tutorials always rock!!! Even though I too have done emboss resist before I always learn something new from you!!! That Brayer is GENIUS!!! :) Just love your stuff!
ReplyDeleteBeautiful results from an amaZing technique!!! Your tutes are always so clear & I learn so much from them. Thanks for that!
ReplyDeleteAlso, the whole a la peanut butter sandwich thing has me laughing!!!
:0D
What a great technique! I am always glad to find a use for those patterned papers that are hanging around in my stash.
ReplyDeleteyou are so cool - I was trying to do it by wiping the ink pad over - never though of using my brayer - doh!!!
ReplyDeletemy cat plaque
http://princesskitten-calligraphy.blogspot.com/2011/09/new-project.html
You are a magician indeed! Such gorgeous-ness and the process is undoubtedly as much fun as admiring the end result. Thanks Mel!
ReplyDeleteSuch a fun post Mel!I can't quit staring at how very different each example looks! I will have to give this one a try for sure!
ReplyDeleteLove the tutorial. I love the count too...This is someone who has two puppets from Mr. Rogers neighborhood....
ReplyDeletethis tutorial is fabulous... thank you very much..
ReplyDeleteWow, that is cool.
ReplyDeleteI am gonna try this today.
thank for the great tutorial.
Wow! Thanks for the tutorial and ESPECIALLY thank you for the ONE PAGE pdf. Wish everyone would condense. Thank you, thank you, thank you.
ReplyDeleteYou're magic, Mel. :) Somehow you've taken something that didn't really appeal to me (the original paper) and made it fantastic.... You ROCK!
ReplyDeletethis tutorial is really COOL! and your 'how to' one page is great! I love your blog and your works are so inspiring. thanks a lot!! ^___^
ReplyDeleteWhat an awesome technique. Thanks for the very detailed tutorial.
ReplyDeleteOMGosh, I am SO going to try this!!! Thanks for the SUPER tutorial!!!! xo
ReplyDeletewowieeee!!! I have been waiting for this! SO INTERESTING! I will try this somewhere in Feb when I get my embossing powders and versamark
ReplyDeleteThis was GREAT! I love not only the wonderful technique you showed, but I love the clear steps and your sense of humor. The Count rocks!
ReplyDeleteHow inspiring! I love all the details in your tutorial. Especially the tip about using several layers of powder, and then removing the top stained layer. Genius!
ReplyDeleteGorgeous work! Very creative and inspiring! Thanks so much!
ReplyDeleteAwesome tutorial! I have plenty of papers that were bought for the great price but aren't really what I like. This technique should make them a lot more interesting!
ReplyDeleteYou are a genius! A la peanut butter sandwiches!
ReplyDeleteFabulous tutorial. I love that you show all the variations and riff with it!
ReplyDeleteI'm going to have to give this technique a go!
Not only is this an awesome technique, your photos of the count are freakin' awesome- so jealous you got to do some a la peanut butter crafting with him ;)
ReplyDeleteLOVE this tutorial! I have a question...how do you emboss on a 12x12 piece of paper? As in the snowflake example. I have a big shot machine. Do I need a different type of embossing machine to do the 12x12 sheet size? Thanks in advance!
ReplyDeleteOnly just found your blog and wow! I love the cuttlebug techniques. Thanks so much for sharing your inspiration :)
ReplyDeleteJust found this via pinterst, thanks for sharing great tutorial
ReplyDeleteI was always wondering how it will be using embossing powder with cuttelbug folders but I've never really tried it. It's really incredible how this technique work's out. Thank you for your amazing tutorials. I just love your blog. :)
ReplyDeleteThis is a wonderful tutorial. Thank you for all the great one by one picture steps, but most of all, thank you for the one page reference page at the end. I am looking forward to trying this process in my she-cave.
ReplyDeletehttp://www.lmcreations-shecave.blogspot.com
Brilliant!!! What a fabulous way to transform a not so pretty piece of patterned paper!!! awesome!
ReplyDeleteKindest regards,
Jennifer
What an awesome tutorial. I've done the technique many times but you have provided great instructions with clear and understandable step outs. I plan to share this post with my crafty friends.
ReplyDeleteThanks for sharing this technique, it is a very smart way to preserve part of a drawn or a pattern. I still don´t know how, but I feel that one day I will use it in my jewelry clay.
ReplyDeleteI will follow your blog.
Regards
Incredible! Thanks for the info !
ReplyDeleteWhat fantastic ideas! You have inspired me to go and tidy my study so I have room to try them out!
ReplyDeleteBrilliant, gorgeous! I had somehow not visited your blog for a while and came here today via Jann Gray's blog. OMG! I have missed a lot, I need to visit you every week. I have a question though. In step 9, the heat embossed area is white/clear. In step 10, they look yellow or golden. I thought you applied a dark ink in step 10, so I don't know why the embossed area looks yellow/gold in step 10. Please clarify. Thanks for the detailed tutorial and tips! You are so generous!
ReplyDeleteHi 'rkramadh' Thank you so vey much for your lovely comment. I'm replying to your question here, since your blogger account is 'no reply' Hope you see this. :o)
ReplyDeleteThe paper I used actually has that golden colour. Step 9 just seems like the paper is white because of a difference in lighting when I shot the photos for the tutorial. Having said that, though, sometimes the embossed sections will seem to change colour a little bit depending on the ink you use to do the resist with. Which is part of the magic surprise, I guess. ;0) Happy Crafting, Mel
Great tutorial! You never cease to amaze me. You have taken this technique to another level and I will try this with some old forgotten papers. Thank you for sharing.
ReplyDeleteWow, just wow. What a fab idea!! I am all new to the world of paper craft and I am amazed everyday at the things I find! Now to put it all together...! X
ReplyDeleteAwesome tutorial Mel...loved it...thanks for sharing!
ReplyDeleteThanks for sharing the wonderful tutorial! Looking forward to try it!!
ReplyDelete