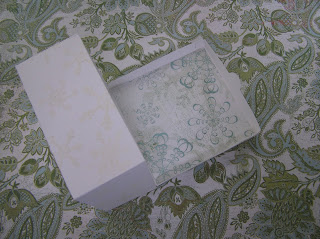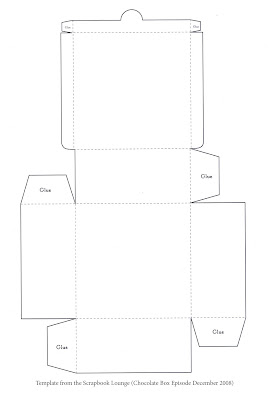
Today's template is a box that's the just right for 3x3 note cards & envelopes. On it is the cute lil' penguin & igloo from Little Paper Shop's {Global} stamp set. He's the perfect size for 3x3 notecards (which make great gifts.)

If you click the pics you can see that the top & the inside are lined with cheapo acetate (but it doesn't look cheap, honest!) :O) I ran it through the Cuttlebug & embossed it. It curls a little but that is remedied easily by sticking it down or stitching it to paper.
The Templates:
You can download the
templates on SCS here
If you'd like the PDF for this Blue Vintage "Merry Christmas Greeting" dictionary definitions,
you can download or print it here.
you can download or print it here.
Buildin' & Embellishin' the Box:
Supplies:
Stamp: {Global} by Little Paper Shop
Paper: Elegant Laid cardstock from Paper Temptress, Cheapo acetate from Office supply store, Basic Grey Silent Night Figgy Pudding (FIG-1011), Announcement Cream cardstock printed with blue Vintage Christmas text
Tools: Snow Dots embossing folder, Needle & Embroidery Thread Basics: Oh So Sticky Tape

Step 1) Print the template onto cardstock, and cut & score the box
The cardstock I used for this box has a luscious texture & weight. It's called Elegant Laid & You can find it at Paper Temptress. It's like watercolour paper but with a lovely textured stripe. It feels nice & snowy. :O) ...and... I'm SO excited to let you know that you can take 20% off your order there all week! Just enter melz in the promotion box when you check out.

Step 2) Cut a piece of acetate to measure 3 2-8 inches square & Emboss it with the Snow Dots cuttlebug folder & adhere it to the box with Oh So Sticky Tape to the top of the box.

Step 3) Hide the adhesive with cut strips of patterned paper (3.2 by 1/2 an inch-ish)

Step 4) Tear a strip for snow & adhere it (3 2/8 inches wide) (The paper I used here is Announcement Cream cardstock printed with blue Vintage Christmas text.)

Step 5) Adhere a stamped & embellished image
This penguin & igloo are from LPS's {Global} set. They're stamped in Teal Encore ink & embossed with clear e.p. I shaded the ice with Copics, Warm Grey #3, & coloured it with a light blue watercolour pencil crayon. The pengin is coloured with a permanent black marker & a Cadmium Orange Copic (YR-07). The igloo is covered in Crystal Lacquer, which was fun 'cuz it looks all icy. There's Crystal ice Stickles on there too for a little bling

Step 6) Assemble box & line box the lid with a piece of DP (cut to 3 2/8" square)

Step 7) With all that embellishing of the lid the box is top heavy. To have it sit nicely, weight the bottom of the box with extra cardstock. (I used 3 squares of the Cream c.s. cut to 3 2/8" square)

Step 8) To make an embossed acetate lining for the bottom of the box:
A) Cut a piece of acetate to measure 3 2-8 inches square
B) Emboss it (I used the Snow Dots cuttlebug folder)
C) Cut a piece of DP D) Lay the acetate over it E) Pierce through the DP & the embossed acetate
...where you'll stitch it to attach it so no adhesive shows:

Step 9) Stitch the acetate onto patterned paper

Step 10) Adhere the stitched acetate piece to the bottom of the box

Step 11) And then just tie bow around the box!
And there you have it...a fun way to get the look of acetate on the cheap and a lil' box for a gift or 3x3 notes & envelopes.
You can see some gorgeous cards with the Global stamp set in the LPS gallery here.
You can see some gorgeous cards with the Global stamp set in the LPS gallery here.
Hope all of your craftin' is blissful! :O)


22 comments:
I love the penguin...he is so cute!!!
Gail H. :-)
This is awesome, great tutorial and such a cute stamp, loving the paper used too.
OMGosh!! This penguin is just to cute. Your project is so creative and inspiring. Thanks so much for the template and the wonderful and easy to follow tutorial.
A very adorable, unique and so beautiful box~! Also the instructions are wonderful as always!
Love the cute penguin, TFS an awesome tutorial!
WOW!
What a wonderful blog. Your work is just amazing, and so generous of you to share it in such detail.
Your little penguin box is awesome. I love it.
TFS
Karen x
Simply amazing as usual! Love the acetate idea!
I'm on a quest for a little truffle/place card holder for my parent's 40th anniversary dinner party Saturday night.....any ideas?!
I have been in hospital and sure have missed your blog. You have not dissappointed me wonderful stuff, fantastic creative lady you.
You are so creative. Great job. Thanks for all your work - you never fail to impress. ikki
Very cute!!!I love the penguin
Mel! This box is so cute! I love the idea with an acetate!
Thank you for sharing the template and tutorial!
Hi Mel-
Wanted to link another card I made using your wonderful labels you posted.
Here it is:
http://thisisbliss838.blogspot.com/2008/12/twilight-tuesday-inspiration-challenge_09.html
Thanks for sharing all your ideas and inspiration!
Kindly,
~Eve
I love the igloo and the pengie. You've made it look great!
hi mel, hurts my shoulder to type..love the igloo &shots of your creative hands,love lady
OK, I'm going to say it again! BOOK! BOOK! BOOK! I'll buy it, I promise, and I'll be your biggest fan and I'll push it on my blog. . .Love your stuff!!!! Best, Curt
This is awesome! You are one patient woman, putting all that work into a box. I would have found one and stuck some paper on it :-)
Love the shimmer behind the igloo.
What happened to the pop-up window for the comments :-(
Hey Mel!! Hope you are doing okay. . . boy, I'm glad I don't have migraines!
I really love this box. . .I think I'm going to work on it this weekend!! Thank you for sharing the template!
Your penguin box is so adorable. I love all the details that you put in all your projects!!
Maria
Ahhhh, so awesome! So, do you ever feel uninspired? With no good idea? Wow!
Your work is awesome!So inspiring and the tutorials are excellent thanks so much for sharing them!
I have awarded you a blog award :)
Krissy xx
Love your box project. I never would have thought to line the box with acetate, much less embossed acetate. Great idea! You have some of the best ideas ever! No wonder I subscribe to your blog. lol
This blog is great! Thanks for your hard work on it.
Thank you so much for your siteI love everything about it.
Post a Comment