I'm "just missing you"...

...so, in honour of the holidays, I thought I'd post a couple of cards this week.
For today's post, this ultra simple
3 1/4" by 6 1/4" card
(with a little digi paper freebie and a short how-to).
-1-

digital image shopping:
I was ever so excited to find the website & digital image
shop of the artist Heather Ellis...here...
...so, in honour of the holidays, I thought I'd post a couple of cards this week.
For today's post, this ultra simple
3 1/4" by 6 1/4" card
(with a little digi paper freebie and a short how-to).
-1-

digital image shopping:
I was ever so excited to find the website & digital image
shop of the artist Heather Ellis...here...
... extraspecially since I love MFT stamps so much (including her Pure Innocence and Boy & the Dog series), but I must admit I have found myself drawn to digital so much of late. I like that I can scale them down and I'm a MESSY stamper so digi actually saves me paper. (I still have to find the perfect ink, I guess).

...and coloured them very lightly with pale Copic marker colours. Then,
scratched the paper with a paper piercing tool to get texture:

I scratched a cross-hatch pattern onto the boy's pants
I also added white dots of gel pen on his sweater.
His doggy got fur texture scritches.
Do you guys like different textures?
(Or am i just a weirdo)? ;o) heehee
and Great news if you're looking for a previously retired Heather Ellis image: It just might be back! There's a note on her site detailing that she's decided not to discontiue her images, since she's had so many requests to keep them available.

pencil damask patterned paper

So, I'm broke, ya know?
LOL
...but really it's true!
Hence, I'm always trying to find ways to get a fresh new look on things
without breaking the bank. This do-it-yourself damask paper has been
super useful in my projects lately (and relatively costless)
so I thought I'd share a copy of it...
and share how you can make your own.
The paper is available for download from
my account at acrobat.com here
When you get to acrobat.com,
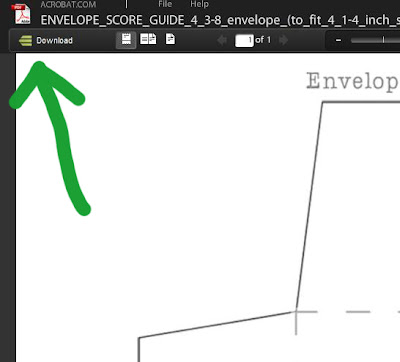
just click the little green download button in the top left corner:
If you have any trouble downloading from acrobat,
please see this post describing how to do it.
If you're still stuck, feel free to comment here or drop me
a note--melstampz@gmail.com---:o)
-3-
make your own digital patterned paper
with a hand-drawn damask pattern:



Digital Image: The Boy & the Dog by Heather Ellis
To emboss the image: Inkjet printer, White cardstock & Matte Medium by Golden; clear embossing powder, heat gun
Pale Copic markers: E50 eggshell; E00 skin white; BG10 cool shadow; B00 frost blue; V000 pale heath; V95 light grape; cool grays: C1 & C3. (Please see this tutorial for a disclaimer on digi embossing & copics.)
To emboss the sentiment: word doc. with coloured phrase, vellum cardstock, inkjet printer, clear embossing powder, heat gun.
Miscellaneous: Fuzzy snow paper (gift from my BFF Kimmy, sorry no source); paper piercing tool to score texture into image & pierce holes for sewing, needle & gray thread
I hope your days are bright and beautiful this winter!

P.S. By the by, this is an unsolicited post. I just bought some Heather Ellis images on etsy a while back and thought you all might find the shop info handy for last minute digi cards. :o)
Copyright notice: this damask image copyright M. McCarthy 2010 and
is for personal use only, please. :) Feel free to sell handmade items made with this, but not digital ones. Thanks!
I embossed this little pair of friends from my inkjet printer
(on some white paper painted with Matte Medium):
(on some white paper painted with Matte Medium):
...and coloured them very lightly with pale Copic marker colours. Then,
scratched the paper with a paper piercing tool to get texture:
I scratched a cross-hatch pattern onto the boy's pants
I also added white dots of gel pen on his sweater.
His doggy got fur texture scritches.
Do you guys like different textures?
(Or am i just a weirdo)? ;o) heehee
and Great news if you're looking for a previously retired Heather Ellis image: It just might be back! There's a note on her site detailing that she's decided not to discontiue her images, since she's had so many requests to keep them available.
-2-

pencil damask patterned paper
So, I'm broke, ya know?
LOL
...but really it's true!
Hence, I'm always trying to find ways to get a fresh new look on things
without breaking the bank. This do-it-yourself damask paper has been
super useful in my projects lately (and relatively costless)
so I thought I'd share a copy of it...
and share how you can make your own.
The paper is available for download from
my account at acrobat.com here
When you get to acrobat.com,
just click the little green download button in the top left corner:
If you have any trouble downloading from acrobat,
please see this post describing how to do it.
If you're still stuck, feel free to comment here or drop me
a note--melstampz@gmail.com---:o)
-3-

make your own digital patterned paper
with a hand-drawn damask pattern:

Step 1) Create a single damask element. (The sneaky trick is that you only need one shape will be repeated to make the pattern).
Draw one, or use a digital or rubber/acrylic stamp; clipart etc... (following copyright, of course) ;o)
Don't like to draw, but want a hand drawn look? You can trace a copyright free image (public domain images are great!) Just lay tracing paper over & use a nice sharp pencil (I love mechanical pencil)

Step 2) Scan your damask element. I scanned it as a colour photograph and at a high resolution (600) for detail & flexibility.
Step 3) Open your damask image in Photoshop (or other software) & Clean it up, cropping & fixing any areas you like using the eraser tool or paint brushes. I didn't worry about getting the image perfect, since I wanted it to look hand drawn.

Step 4) Turn Your scanned image into a photoshop brush.(Not sure how to do that? Here's a great tutorial by Dani for how to make a brush in Photoshop.)
and then
Step 5) Repeatedly "stamp" your new photoshop brush in a pattern to make a piece of digital paper. I made mine dark by "stamping" the brush in black & then adjusted it to use later by making it pale (under the "image" tab > "adjustments" > "hue & saturation" > then slide the scale bar to increase the "lightness"

Step 6) Print the image out to make your very own paper. To emboss mine, I just...
A) brayered a thin layer of Matte Medium (by Golden) onto white cardstock,
B) had the clear embossing powder ready,
C) printed it in the digital printer (my printer is a Canon Pixma 260),
D) quickly sprinkled the embossing powder on the wet printer ink and heat it to melt it...
et voilà, homemade embossed damask paper!
Draw one, or use a digital or rubber/acrylic stamp; clipart etc... (following copyright, of course) ;o)
Don't like to draw, but want a hand drawn look? You can trace a copyright free image (public domain images are great!) Just lay tracing paper over & use a nice sharp pencil (I love mechanical pencil)

Step 2) Scan your damask element. I scanned it as a colour photograph and at a high resolution (600) for detail & flexibility.
Step 3) Open your damask image in Photoshop (or other software) & Clean it up, cropping & fixing any areas you like using the eraser tool or paint brushes. I didn't worry about getting the image perfect, since I wanted it to look hand drawn.

Step 4) Turn Your scanned image into a photoshop brush.(Not sure how to do that? Here's a great tutorial by Dani for how to make a brush in Photoshop.)
and then
Step 5) Repeatedly "stamp" your new photoshop brush in a pattern to make a piece of digital paper. I made mine dark by "stamping" the brush in black & then adjusted it to use later by making it pale (under the "image" tab > "adjustments" > "hue & saturation" > then slide the scale bar to increase the "lightness"

Step 6) Print the image out to make your very own paper. To emboss mine, I just...
A) brayered a thin layer of Matte Medium (by Golden) onto white cardstock,
B) had the clear embossing powder ready,
C) printed it in the digital printer (my printer is a Canon Pixma 260),
D) quickly sprinkled the embossing powder on the wet printer ink and heat it to melt it...
et voilà, homemade embossed damask paper!
Blogger pictures for those who prefer them...


(Simply click on the photos to see them larger
& click back to return to this post). :o)
& click back to return to this post). :o)

Digital Image: The Boy & the Dog by Heather Ellis
To emboss the image: Inkjet printer, White cardstock & Matte Medium by Golden; clear embossing powder, heat gun
Pale Copic markers: E50 eggshell; E00 skin white; BG10 cool shadow; B00 frost blue; V000 pale heath; V95 light grape; cool grays: C1 & C3. (Please see this tutorial for a disclaimer on digi embossing & copics.)
To emboss the sentiment: word doc. with coloured phrase, vellum cardstock, inkjet printer, clear embossing powder, heat gun.
Miscellaneous: Fuzzy snow paper (gift from my BFF Kimmy, sorry no source); paper piercing tool to score texture into image & pierce holes for sewing, needle & gray thread
I hope your days are bright and beautiful this winter!
P.S. By the by, this is an unsolicited post. I just bought some Heather Ellis images on etsy a while back and thought you all might find the shop info handy for last minute digi cards. :o)
Copyright notice: this damask image copyright M. McCarthy 2010 and
is for personal use only, please. :) Feel free to sell handmade items made with this, but not digital ones. Thanks!