The Image:
This sweet animal stack image is from the new Paper Garden Projects Stamp Kit: FarmYard Friends. It's tucked in a pocket that's made from Basic Grey Weather Vane paper (that comes in the kit too) and a Clear Card box (which you can also find at Paper Garden Projects--in 1/2 or 1 inch thicknesses.)
The Pocket:
The larger pocket (holding the pencils) is made from fun foam. It's a super affordable (and speedy) way to make a personalized gift for artistes young & old, (since you can find the sketchbooks on sale for around 5 dollars & the fun foam is a dollar.) I wish you could feel the fun foam after it's embossed: it feels like suede! You can just stick the pocket together with Oh So Sticky tape (or you can emboss it & stitch it first.)
Potential Uses:
Of course, you can use that pocket for anything: stamp images of the Farm Friends & tuck them in there to give to a stamping friend or as a child's gift for a special colouring book....fill it with cards you've made...tuck a note pad into it...
I plan on using this as a sketch book for stamping ideas; I'm hoping the coloured pencils will help me think more visually...
Here are the schtuffs to make it:
Supplies:
(From the Paper Garden Projects Farm Friends Stamp Kit)
Stamp: Animal Stack stamp (made by Pink Cat Studio)
Papers:
1 piece of Weather Vane Basic Grey patterned paper (6 inches by 4 inches)
1 piece of Wedding White Cardstock (5 and 3/4 x 3 and 3/4)
Other Materials:
(from your stash or Paper Garden Projects)
For Pockets:
Clear Card box (for acetate pocket)
Fun Foam (1 large piece)
Oh So Sticky tape
Cuttlebug embossing folder (I've used Floral Fantasy)
Scissors
A Tim Holtz Design ruler
Paper piercer, needle & thread (black)
For Animal Stack:
Black ink
Copic Markers: Black, BG-15 Aqua, & RV-11 Pink
watercolour pencil crayons
White Marvy Uchida Puffy Velvet marker
The Butterfly is cut from the Urban Prairie 6x6 paper pad & adhered with Tombow Monomulti & glittered with a Sakura Stardust pen.
How-To:

Step 1) Cut fun foam pieces to fit Sketch book (the sketch book I used here is 11 & 2/8 inches by 8 & 3/4 inches, so I've cut the fun foam pieces to measure):
A) Back of pocket: 10 & 3/4 by 8 inches (Or 2 pieces so the piece that shows will fit in the Cuttlebug: 2 2/8 inches x 8 and 6x8)
B) front pocket: 6 by 8 inches
C) Front pocket strip: 3/4 by 8 inches
Step 2) Embellish the fun foam:

A) Cuttlebug fun foam pieces. (Since a lot of it is covered by the image, it's okay to overlap.) This uses the Floral Fantasy embossing folder.

B) If stitching, pierce the fun foam. A Tim Holtz Design ruler is nifty for piercing

C) Sew the fun foam together for decoration. I did it in this order:
1st) Adhere the thin strip onto the pocket front & stitch it.
2nd)Adhere the front pocket onto the back & stitch it too.

Step 3) Adhere the foam to the sketch book (Oh So Sticky tape holds it really nicely. It's surprisingly durable & once it's on there it's not budging.)

Step 4) Cut clear window from Clear Card box to make an acetate pocket (to measure around 6 inches by 4 inches.)

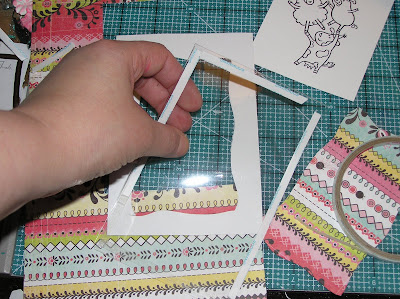
Step 5) Cut a frame from Basic Gray paper Weather Vane Basic Grey patterned paper (to measure 6 inches by 4 inches.) You can use scissors or an exacto blade/ hobby knife to create a wavy frame line.

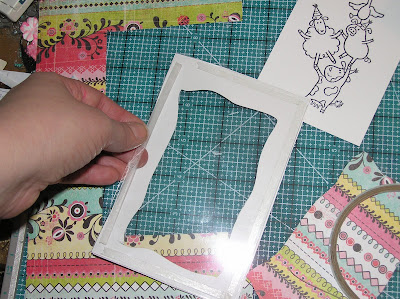
Step 6) Adhere window to back of patterned paper frame

Step 7) Make sure the acetate is free of any particles or paper bits...

Step 8) Stick the frame & acetate window onto the front of the foam pocket on sketchbook (only adding adhesive to 3 sides--both sides & the bottom--leaving the top with no adhesive so it's open and makes a pocket.)

Step 9) Stamp the Farm Friends animal stack

Step 10) Colour the animals however you like.
These guys were coloured using a Copic Marker on Watercolour technique: Using watercolour pencil crayons for the gereral colouring gives a soft blending & the deeper areas of colour are brightened with matching Copic Markers.
Combining watercolour pencils & Copics is a fast way to get the rich colour of Copics but also have easily blended areas. (It might be a good technique if you're new to Copics, if you only have a few colours, or if you just want the best of both worlds!) :O)

Step 11) Slide farm animal stack into pocket. Since it's a pocket, you can switch out the image whenever you want.


13 comments:
Hi Mel, just to let you know I have nominated you for a blog award, you can get it at: http://thesecretworldofacraftaholic.blogspot.com/
:)
Love you 'how-to' on the sketch book !
Mel has anyone told you lately how FAB-ulously Creative you are?!! WOW this is such a clever little gift to give.. or to keep! Ü
I just love coming to your site, you are one of my must see blogs for Inspiration! Thanks so much for sharing all of your ideas with us and for the time spent creating these fabulous tutorials! You ROCK! Smiles, Sherry
Hi
I love your creations, thats inspire to creating different ideas.
Thakns for sharing expectacular creations
Brilliant idea Mel, it looks terrific.
Love, love this project!!! What a wonderful gift it can be!!! Thank you so much Mel for your fantatsic idea!
This is amazing Mel!! Hope you are well and that your craft room is wonderful!!
What a great idea!! So cool. I have a couple of neices that would love this. TFS
Mel what a great project love your colors thanks for sharing
Hugs
Norine
Mel you are so clever... i love to drop by and see all of the wonderful creations and tutorials you create.. every time i come i find something i missed.... trying Gesso and Ranger inks tomorrow...hehehehe... have a great sunday crafty hugs Tina x
Another amazing post! You are such a gem in the crafting blog world! What would we do without you! Best, Curt
what a FUN project! I love the concept & the image is so cute in the frame. you're just too clever, woman!
This is a great idea! I will be making a card like this soon! You gave me an excellent idea for making it into a pocket so that we can change the pictures. THANKS tons!
BTW I have uploaded the freebies!
This is seriously clever! I really love checking in on your blog to see what wonderful new things you have come up with!
Post a Comment