...They said they want some LOVE already! heehee ;o)

Don't background stamps seem to have taken a backseat, lately? O Admit it, Dear Reader! You neglect old Bob the background stamp a little. You loved him once upon a time, but left him high and dry once he got boring--without so much as a Dear John letter, I might add. ;o) At least, I know I did. Is it time to rejuvenate that love affair, perhaps?

1...Preview of LPS set {Beary Best Katie} & enter to win it!
2...LPS Sketch challenge
3...Techniques: Stuff to do with background stamps Part #1: Magic pattern stamping
4...Cheap tricks: Sanding & White ink for fine highlights
5...Digital variation of magic patterns
-1-
1...Preview of LPS set {Beary Best Katie} & enter to win it!
2...LPS Sketch challenge
3...Techniques: Stuff to do with background stamps Part #1: Magic pattern stamping
4...Cheap tricks: Sanding & White ink for fine highlights
5...Digital variation of magic patterns

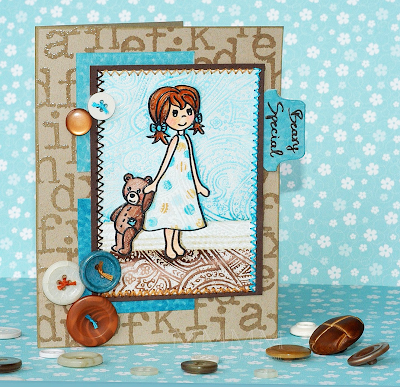
{Beary Best Katie}
This new LPS set is one beary sweet set! teeheehee ;o)
They don't come any cuter than this:
{Beary Best Katie} from Little Paper Shop
(releases tomorrow July 14th)
Leave a comment on the LPS blog and be entered to win Katie & her bear!
Katie is an outline stamp just like yesterday's little angel & the pattern stamping is the same too. There's a tutorial below for how it was done,
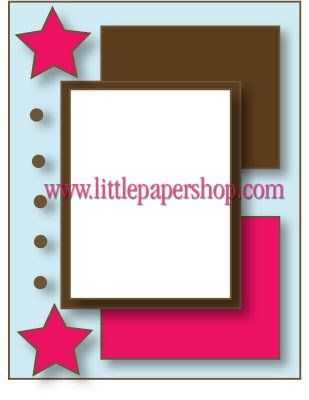
but first my backwards take on the newest LPS sketch...
-2-

Don't know how I managed to reverse the squares on this.
(It was not an act of rebellion) but...here's the real sketch:

If you'd like to join us, please do!
Play along with our challenge this week and a winner will be announced next week to win this set!
You have until next Monday (the 20th) to play. :O) Details on the blog HERE
-3-
Stuff to do with Background stamps-Part #1
Your outline stamps told me that they wanna feel
some magic with background stamps...
some magic with background stamps...
"Magic pattern" stamping that is...it's one way to get new life out of your background stamps (and strike up a new romance with outline stamps (past & present.)

- Cardstock (any that will take embossing & maybe a bit of water)
- Outline stamp
- Background stamp
- Black Craft/Pigment ink
- Versamark (or clear embossing ink)
- Clear embossing powder
- Heat gun
- Inks/markers (used here: a blend of Copic & water-based markers)
- Optional (for masking): scotch tape

Summary of the technique: Stamp an image & colour any parts of it that you'd like to be solid, then heat emboss over it with a clear pattern background stamp & continue to colour. The embossing will resist your colouring and a magic pattern will appear. hehehe

Step 1} Stamp your outline image, and emboss if you like. This is {Beary Best Katie}

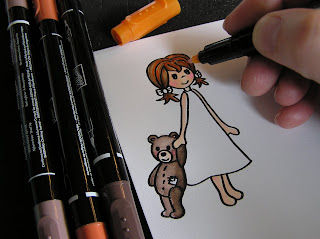
Step 2} Colour any areas that you would like to be solid (without pattern)

Step 3} Emboss a clear background over your line image: Stamp a background stamp in Versamark (or any clear ink for embossing) add clear embossing powder & heat set. Press well if the first image was embossed. (You may still get a halo effect around your image a bit, but I actually like the pop it gives the image...)

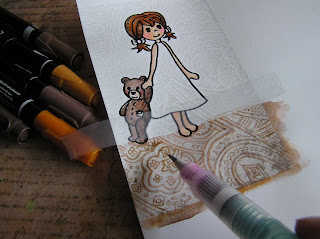
Step 4} If you would like to mask, just use scotch tape. (The embossing means it won't stick too much-depending on the tape of course.) This image was masked to make a baseboard behind Katie & Bear.

Step 5} Colour with whatever medium you like. I used a mix of water-based markers on a waterbrush as well as Copic markers for this. It is such a blast to watch the pattern appear!

Step 6} Directly marker it if you like: Applying colour directly with a marker will give you nice deep shadows to ground your image or just bold colour contrast with the emboss resist background pattern.
If you want, you can experiment with layers of colour to get the most out of your markers & apply them in different brushstrokes to add interest.

Step 7} Blend with a waterbrush, if desired. It's a soft way to add other colours. It may be a good idea to avoid oversaturating the paper with water. If you get curling, dry it under a stack of books, or cover the entire back of your image with adhesive and the curl will go away.
I like how you can make patterned wallpapers & how easy it is to add depth using deeper colours in areas.

Step 8} Peel the scotch tape mask to reveal the white baseboard.

Step 9} Add shading to give your masking some depth (in this case, the baseboard.) I just drew lines with the chisel end of a Putty Copic marker to mimic the profile of a baseboard.
Colour in dots or patterns if you like. (Katie's dress got some polka dots.) :O)
-4-
(sanding embossing powder)
You can sand embossing to reduce the shine, or for a matte look. Of course, you'll want to avoid sanding too deeply, so you don't blur the black ink/embossing underneath the clear.
Sanding is handy for photographing your cards too, since them un-sanded embossing glare can make them difficult to shoot--though the technique never seems too shiny to me in person-depends the embossing powder you use, I imagine. :O)

A couple of teeny dots of white acrylic ink can go right on
top of embossing for sneaky fine highlights. :O)
-5-

(a digital magic pattern variation)
A) Print out any digital image or paper you like
B) Heat-set or emboss to prevent it from blurring
C) Stamp over it with clear embossing & colour it
Magic pattern stampin's is handy for adding some dimension & pizazz to digital images too. :O)
Thanks for readin' or lookin'!
P.S. You can see some gorgeous previews of these 2 new sets on the LPS blog here.
P.P.S.
Magic pattern stamping on vellum :

(fun since you can colour from the
back of the vellum cardstock too)
&
Magic pattern silhouette stamping:
(colouring sections in black)

&
Magic Pattern Blooms tutorial:

(affordable perty 3D flowers)


10 comments:
OMG ... I love this ... thanks for sharing! I must try this ... HOW FUN!!!
This little girl is so sweet! And I love the new technique! It really does work as a magic! Thank you so much for sharing, Mel!
WOW! this is amazing! The embossing thing stumps me how it didn't go all over the teddy and girl's face. I'm going to have to try this myself.
LOL! LOVE the title of your blog post, hee hee. This is a STUNNING card Mel-love all the little details! You put a lot of love into your cards and it really shows!
WOW Mel!!! You are amazing. Love this idea of the background stamp, your image pops like crazy and having the pattern on the wall and floor - fantastic!! I also love your post title.
As always, your creativity astounds me! Love what you did with your focal...so copying!
Only you would think of this....terrific idea...gotta try it really soon. YOU are so talented!
Love that technique Mel and of course I adore Beary Best Katie!! Super duper again!!
You ROCK"!!!!!!!!!
Cute, cute, cute!!!! LOVE this!
Post a Comment