


The problem with digital images is that you can't get
any pattern or texture with them, right?
Nuh Uh, my friends! ;-D
Nuh Uh, my friends! ;-D
This furry little Squirrel buddy is as digital as they get, but
he's all texturized & patterned too! :o)
(he's embossed on some decoupaged book paper):
he's all texturized & patterned too! :o)
(he's embossed on some decoupaged book paper):

...He's from myGrafico and is part of a digital kit called
Autumn Elements Stamps (by dilek design studio)...
...he lives on the cutest corner-bracket branch....

Autumn Elements Stamps (by dilek design studio)...
...he lives on the cutest corner-bracket branch....

...and his new home is on this mini corkboard:

(yup, i know, i'm a nut!)

1...a myGrafico recipe challenge
2...achieving digital découpage embossing
3...making a really speedy mini corkboard
4...cheap tricks: DIY fancy post it notes
-1-

has all kinds of gorgeous work by their talented design team
this project was for their
this project was for their
Recipe Challenge #16:
1 digi + 2 patterned papers + and 3 embellishments
1 digi + 2 patterned papers + and 3 embellishments
I've never done a recipe challenge before (I live under a rock sometimes), so I hope it wasn't cheating to use the cork sheeting...(apparently, I also turn into Dr. Seuss sometimes, ynuk ynuk)
1 digi:
The sweet squirrel on a branch (part of a digital kit from myGrafico called Autumn Elements Stamps and created by dilek design studio.)
2 patterned papers:
makingmemories 12x12 Toil Mocha Paperie (Item# 31001)
& a vintage book page (or text pattern paper.)
& a vintage book page (or text pattern paper.)
3 embellishments:
Googlie eye, Button push pin, Stitching.
-2-

...achieve digital découpage embossing

- Vintage book paper
- Mod Podge & a brush (the rougher the bristles, the more texture you get)
- embossing powder & heat gun

Step 1} Stick a vintage book page to a standard sheet of cardstock. Let it dry well. Flatten under books if needed.
(I used lots of mod podge especially between the page & the cardstock to be sure there was no bubbles or areas without Mod Podge.)
Please note (!): Other glues might work as well-as long as they dry hard enough to not mess up the printer (no guarantees there, of course.) I use a very affordable Canon Pixma all in one printer ($50.00) so that I don't have to worry about it. :o)

1) You could do this on any patterned paper of course. You could also experiment with the medium (using gesso, acrylic paint, gel mediums, digital grounds, matte medium...)
2) Change up the application method: sponge or make swirled brush strokes.
3) You can even stamp in the wet Mod Podge (or other medium) to get even more texture, but please be sure to clean your stamp as soon as possible.

Step 2} Print & emboss the digital image from Autumn Elements & cut it out.

Step 3} Colour the image with Copic markers. The brushed mod podge gives nifty texture, especially if you remove some colour with a colourless blender or a lighter copic. Copic maker colouring may be sticky before the Copic marker cures. The water-proofing of the Mod Podge gives a nice sheen to the Copics.

Step 4} Adhere a googlie eye onto Mr. Squirrel
-3-
...make a speedy mini corkboard
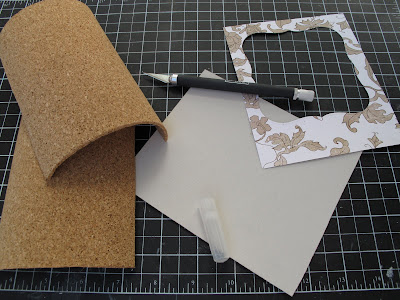
Step 2} Cut the pieces for the corkboard (all the same size):
- patterned paper
- acrylic paint
- pieces cut from a roll of cork
- piece of artist mat board
- exacto blade, ruler, & scissors
- Nestabilities Label die & Cuttlebug
- Paper piercer, needle, & thread
- Tombow Monomulti
- Copy paper

Step 2} Cut the pieces for the corkboard (all the same size):
- 2/3 pieces of cork (a roll from the hardware store for 7 bucks)
- a piece of artist mat board
- a piece of patterned paper (die cut with a Nestabilities label shape.)

Step 3} Paint the patterned paper frame with acrylic paint (tones down the contrast & adds snifty texture)

Step 4} (Optional to make stitching easier): Make the frame sturdy by adhering it to a second frame (made of cardstock.)
The easiest way I've found to line the two frames up perfectly is:
A) Plan ahead & adhere the patterned paper to cardstock first & cut it at the same time (no duh, hey?)
or B) if you're nutty like me & add everything as an afterthought:
- Cut them separately.
- Line the frame parts up when you stick them together.
- Trim the excess crooked cardstock using the painted frame as a guide.

Step 5} Pierce & stitch the frame with embroidery thread.

Step 6} Layer the cork pieces onto the mat board, adhering them to each other.

Step 7} Apply adhesive to the back of the frame.

Step 8} Stick the frame onto the cork sheet layers.

Step 9} Apply adhesive to the back of the Squirrel & leafy bits & adhere it to the corkboard & patterned paper frame:

-4-

Make your own mini post it notes by cutting copy
paper layers with a small Nestabilites label die:
paper layers with a small Nestabilites label die:

You could also make sticky-back notes: For a temporary adhesive, I've found Dotto works really well, or you could use a thin layer of Tombow Monomulti (dry it first & it becomes a temporary adhesive.) I apply a little adhesive just at the top of the back.
and there you have it:

a place to store somenuts oops, store some notes! ;o)
a place to store some
Happy Fall!


4 comments:
Loooks awesome. I'm gonna have so much fun making it :)
Thank you.
xoxo
Thank you SOOO much for joining us over at MyGrafico Challenges as our guest designer! Yours was one of the blogs that got me started in blogging and making cards earlier this year and I'm inspired by you and all that you do. Again, thank you, and I am a huge fan :D
- Ann
Love the little squirrel corkboard. Girls would love him too!
How cute is that?? I love squirrels!
Post a Comment