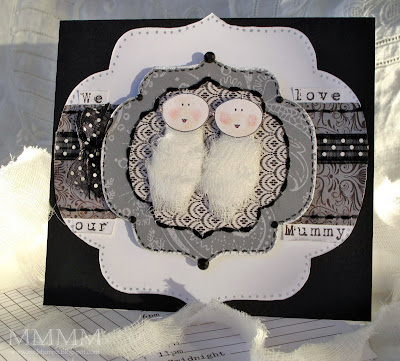
Cathy (of Paper Garden Projects fame) made a gorgeous fall sketch into a digital freebie--it looks gorgeous with her fab Copic marker skills. Her creation gave me the idea to make a couple of PGP freebies too. This card uses the first digital Halloween image that I doodled. It's a little sketchy, but I hope you like it. I've also got a card with the "apothescary jars" in the works...
1... digital freebie for Paper Garden Projects
2...swaddling some mummy babies
3...making GIANT templates from your Nestabilities
4...embellish-y stuff (the card background)
5...baby gem spider (+speedy way to embellish inside cards)
6...digi: apotheSCARY jars
-1-
Mummy Twins freebie
for Paper Garden Projects
for Paper Garden Projects


(I used the small ones here)
SMALL mummy baby PDF
SMALL mummy baby JPG
&
LARGE mummy baby PDF
LARGE mummy baby JPG
My BFF Kim has twins (and coincidentally so does Cathy!)
Kim's become another victim of the flu--poor Darlin'--
so I hoped this might give her a giggle. Love you Kimmy!
Kim's become another victim of the flu--poor Darlin'--
so I hoped this might give her a giggle. Love you Kimmy!
...swaddle mummy babies

- Nestabilities Label 9
- Neenah white cardstock
- Black Prismatic cardstock
- Copic Multiliner
- BasicGrey Ambrosia 6x6 pack
- Needle, thread, Paper piercer
- Tim Holtz Design ruler
- Scor-tape, Tombow monomulti
- Black Rhinestones
- The "I want it white" Collection
- Cheesecloth

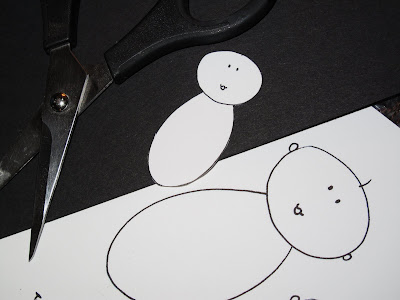
Step 1A} Print the mummy twins & their spare heads for layering (how ghoulish, hey?)
Step 1B} Cut them out.
Alternatively, you could print just one baby with one or two heads, ROFL. (The picture above shows the size I used & the large size so you can compare) :o)

Step 2} Colour & the extra heads and cut them out. I lost one of the baby's heads & couldn't stop singing "Mommy had a baby & her head popped off...!" (Ever play that with dandelions when you were a kid?) Good ol' wholesome, morbid fun!

Step 3} Cut strips of mummy gauze from cheesecloth
Of course, if you don't have cheesecloth, you could swaddle your babies in ribbon. :o)

Step 4} Wrap each baby, stick on their heads, & adhere them to a card. :-D
-3-
Make BIG shape templates
(from your Nestabilities)
(from your Nestabilities)
Giant template shapes to match your Nestabilities.
I love the labels 9 but I wanted it to be enormous for large 5.5 inch/6 inch cards...
so I did this stuff:
so I did this stuff:
- Die cut the largest size of the Nestabilities label
- Traced it onto white paper
- Scanned it & saved it as a jpg
- Enlarged the image & printed it out as a template
- Traced it onto cardstock & cut it out
-4-
...do some embellish-y stuff
(the background of the card)
(the background of the card)

Step 1} Trace the big Nestabilities template onto cardstock & cut out. Add a strip of patterned paper & embellish it (I pierced & stitched this BasicGrey Ambrosia paper.

Step 2} Cut out the sentiment & adhere it.

Step 3} Layer ribbons. These are two ribbons from the "I want it white" collection at Paper Garden Projects. (A gingham ribbon under the sheer dotted one...just to be weird.) ;o)

Step 4} Make a shaped mat for the babies:
A} Die cut the Nestabilities label (2 patterned papers)
B} Distress the edges
C} Add black rhinestones
D} Pierce & stitch around the inside
E} Faux stitch around the outside
-5-
...jazz up the inside of black cards
(+ baby gem spider)
(+ baby gem spider)
A lot of people don't like to have to write on the inside of black cards, but I am SO crazy for black, so here's one solution--a curvy folded white piece inside the card:

to make it...

Step A} Fold a piece of cardstock to the desired size.
Step B} Lay the big Nestabilities template over it.
Step C} Trace it & cut through both layers of cardstock (with a bit off of the top of the folded edge so it will make a shaped card)
Step D} Embellish the edges (I added silver metallic dots to match the card front)
I also added a wee spider:

A) Stick a black self-adhesive rhinestone on the card
B) Draw a silver line for his wee web
C) Add teensy eensy spider leggies (I used a Copic multiliner)
In hindsight (if you want perfect legs) you could draw them first & add the rhinestone after.

and th-thuh-thuh-thuh-that's all folks!
-6-
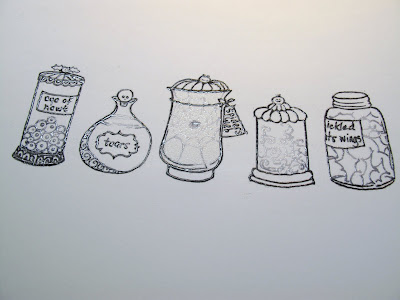
apotheSCARY jars


Apothescary jars PDF
Apothescary jars JPG
&
Apothescary digital paper JPG
Apothescary digital paper PDF
Here are the jars (embossed but uncoloured) straight out of the printer
(on paper that I painted with matte medium):

(click the pic for a close-up look)
The neat-o thing about digital...is that you can draw your images, scan them & then touch them up so that they have layers of various shades. I used a Photoshop brush with different transparencies to make the webs & things in the jars lighter in places, like they were seen through smokey glass. I'm no pro by any means, but it sure was FUN! A quick sprinkle of clear embossing powder makes em all textured. :o)=
On a personal (oink oink) note: Thank you sooooooh much for your kind thoughts while we piggies had the flu. It was certainly scary with the whole lung damage thing, (but though we're both still way tired--and my chronic lung jazz etc will still take hard work to repair) we are now well on the mend from H1N1. Hope you are all healthy and so very happy! oxo


15 comments:
OMG this is MARVELOUS!!!
LOL...leave it to YOU! too cute and love that rhinestone spider!!
great idea on the nesties too...you're just tooo schmaht!!
So cute Mel! (and the rhinestone spider is to die for!)
Oh I love this, and I think that you made it twin mummy babies was just the perfect idea for your friend! Your little spider is so cute, and I love that idea as well!
I am still giggling at your "mama had a baby and her head popped off"! Just yesterday I found myself singing "nobody likes me, everybody hates me guess I'll eat some worms!" remember that one? LOL!
Sooo cute!! Great ideas as always Mel!!
smiles,Deena
Those mummies are way toooo cute ! Love them
Oh my word - this is so stinking cute! Love the little mummies and that spider is just adorable!
Hi Mel,
This tutorial and the card are fantastic thank you for sharing. Your work is always fabulous.
Hugs Ali x
i am still giggling over your song..... just can't stop! :D cute project! and the papers and jars are wonderful!!! love love love the spider! :)
OMG!! Adorable! Love the tut and thanks so much for the freebies. xxD
Thank you so much for all you share with us! Glad you are all doing better!
xoxo
Joy
Thanks so much for the info and the freebies! The spider is really cute.
Great images.
TYFS
The little jars are super cute! Thank you, you are so generous. :)
These are just wonderful digis. Thank you for sharing. Jane
Post a Comment