


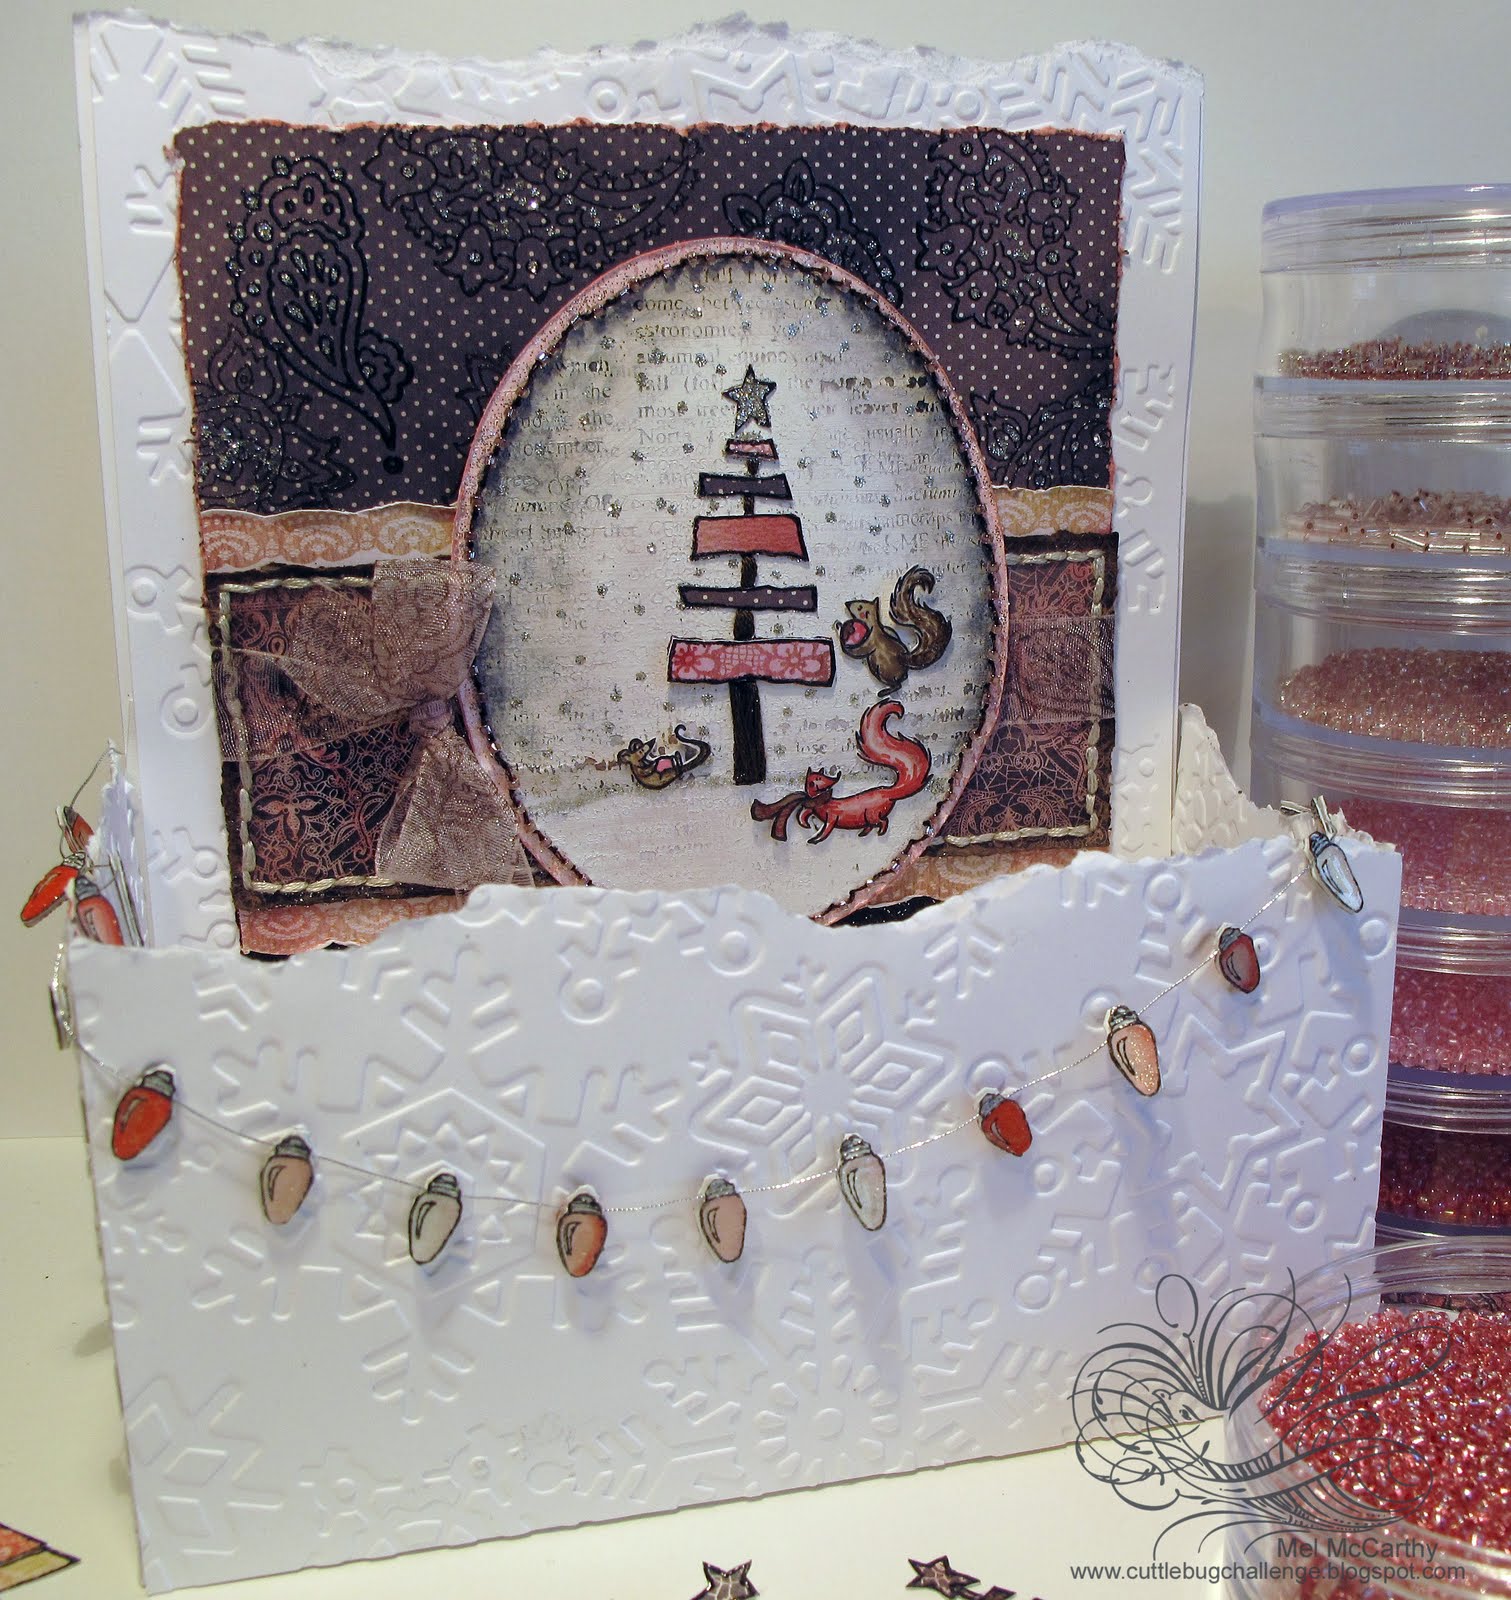
One month until Christmas! A potential box idea for those of you who enjoy the creative freedom that a layout of a 5-6 inch card gives you...This is a 6 inch wide box with a large card layout on the back.

Handy for gift giving this year cookies or other things, perhaps?
Here's a close-up of the sweet little animals that are on it:

(These Critters are teeny Purple Onion Design stamps.)
Their wee size makes the perfect for inchies, tags, or 3x3 note cards.

1... stamps from Purple Onion Designs
2...Cuttlebug Challenge Blog--Be Inspired Wednesday #59 Glitter!
3...making the P.O.D. critters image
4....cheap tricks: the background papers & custom ribbon
5...making an embossed gift box (6" wide 2.5" deep with a card back)
6...making a string of double-sided mini Christmas lights
-1-

...from Purple Onion Designs
I really love the mix of elegant design/element stamps & cute/cartoon stamps that Purple Onion Designs has, so I wanted to do a project that incorporates both styles. These are the stamps used on this card-backed box (just click to go look at them at P.O.D.):

...from Purple Onion Designs
I really love the mix of elegant design/element stamps & cute/cartoon stamps that Purple Onion Designs has, so I wanted to do a project that incorporates both styles. These are the stamps used on this card-backed box (just click to go look at them at P.O.D.):
4 Seasons Definition set
(for the acrylic textured paper)

Merriness
(the tree & the light)

Critters Stirring

(for the acrylic textured paper)
Merriness
(the tree & the light)
Critters Stirring


-2-

Cuttlebug Challenge Blog #59
the challenge for the next 2 weeks is to
add glitter to your projects!

for the image:
- White acrylic paint (with POD definition stamp pressed in it)
- Cardstock (Neenah white)
- Paper piercer, thread, & seed beads
- Tree from Merriness & BasicGrey paper scraps
- Brown Stazon, dark brown CTMH marker, & waterbrush
- Tissue paper (to stuff), Tombow monomulti
- Sakura quickie glue pen & Martha Stewart White Gold glitter
- Paisley stamps from Purple Onion Designs
- BasicGrey paper 6x6 paper pack
- Pink & Brown markers
- Pink Organza ribbon & Brown Stazon
- white cardstock (2 sheets of standard cardstock
- Provocraft large snowflake folder
- Cuttlebug Machine
- Black pigment ink
- clear embossing powder
- Copics--or other markers
- Sakura Stardust glitter pen
- lacquer glue
- Tombow
- Silver thread/string/wire...
-3-

...make the P.O.D. image

Step 1) The image for this is on acrylic texturized paper. I used a scrap of cardstock to drag acrylic paint onto a full sheet of cardstock.
More details on how to make this paper can be found in this older post. & here's a version with collage under it.

Step 2) This paper was impressed with a definition stamp from the Purple Onion Designs 4 Seasons Definition set into the wet acrylic paint. I sanded it a little to give it more "tooth" to stamp on.
Please note: using acrylic paint on stamps means you really must clean them right away. A soft toothbrush works wonders.

Step 3) Stitch beads around the shape & add marker if you like (Copics stay nicely on the acrylic paint.)

Step 4) Stamp tree (in waterproof ink--this is brown Stazon) No need to get a perfect image since it's just a guide for where to stitch & add paper pieces next...

Step 5) Make holes along the trunk (with a paper piercer) for stitching.

Step 6) Stitch the trunk (these are super easy straight stitches)

Step 7) Add a wash of water-based ink to distress the words on the acrylic paper. (Too much water may warp the paper, though, so a damp brush is good.)

Step 8) Stamp the tree on patterned paper scraps to paper piece it.

Step 9) To make sparkly snow dots & star: add dots of Sakura quickie glue pen & glitter (this is Martha Stewart White Gold glitter.)

Step 10) Stamp & emboss Purple Onion Designs critters & emboss them.
Step 11) Colour & cut out the Purple Onion Designs critters & stick them on.
-5-

the background bits:
(stuffing, paper tricks & custom ribbon)

the background bits:
(stuffing, paper tricks & custom ribbon)
You'll never guess the mess that's behind the critters:

A trick I learned from a Jennifer McGuire Thinking Inking video. Stuff the back of an image to make it puffy. She's too clever for words!

to get a straight torn edge: use a ruler & a drag a paper piercer along it (on top of something soft like layers of fun foam)


Ink the torn edge... with light bright colours (or a dark one for a faux burnt edge)


Ink the torn edge... with light bright colours (or a dark one for a faux burnt edge)

Heat-Emboss element stamps... with a mix of pigment inks (black and brown) & clear embossing powder & add glitter for homemade bling paper on the cheap. (These are Paisley stamps from Purple Onion Designs.

Shade the bottom of DIY patterned paper
with a darker marker to get a second colour.

To get easy custom ribbon in minutes
(that's also super cheap! hehehe) just:
A) anchor ribbon (with tape or pins in a fun foam pad.)
B) Stamp with Stazon or other fast drying solvent ink.
(this is stamped with all of those Purple Onion Designs Paisleys)
C) All done! Now you have new fancy schmancy custom ribbon.
-5-
make an embossed card-backed gift box
(6" wide 2.5" deep with a card back)

This is a speedy way to turn a larger card into an embossed gift box
(ideally--to fit this box--any card that's between 5.5 and 6 inches)
This makes a box that measures:
6 inches wide
2.5 inches high (in the front)
2.5 inches deep (from front to back)
It's and 3 1/2 inches high at the back
(which will support a large card nicely) :o)

Step 1) Start with a standard size piece of cardstock (8.5 x 11 inches)make an embossed card-backed gift box
(6" wide 2.5" deep with a card back)

This is a speedy way to turn a larger card into an embossed gift box
(ideally--to fit this box--any card that's between 5.5 and 6 inches)
This makes a box that measures:
6 inches wide
2.5 inches high (in the front)
2.5 inches deep (from front to back)
It's and 3 1/2 inches high at the back
(which will support a large card nicely) :o)

Step 2) With the cardstock on the horizontal (so it looks short) score at the 2.5" and 8.5" mark
Step 3) Turn the cardstock on the vertical (so it looks tall) and score at 2.5" and 5.5" and 7.5"
Step 4) Cut 4 slits for the tabs & cut away the two areas at the back of the box (indicated in red on the photo)
Step 5) Make embossed (torn) pieces for the side of the box.
A) Cut 2 short & 2 tall piece 6 inches wide (to emboss both sides of the front & back.)
B) Line up on the box to measure roughly & tear the edge, where you like.
C) Repeat to make 4 small side pieces (Cut 4 pieces 2.5 inches wide, line up, & tear tops)
D) Dry emboss the snowflakes on each piece (this is a new LARGE Provocraft Cuttlebug Snowflakes folder.)
E) Glue all the embossed pieces to the box.
F) Adhere your card image to the back of the box.
-6-
make a string of mini Christmas lights:
(double-sided)
(by the by, sorry that these photos are so icky. Winter has its loveliness,
but my photos really miss the sun!)

make a string of mini Christmas lights:
(double-sided)
(by the by, sorry that these photos are so icky. Winter has its loveliness,
but my photos really miss the sun!)
Step 1) Make the wee lights:
A) Stamp POD light in black pigment ink (or waterproof ink
B) Emboss in clear embossing powder
C) Colour with Copics--or other markers
D) Add Sakura Stardust glitter pen
E) Cover with lacquer glue

Step 2) Cut the lights out: (I made a pair of each colour)

Step 3) Line lights up in pairs and apply Tombow (or your favourite adhesive) to the back of one of each pair of lights

Step 4) Glue the lights to silver thread (sandwiching a matching light on the back of each one.)

Step 5) Drape the lights on the box front (and secure at the back of the box.)
and that's it:

and that's it:
Hope you're happy as a
cute lil' critter today! ;o)


14 comments:
Mel -
What can I say - FABULOUS! You always amaze me with the things you come up with. Thanks for sharing with us. Have a wonderful Thanksgiving.
Elaine Allen
waw adorable blog , i like your cretions and your tutorial, thanks for sharing it whit us all ;). i ve become a follower
hugssss
helen
You are so creative and write the best tutorials! I am still loving the DIY embossing plates out of cereal boxes!! Yours is one of my favorite blogs!
Fabulous project! I am amazed of how much detailed and delicate work you put in it!
YOU are insane!! You KNOW that right? really... you are!
can't believe you cut out alllll those bulbs.
have I told you this week how AWEsome you are?
Mel,
This is an amazing project. Love all the detail and colors. Talented lady.
Myrna
ummmm how many bulbs?? lol fantastic work! I don't get where the stuffin goes though, You lost me there....
Wow, such wonderful detail. Love your work. ANesha
Hiya Mel!
Wow, another fun creation! You sure can make such unique stuff! I love your sewing creations. .. I always tell myself that I should be more creative with embellishing my cards and projects. I love the way you added the beads.
I love what you did with the designer paper too. There's so many ways to make a designer paper more beautiful and I think you've thought of all of them! LOL!
Thank you for the thanksgiving wishes. I think you Canadians celebrated Thanksgiving already, huh? Even if you are not celebrating Thanksgiving today, I want to wish you Happy Thanksgiving anyway. .. I'm thankful that I met such a talented and sweet blog friend like you!!!
Maria
OMG woman...you make nothing simple, do you? It's no wonder mine look so basic...they have to! Ah, sigh...jealous!
WOWZERS! Mel, this is absolutely awesome! Everything you do has so much love put into it!
Happy Thanksgiving!
OMG!!!!!Mel you are the best cute lil critter ever and ever!!!!WoW stunning work you must have patience of a saint!!!!!
I love it!!!TFI
Enjoy the rest of your week:)xxx
Mel, i just love reading your blog! your tutorials are so packed with information, and I ALWAYS learn that the ever amazing Mel has some new thing to teach us all!! Keep doing what you do best...inspiring the rest of us!! :)
What an amazing project, your attention to details just always blows me away :) love the woodsy color scheme on this one in combination with the fresh white.
Post a Comment