


This post is all about the flowers from yesterday's Caardvarks "Get Published--Your Best Wedding Card" challenge... Prima & other pre-made store-bought flowers are so lovely, but they're just not in my skinny old budget. ;o)

I made another bucket handbag box & embellished it with the small white flowers, but most of this post is describing how the Fred She Said flowers were made to put on this card:

Please click the photo, if you'd like to go to
the card tutorial with the Caardvarks Challenge link...
....and now for the flower making schtuff:
BIG freds

(These large 5 pointed petal flowers are about 1-1/2 inches wide)
& LITTLE freds

(These small flowers are about half an inch wide)

Digital Paper Flowers:
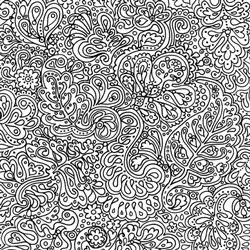
SUMMARY: These two sizes of flowers were both printed (from digital images.) The printer ink is heat-embossed in clear to get a smudge proof outline...Then a they were clear embossed with a pattern, coloured, shaped, & embellished with pearl seed beads. Of course, you could stamp too; the digi way just seems faster & more consistent. :O)

- Paper Temptress Candido Incandescent cardstock &
- Pearl Vellum cardstock
- Flowers from Fred She Said's Flowering Hearts Doodledallion Digi Set
- Vellum, Clear & Pearlized embossing powder, heat gun,
- Stylus (or end of a paint brush or pen)
- YG-91 Putty Copic Marker,
- Three For You flower punch
- Paper piercer, needle, silver thread
- Pearl seed beads & silver bugle beads

Step 1) Print & emboss FSS flowers. Print flowers on Paper Temptress Candido Incandescent cardstock. (It has a shimmery finish for some classy bling--but no fuss no muss.)
Step 2) Stamp with a background stamp over the flowers (in Versamark ink--or the like.) Heat emboss the pattern with more clear embossing powder & melt with a heat gun.
I used my new fave background stamp Tapestry
from Paper Garden Projects here:
I put it on my my Cuttlebug plate (as a block to stamp with)
since it's so nice and BIG & comes on Ez mount.

Step 3) Colour the flowers... The darker flowers are just coloured with a Putty Copic marker. The clear embossing powder is a-okay for your Copic markers (Copic site says embossing powders won't damage the tips, but suggests avoiding coloured embossing powders.)
Nifty thinger: Copic colouring will dull the shine of the embossing effect--which I quite liked for this look--BUT the really nifty thing is that it turns out you can just heat the powder again quickly to make it all shiny again!
from Paper Garden Projects here:
I put it on my my Cuttlebug plate (as a block to stamp with)
since it's so nice and BIG & comes on Ez mount.
Step 3) Colour the flowers... The darker flowers are just coloured with a Putty Copic marker. The clear embossing powder is a-okay for your Copic markers (Copic site says embossing powders won't damage the tips, but suggests avoiding coloured embossing powders.)
Nifty thinger: Copic colouring will dull the shine of the embossing effect--which I quite liked for this look--BUT the really nifty thing is that it turns out you can just heat the powder again quickly to make it all shiny again!

3B)For more subtle colour tinted on the clear embossing:
1) Scribble with a Copic marker on an acrylic block or something
2) Quickly, while the Copic ink is wet, pick it up with your finger (if you're nutty like me)
3) Smudge over the flower with your inky finger & repeat until you're happy with the results

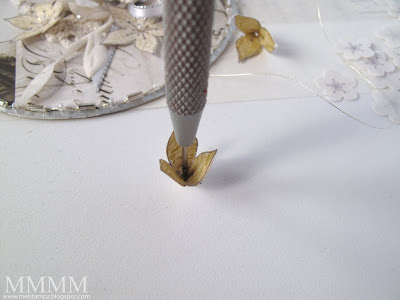
Step 4) Cut the flowers out & shape them: I shaped these quickly by pressing in the centers with a stylus after putting them on a homemade fun foam mat (made of 4 layers of 12x12 fun foam.) It gives cushioning, so they shape nicely.
A little of the embossing powder may flake off. You could discard the ones that happens with, if you like (but I just use them strategically since this is a shabby chic look after all.) ;o)
...make medium bud (or trumpet lilly-like)
variations of the large fred flowers:

Step 1) Cut one petal from the flower

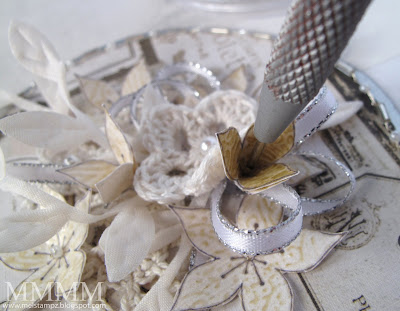
Step 2) Shape the flower like an opening bud & glue it:
2A) Put a nice strong adhesive under one of the petals beside the cut section (for instance, behind the petal marked A in the photo above.)
2B) Pull the glue-y petal over to adhere it to the front of the petal on the other side of the cut section (onto the petal marked B).
2C) Trim it up: cutting away any of the petal that may stick out from underneath where you don't want it to.
2D) I save the cut-off petal (marked C) to use as a single bud or leaf.
2E) You end up with the 3-petaled, trumpet-shaped bud flower on the right in the photo above (marked D.)
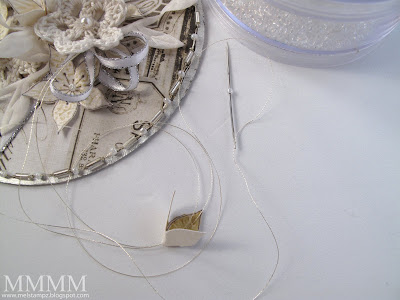
Step 3) Pierce the into the bottom center of the flower (to sew it on securely and add a decorative bead center) or you could just glue it on.
Step 4) Pierce a hole if you want to stitch on the flower on: make a hole in the patterned paper where you want the flower using the paper piercer (going through the hole you made in the last step.)
2B) Pull the glue-y petal over to adhere it to the front of the petal on the other side of the cut section (onto the petal marked B).
2C) Trim it up: cutting away any of the petal that may stick out from underneath where you don't want it to.
2D) I save the cut-off petal (marked C) to use as a single bud or leaf.
2E) You end up with the 3-petaled, trumpet-shaped bud flower on the right in the photo above (marked D.)

Step 3) Pierce the into the bottom center of the flower (to sew it on securely and add a decorative bead center) or you could just glue it on.

Step 4) Pierce a hole if you want to stitch on the flower on: make a hole in the patterned paper where you want the flower using the paper piercer (going through the hole you made in the last step.)

Step 5) Sew the open bud flower on with silver thread and add a little pearl seed bead center:
5A) Select a needle (test to ensure that it will fit the bead on past the eye of the needle.)
5B) Stick the needle in from the back & adhere the thread end at the back of the patterned paper.
5C) Put the flower on the tip of the needle (bottom side first)
5D) Thread the flower onto the thread.
5E) Add the bead onto the needle tip
5F) Go back through the flower and into the front of the patterned paper, where you made the hole using the paper piercer.
5G) Adhere the thread end at the back of the patterned paper.
5B) Stick the needle in from the back & adhere the thread end at the back of the patterned paper.
5C) Put the flower on the tip of the needle (bottom side first)

5D) Thread the flower onto the thread.
5E) Add the bead onto the needle tip
5F) Go back through the flower and into the front of the patterned paper, where you made the hole using the paper piercer.
5G) Adhere the thread end at the back of the patterned paper.
..make small Fred Flowers:

Step 1) Make a sheet of flower centers--digitally: Open a copy of the punch guide in photoshop/other software use a photoshop brush to add centers & Erase the flower punch guide layer (leaving just the centers) Save the file & print it (If you'd like more specific directions for this, please see the 'cheap tricks' punch guide directions below)
+Print+the+FSS+flower+centers+on+PT+Incandescent+cardstock+%26+heat+set+them.JPG)

Step 3) Stamp & Emboss the tapestry background over the flower centers (These are done in Versamark ink & emboss it with pearly iridescent embossing powder.

Step 4) Punch the flowers out (cutting off strips of the scrap parts left after punching as you go, so the punch will fit.)

Step 5) Shape the small flowers & stitch them on in the same way as the large ones (in the tutorial above.)

To make the bucket handbag, I just...

...adhered a whole bunch of the flowers on the front of
a stitched white bucket handbag. (The template can be found here.)
-3-

Punch guides for digital flower centers
(using Photoshop/other software)
If you'd like to make templates to match your own
flower punches here's how this one was made:
flower punches here's how this one was made:
(This might seem like a fair bit of work but it makes a punch guide matches your very own punches, and it can be used again and again with any style of center you like.)
Step 1) Punch once on a sheet of white copy paper to get the three flowers (or your shape) out of it.
Step 2) Lay the punched white paper on a scanner bed.
Step 3) Place a dark sheet of cardstock behind it (to make the flowers show up)
Step 4) Scan it, save the document, & open it in the software of your choice (layers are needed, so I used Photoshop)
Step 5) Cut and paste in Photoshop to make fairly even rows. No need to be perfect the set of 3 is all that matters & it will always be even since it was scanned from the punch.
Step 6) Merge the layers (in Photoshop, this is under the "layer" tab at the bottom "merge layers") At this point, it will look something like the grey rows of flowers in the picture above.
Please stop & SAVE a different copy of this for future use
(since the next steps involve obliterating this layer) ;O)

To use the punch guide:
(since the next steps involve obliterating this layer) ;O)

To use the punch guide:
Step 7) Create a new layer to put the centers in click "layer" tab "new layer"
Step 8) Make a photoshop brush from the center of Fred She Said flowers & use it to put the centers in--nice because you can size to fit your particular punches. Merge this new layer with the centers.
Step 9) Delete the under layer of original flowers. Save & print it out for punching.
If you have a Three for You punch & you'd just like to use the guide that I made,
then you can simply skip to step 7 (above) after opening the punch guide.
The 3 for U punch guide is
available for download here:

Download Three For You punch guide PDF
Download Three For You punch guide JPG
Download Three For You punch guide PNG
then you can simply skip to step 7 (above) after opening the punch guide.
The 3 for U punch guide is
available for download here:
Download Three For You punch guide PDF
Download Three For You punch guide JPG
Download Three For You punch guide PNG
Hope you're having a great weekend!


17 comments:
You are one amazing lady Mel, might have to try this one.
Pinky
Goodness Mel - how fabulous! Jo x
OMG this is awesome! Just stunning
you are PHENOMINAL! I can't believe the WORK you put into each and every project!! I'm just blown away by your genius! yes, truly genius!
flabbergasted...I'm speechless, and you know that doesn't happen often!! xoxo
I'm speechless! So I'll just say WOW! and thanks for sharing with us!
Wow Mel, how clever of you to figure out how to make a punch guide! Just so kewl!
ok this is beyond amazing!! I just cannot imagine the work that took! Just gorgeous!
I am speechless yet again by your creativity. Wow, stunning!
Wow. Did this take you like a week to do? OMG!
I am so blow away by your attention to detail AND you are so great about explaining the process!! I'm just so so impressed! It must take you forever to post a card with all the fun tips you share. I'm a big detail girl but, you take the cake. Have a great day and thanks for sharing so many of your tricks. Fondly,Kathy
Wow..Simply beautiful..and so detailed..Thanks for commenting on my blog too :))
Love, Love, Love it Mel the bag is amazing, so are you. Hugs x
You are absolutely amazing! Thanks for taking the time to post tutorials and tips for your projects - I have learned a great deal from your blog.
Teri
wow...this floral wedding card looks awesome. I have never seen anything like it. It was nice going through your blog. Keep it up the good work.
Wow! I've just discovered your blog, I can't wait to check in and see what you're up to! Fabulous!
You are one amazing lady Mel, might have to try this one.
Thank you for sharing - really wonderful and I can't wait to get creating with my 3 for you punch. I haven't been able to download the pdf, even though I downloaded all the 4 shared software...it lets me download the jpeg though. Any chance you can upload the pdf file - and also your fab flowerburst pdf would be great, as I dont have the software you mention. Many thanks, Sue
Post a Comment