


This one's for You, Malin!

...make a custom pattern in Photoshop
& use it to fill line art or digital images
I uploaded a Powerpoint of this tutorial here,
since these Blogger pictures can be hard to see.
(If you like the powerpoint idea, please let me know for
future technical tutorials)
Click the image to go to the powerpoint pictorial:

(Acrobat takes quite a while to generate the preview,
but you can download the powerpoint right away, if you like)
And here's how the custom pattern & image filling is done:
(my way, anyhow)

Step 1) Open the image that you'd like to turn into a pattern. Select the Edit tab, then choose "Define Pattern"
(Sizing: You can use some pretty large images for patterns. I used this one which was 2500 pixels, since that prints at about 8.5" square (and fits on a standard sheet of cardstock). 2500 px is the maximum size for Photoshop brushes in PS so I made some coloured damask patterns that size. I think I may do a little tutorial on brushes at some point, if anyone is curious about them).

Step 2) A window will pop up for you to name your pattern.
A little thought on naming patterns: If you are using someone else's image, it helps to add that info in the name, so you know who to credit when you use it, and you can refer to their terms of use or copyright policies.

Step 3) Close the image you used to make the pattern, and open the line art image (or digital stamp image or template) or whatever you want to fill with pattern....

Step 4) Once you open the image to be filled:
A) select the paint bucket tool.
B) Pull down the tab that says foreground in the toolbar above & select "Pattern" (instead of foreground which gives you solid colour).

Step 5) Pull down again (by the pattern square thumbnail image) to choose your pattern.

Step 6) Set the opacity for your pattern fill. You can make it more or less opaque (solid) or you can make it more transparent (sheer).

Step 7) Position the paint bucket over the line image & click to fill.

Step 8) Repeat with the paint bucket to fill the rest of the image with pattern.

Step 9) Use the zoom tool to get close for easier pattern filling on small areas.

If you like you can fill with colour before adding pattern
by using the "Foreground" paint bucket fill setting first:

(Repeat to fill all areas)

Then, switch to the "Pattern" setting
again, set the opacity, and fill over the colour with pattern.
or....
To get a coloured pattern, change the colour of the image,
then set it as a pattern:

(There's a tutorial on how
to change black &
white images to colour ones
in an older post here).
Then you can fill the image with your new coloured pattern:

Trouble-shooting:
If the whole page fills with pattern, it probably means...

...that there's a hole in the line art somewhere:
(unless you are on another layer that isn't the image layer)

(or in otherwords, there's a break in the line that is
letting that pattern get out of line! ;)

Repair the hole in the line art with the brush tool.

You can use this method to fill templates
(or parts of templates for added detail)
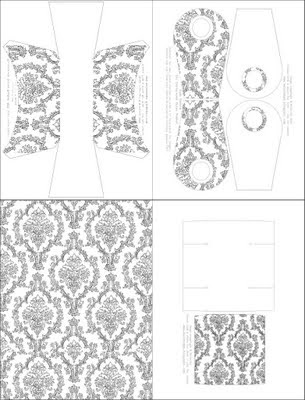
(This template set is available here on Flickr)
It's handy for making custom patterned envelope templates:

(or just making patterned envelope liners)
You can scan anything and turn it into a pattern
(book pages, fabrics, kid's art...)
Even fill things with scanned photographs:

This was done with a vintage photo postcard of
Stanley Park, Vancouver BC Canada.
(I have a collection that I've been meaning to scan & share with you)
Credit for the dress judy image goes to... The image used here is an adaptation of an image created by Monica Gaffney. I turned her Red Dress image into an outline image for a blog buddy, Malin. Monica's fun & funky digitals can be found in her etsy store, AssortedSundries, here.
Coming soon to a blog near you:


If you have any pointers for how to do Photoshop things in a better
way, I'd love to hear them. I just make things up as I go, :o)
way, I'd love to hear them. I just make things up as I go, :o)


15 comments:
Thats awesome Mel!
So many ideas! The photo made me chuckle! How great is that! xx
woohoo.... fab tutorial girlie! I can see me using this...... THANK YOU!!!! have I told you lately how AWEsome you are?!! *wink*
hugs
This is an awesome tutorial! Thanks so much for posting this.
Great tutorial. Thank You for sharing it.
I am going to have to study this!
Thanks!
Sandra ltb
This is a wonderful tutorial. I love how it takes the simple line drawing into something beautiful and alive!
OMG! This is fabulous! I love the Power Point format and your directions are so very clear and helpful. I've been wanting to do this for ages (to do something as simple as filling the image of a balloon with the words "happy birthday [name]") but couldn't figure out how. many thanks
Fabulous tutorial Queenie! I can never explain things SO WELL. Excellent job!
oh oh More photoshop tutorials PLEASE! Love this! Thanks
Gosh, I wish I had Phtoshop, so I could make fabulous pieces like this! Thanks Mel!! Your tutorials make me smile!
Awesome. I have GIMP, but it plays the same as PS. I must try this! THANKS!
This is great! Love the print! Tutorial on brush...more than welcome!
Good job,Mel:)
Whoa girl! You spent some serious time & put a lot of work into that tutorial! Fantastic job!! I totally appreciate the details you put into the things you do!! =)
Wow! This is a fabulous tutorial. I have used Word to fill images, but am always so glad to learn how to use Photoshop! Will definitely give this a try. TFS!!
Hi Mel. Great tutorial. Liked it on Powerpoint too. I agree, easier to see. Thanks so much.
Post a Comment