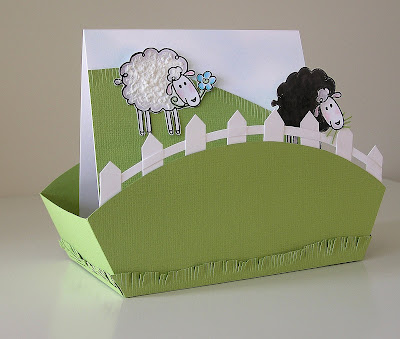
This was sooooo fun to make. I love that sheep too much! The two buddies above are made with the same stamp (You can just cut the flower off to make the black sheep) and he's eating grass. heeheehee.
I grew up on a farm in beautiful Queensville Ontario, so this brings back sweet memories of playing on the rolling hills. Though, we never had sheep (it was a cattle farm.) My Charles Charming had sheep though. Lots of them! So it sends him down memory lane too. :O)
I grew up on a farm in beautiful Queensville Ontario, so this brings back sweet memories of playing on the rolling hills. Though, we never had sheep (it was a cattle farm.) My Charles Charming had sheep though. Lots of them! So it sends him down memory lane too. :O)
(From the Paper Garden Projects Farm Friends Stamp Kit)
Stamp: Sheep with flower in its mouth (Designed by Pink Cat Studio)
1 piece of Parakeet (lovely grass green) textured Cardstock
1 piece of Wedding White Cardstock
Other Materials:
(from your stash or Paper Garden Projects)
For Box:
Scor-Pal
Oh So Sticky tape
For Fence:
Tim Holtz Design Ruler
Pencil
Scissors or a Stampin' Up word window punch
Tombow Monomulti
For Sheep:
Black ink
Copic Markers: Black, BG-15 Aqua, & RV-11 Pink
watercolour pencil crayons
White Marvy Uchida Puffy Velvet marker

To make the Rolling Hills Box:
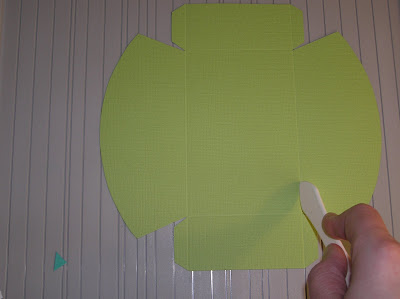
Step 1) Print rounded basket template onto the textured Parakeet cardstock (lovely grass green.) You can use either template (the one with no dotted lines or the one with lines, whichever you're more comfortable with)
Step 2) Cut the box out on the solid lines.
Step 3) Score where the dotted lines on the score guide indicate. (Save assembling the box until last.)

Creating the fence (with a Word Window punch or by hand):
Step 1) Make a cutting/punching guide:
A) Cut a piece of Wedding white cardstock (roughly 3 inches high by 6 inches long)
B) Mark it at every 1/4 of an inch.
C) Cut the fence posts:
- If you're cutting by hand, then just cut away every other 1/4 inch section to make the fence posts.

- If you're punching, then cut the piece into 2 3 inch halves (so the punch will reach)

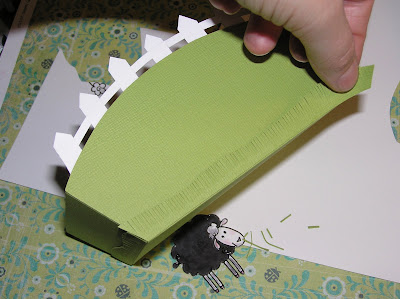
A) Check for fit: Make sure the punch marks (or cuts) go deepest on either end where the box curves down (You can dry fit it to check that it all fits well.)

B) Mark where to adhere it: Using the front of the box, mark the fence so you have a guide for where to adhere (You can draw the fence points on now too if you like, or just freehand cut them later..)

C) Add adhesive to the fence under the marks you've made

D) Trim the ends of the fence (using the box edges as a guide)

Step 3) Create the picket points (free hand or following your pencil markings)

Step 4) Fashion a curved fence railing:
A) Place the front of the box onto the top of a piece of Wedding White cardstock & trace the curve.

B) Move the box down about 1/4 of an inch & trace the curve a second time.

C) Cut the railing line out & erase pencil marks

D) Weave the railing through the fence pickets & adhere it (or you can just adhere the railing on top or behind the fence pickets.)
Step 5) Make a liner (for inside the front of the box) to hide the fence bottom mess:

A) Trace back of box onto a scrap of the Parakeet (grass green) cardstock

B) Cut front liner piece

C) Adhere front liner piece to the inside of the front of the box (over the fence bottom mess.)
Assembling & Embellishing the Box:

Step 1) Assemble the box (adding Oh So sticky tape on the 4 tabs)

Step 2) Stamp or Emboss the sheepie & cut it out (I cut the flower off.)

Step 3) Colour the sheep in with a black marker. (I used a black Copic Marker it adds contrast to the fence, but it also hides the swirl of the cut off flower.)

Step 4) Make grass strips by cutting wavy pieces & fringing them. Cut little pieces of grass for the sheep to eat too. :O)

Step 5) Adhere grass to the bottom of the box (on all the sides)


Step 6) Adhere the grass in the sheep's mouth (from the back.) Tombow Monomulti is just right for this application.)

Step 7) Adhere the sheep to the top of the box behind the fence (or wherever he/she feels like grazing. :O)
To Make a Matching Card:

Step 1) Clone the Sheep (Dolly, is that you?) hehehe: Stamp or emboss the sheep onto Wedding White cardstock
Step 2) Colour your image however you like (I used Copics on the flower (BG-15 Aqua) & for a blush on the face (RV-11 Pink)
Step 3) Add a little shadowing (I used watercolour pencil crayons in grey & a light touch of black)

Make Dolly puffy
Step 4) Make your sheep puffy using a White Marvy Uchida Puffy Velvet marker. To add puffy pen details:
- Shake it up
- Colour it on (I like to dab in dots)
- Heatgun it right away for lots of puff (for less puff, let it dry before heat gunning it)
Making the hills:

A) Cut some of the Parakeet (green) cardstock to measure 4 2/8" wide.
B) Cut it into a hill (about 3 inches high & sloping down.)
C) Cut another 4 2/8" wide piece into a wavy strip.
D) Stamp "baa" on it & fringe it.

To make the sky (and the main card):
A) Cut a piece of cardstock to measure 11 by 4 2/8" & fold it in half.
B) Sponge blue pastel or ink onto it to create a cloudy sky.
C) Adhere the hills to it & adhere the strip of fringed grass at the bottom.
D) Finish by adhering the sheep too.

Thank Ewe for being Ewe!
You make the Net a place as lovely as rolling green hills!


20 comments:
Oh Mel, this is adorable! You are one of the most talented paper crafters I've seen! Your always coming up with something creative! Thanks for all your inspiration!
Hugs,
Joani
OMG Mel, this is just fabulous and so different, I love it. Thanks for the instructions I am definately going to make this.
to darling Mel!! tfs! =)
hey...did you see I used your idea for nestie storage!! love it!!
I just want to thank you for all the work you do to make your blog such a wonderful place to visit. Missed you while you were moving, so happy you are back.
Very Cute Mel, I love grass in the black sheeps mouth....lol darling!
Oh, that fence! Brilliant! TFS!
Okay. . another template I have to try! My goodness, my list is getting longer every time I visit your site. Wow, you're really doing wonderful things with those animal images. . .so fun. I love what you did with the fence!! Very creative as always!
Maria
Super Cute! I just want to hug those cute little lambs.
TFS
Leigh
SO cute! Those little sheep are the cutest ever!
This is just so darn adorable. I can't wait to give it a try. Your site is so inspiring.
Too sheeping cute! Love the green of the grass and the little black sheep.. I should give one to the my little black sheep.. Brad. hee hee.
Totally delightful! I can't believe how creative your mind is. TFS!!
That is so adorable!
Thankso so much for the template. it looks soo fabulous.
i love it!
Hey Mel,
That is just the cutest, darn card ever. I hope you post it over at SCS...wow you never cease to amaze me.
take care,
Karen
ABSOLUTELY AMAZING MEL!!!
Mel, It's simple you're amazing! What else can be said, WOW!
Wow! That is amazing, Mel! Love the fence and the scene you created!!!
That is so darn cute!! You continue to amaze me with all your wonderfully creative ideas! How is your new craft room?
Swedie
Fabulous, as always. It's always so much fun to visit your blog and see what you've been up to. It's even better when you share -- ha! I'm better at cutting, folding and punching than I am at coloring, so I may just have to give this a "go." Thanks for another template to add to my collection.
Post a Comment