Friday, July 31, 2009

Susie Surprise at Paper Garden Projects: Woo hoo!


Susie just makes you happy, doesn't she?
That smile is a contagious one! :O)
Maybe it's that sentiment?--"woo hoo!"...


This was inspired by the fabulous Elena, who rocks the copics and has made some sweet cross stitch cards. I can't colour as beautifully as Elena or cross stitch, but I certainly am inspired by her! :O)

Making this card really made me appreciate Copic markers, not just for colouring, but also for all the bits'n'bobs. In all honesty, I would buy Copics even if you couldn't colour on paper with them! It was a hoot custom colouring different embellishment jazz for this: microbeads, flower gems, ribbons--oh my. ;o) Hope there's something here to add colour to your day!


1...Enabler Alert: Susie Surprise @ Paper Garden Projects
2...how to... embroidered copic coloured image on fabric cardstock
3...paper pieced cupcakes with some copic tricks
4...cheap tricks with ribbon

-1-

Can you resist the cute? ;o)


-2-

...make an embroidered copic image
(on homemade fabric cardstock)


Basically, this image was done by: gluing fabric to cardstock, stamping, colouring lightly with copic markers, then piercing & stitching. It took a while, but I love stitching & that retro texture it gives you. :O)


for homemade fabric cardstock:
  • fabric (this was a worn out pillowcase)
  • adhesive (I used Alene's tack it over & over)
  • cardstock (any will do-I used 80lb scrap cardstock)
for the image:

in this photo: darkening areas of the stamped
Susie Surprise image with a Copic multiliner

Step 1}
Create the image:

A) Tear fabric & fray edges (just pull threads until you're happy with the fray)
B) Glue fabric to cardstock (I used Alene's tack it over & over)
C) Stamp Susie Surprise (using an ink that will be colour proof is a good idea. Heat setting helps.)
D) Colour (Copics will bleed a lot on fabric so a very light touch is good. You can always go back & fill in more, of course.
E) Pierce around the edges of the image (for embroidering)
F) Stitch with Embroidery thread
G) Darken the stamp areas (that are left un-stitched) with a Copic multiliner
H) Lacquer the balloons


Step 2}
Embellish the image: pierce & stitch a frame around Susie (I used black thread)

For sneaky faux stitches
in between (in multiple colours without having to thread a single needle) I filled in with Souffle pens & various markers...sneak sneak sneak!

-3-


I want to gobble these little cupcakes right up. I love the design of them
and with microbeads they look crunchy & sugary, mmmm sugar!


Step 1}
Go over the Black cardstock with an anti-static bag (this is SU's embossing buddy)


Step 2}
Stamp & emboss cup cakes in white (for the bottoms)
&
Step 3} Cut out the black cupcakes...


Step 4} Paper piece for some colourful tops...

A) Stamp cupcakes on patterned paper
B) Cut out tops
C) Glue tops to black cupcakes

Step 5}
embellish them:


cheap tricks for embellishing cupcakes

A) Cover the icing tops in Crystal Lacquer
B) Add clear microbeads
C) Shade microbeads with Copic markers for depth


Colour rhinestone flowers any hue you like with Copic markers and then glue them onto the cupcakes with a little dab of Crystal Lacquer...


the cupcakes are attached to the card with foam tape. Foam mounting tape comes in white & black to match your project (but you can be sneaky & colour in the sides of the white foam with Copic markers so that it is any shade you need!)

-4-

(with ribbons)


Don't you get a kick out of making something that matches your projects perfectly? What is it about customizing things that is just so irresistible? Here are a couple of ideas for saving cash-ola by custom colouring ribbons...


Two things for this.... 1-Copic markers
&

Click to go see the "I want it white" collection


Step 1}
Tie a bow. I used the May Arts sheer dotted swiss ribbon (I prefer to tie as the first step, so I know exactly where to put colour in the next step) which is....


Step 2} Colour the dots. This feels like pure magic. You don't have to be careful at all! The black hides any over colouring & the white dots show off Copic colours beautifully. TOO fun, I tell ya! :O)

Then I wanted black ric rac, so I took the white stuff from the kit...


If you want to get rich black died ribbon, you can press it onto a really black ink pad. I used a Stazon pad & pressed with the end of a glue stick (WITH the cap on it) LOL.


Tim Holtz ruler to the rescue! (for centering that ric rac on the card.) I think my brain is lop-sided with all this heat lately, but Tim keeps me in line, teehee. The card also has speedy faux stitches drawn on with a copic multiliner.

& that's all I could think up to blather on about today! ;O)


Thank You so much for stopping in &
I hope you have an amazingly wonderful day!


Wednesday, July 29, 2009

Winter Wonderland Gatefold with Belly Band (Cuttlebug Challenge)

Firstly, thank you so much for your kind comments. You certainly
know how to make a gal blush over some ol' cereal box stuff!

and today's project...


This is an embossed gatefold card--
with a belly band that you slide off:


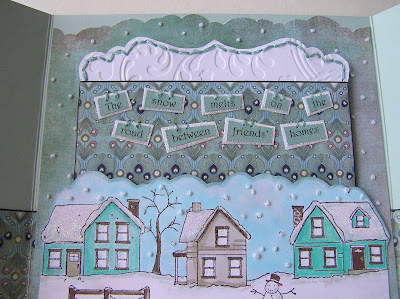
the inside has a pocket with a little sentiment


that says...


"The snow melts on the road
between friends' homes"


...and when you pull the card out of the pocket,
there's a snowy sky:


The sky is stitched with little embroidery knot snow.
i'm knot crazy! ;o)

& here's the steps that went into putting this jazz together...


1...Cuttlebug Challenge (Wednesday Inspiration #42: gatefold & digital)
2...Copics on white embossed image (with Digital/Stamped images)
3...cheap tricks: snowy scene with ripped Q-tip snow
4...gatefold construction (assembling bits & embellishments)

-1-
Cuttlebug Challenge Blog
Wednesday Inspiration #42 (Gatefold & Digital)

This was for the Cuttlebug Challenge Blog
Here's the challenge link

(#42 Gatefold for Friendship week)

It might seem strange that this was made for this week's the Cuttlebug Challenge Blog's Be Inspired Wednesday (#42) in honour of friendship week. "What?" You might ask; "isn't this a little frosty for friendship?" But my BFF Kimmy expressed a like for a card I made in these colours with this stamp, so winter it is! :O)

Hope you can play along with us!

-2-
Copic markers on white embossed digital image
(works on stamping too though!):O)


It uses a gorgeous digital frame created by Maggie (who is Mlamarre Designs). :o) The frame is embossed white--straight out of the printer-- and coloured with copics.

I know some of you stampers may be getting tired of digital image tricks, but please rest assured that this technique works with stamps & copics too! :O)


Step 1} Print & Emboss the frame. The metallic cardstock I used (Bronze Stardream cardstock from Paper Temptress) lets you emboss right out of the printer & white embossing powder shows up on the dark cardstock. It's like magic! giggle-giggle.

You could also emboss in silver or other colours, of course. I didn't worry about the dots of white embossing, since I knew I was cutting them away, but you could use an embossing buddy, if you're not lazy like me. :O)


Step 2} Colour the embossing with Copic markers (other alcohol markers might work too.)


--> Colour goes on surprisingly quickly (but avoid overworking so it doesn't muddy.) This might sound intricate, but it's super speedy. I'm just trying to share everything I can think of with ya...

--> Use your finger for speedy blending: smudge the copic marker with your finger right after applying a stroke of it. The ink will blend slightly and stay in nooks & crannies for a nice texture & softer lines.

--> Layer colours for shadows: Three turquoise shades were used on this to get shadows in the white embossing. To get shadows of the frame, I used a Dark Bark Copic right onto the bronze cardstock.

--> Please see the "disclaimer" below for ideas on how to preserve your Copic marker tips with this technique. :O)


Step 3} Cut the frame out. Use an exacto knife or hobby blade to cut the middle, if you like.


Step 4} Pierce it around the inside of the frame


Step 5}
Bead it (if you like)


(ways to preserve Copic tips)

-->Avoid colourless blender: It will smudge & muddy your white embossing powder. To pull colour or blend I use a lighter version of the colour I've applied (like a Frost Blue BOO to remove an Aqua BG15)

-->White embossing powder may come off on your Copic marker: To avoid wrecking your tips, you can use the chisel side (or broad tip) of the marker (which I hear many people never use anyhow.) :O)

-->My favourite alternative: If you have refills for your Copics, you can paint them right onto the embossing with a paint brush. I only have one refill--so far, hehehe.

-3-
...Snowy scene with ripped Q-tip glitter snow


  • Stamps (Winter Neighborhood)
  • A q-tip (cotton swab or cotton ball)
  • Adhesive (I like Crystal Lacquer)
  • Glitter
  • Sakura Quickie glue pen


Step 1} Stamp & colour a scene. This is Winter Neighborhood, by Eat Cake Graphics, from Paper Garden Projects. It's embossed with Chocolate Chip craft ink & clear embossing powder.


Step 2}
Add cotton & glitter:

A) rip the top of a Q-tip or cotton swab (or use a cotton ball) glue it onto the areas where you'd like snow. I used Crystal Lacquer for this.
B) sprinkle with glitter.

The cotton bits make fun chimney smoke too:


-5-
the gatefold construction:


This is basically two simple gatefold cards an outside one (white) and an inside one (blue) In other words, the blue one acts as a liner for the white one.) Lining it lets you stitch both of the parts & hide all the mess easily.


the outside gatefold:


To make the white outside gatefold card:

A) Cut a piece of white cardstock to measure 11 by 5-1/2
B) Score it at the 2 6/8 inch mark and the 8 2/8 inch mark & fold flaps in
C) Emboss each flap with a Cuttlebug embossing folder (this is Snow Dots)
D) Pierce along the outside of the 2 flaps & stitch it if you like

Since it's going to be lined you could add ribbon or other trim to the flaps:


I cut crochet trim in half & adhered it to the edges.

the inside gatefold (or liner):


Create a second gatefold to line the white one (scoring at the same spots--at the 2 6/8 inch mark and the 8 2/8 inch mark--and then dry fitting to see if it needs scoring again just beside your first score marks.)

Cut some patterned cardstock for the sky & sides. (The sky was cut with the cloud shape at the top & stitched with those embroidery thread knots for snow.)

the pocket:


The pocket was made by...

A) ...stamping the Winter Neighborhood on Neenah white & colouring it
B) ...cutting it out with a cloud shape at the top
C) ...adding some snow embroidery knots,
D) ...putting some quickie glue and glitter to the roofs etc.
E) ...sticking some lace on the bottom & stitching.

the sentiment:


The sentiment was...

A) ...printed the sentiment off the computer & cut up the words
B) ...stuck the words on some white paper & cut them out again (to make white frames)
C) ...stuck them on a card (with patterned paper & a curvy embossed white topper) (curvy template here)
D) ...stitched a bit (stitches on the curvy bit & at the top of the words)
E) ...backed it all with a plain piece of cardstock for writing on...

....then it can slide in the pocket:


the belly band:


To make the belly-band, I did this stuff:

A) Cut two strips of cardstock: the first measuring 2-2/8 x 11 inches (to fold around the card) and the second measuring 2-2/8 x 5-3/8 inches and as a panel on the front.

B) Scored the belly band at at the 2 6/8 inch mark and the 8 2/8 inch mark and again about 1/8 of an inch to the left & right of that-(makes room for the layers of the card) :O)

C) Cut a piece of BasicGrey Marrakech patterned paper to measure 2-2/8 x 5-3/8 inches, distressed the edges with a Dark Bark Copic marker, & adhered it to the front panel.

D) Adhered the image under the embossed frame & stuck it to the front of the belly-band.

E) Slid the belly band on over the finished card:


and that's it...


Hope all this chit chat had something useful for Ya! :O)