


Hope everything is wonderful with you. I'm so slowly recovering from moldiness, but I'm lucky to have lots of thrilling things to keep me upbeat...
For today's post, an ode to the printer. Hybrid stuff...
- 1 --> New Digital Images to Print: a Sale on everything in the store at The Little Paper Shop including the new digital Images (which are already so affordable.) Today's the last day!
- 2 -->Paper to Print 'em on: my invitation to You to join us for the Paper Temptress party on Paper Craft Planet tonight!
- 3 --> One way to print 'em: a hybrid technique embossing any image from your printer on Glimmer cardstock (my first Copic tutorial)
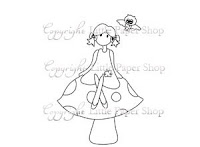
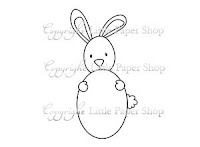
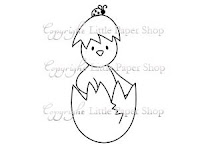
Digital Images to Print:
The sweetest new images are available digitally at LPS.
Click the pics to go to the store & check em out:


Paper to Print them on:
You know I love Paper Temptress papers. (The tutorial below uses one of their cardstocks.) They have so many stunning papers to choose from to make your projects unique. Now there'll be even more paper to tempt us! I'd love it if you'd join me & the DT...Here's an invite:
to All You paper lovers:
it's a Paper Temptress Parteh!
What:
1st: New Papers!!! Paper Temptress will be stocking 50 NEW kinds of paper this week
2nd: Paper Prizes & all the DT available in chats on PCP to dish about all the Paper Temptingness.
Sneakie Hint: There'll be a loverly variety of new papers for everyone--from you Copic Conoseurs or Watercolourists....to you Metallic Mavens and Divas of 3D Buildin' heehee ;O)
Why:
To celebrate the new additions, we're havin' a release party on Paper Craft Planet! Come & Join us (the Paper Temptress design team & other Peeps who are happily tempted by the love of Paper.) Everyone will be entered to win a package with a sheet of every single one of the new cardstock. (Two people will win that whole package of 50 sheets each.) That's a whole lotta gorgeous paper goin' on. :O)
When:
Tonight! Wednesday, February 25th, 8:00 PM Central time, (9:00PM Eastern time 7:00PM Mountain Time and 6:00PM Pacific Time.)
Where:
The Paper Temptress group on Paper Craft Planet.
...and now for those of you interested in a tutorial
One way to print digital images...
Embossing digital images &
Copic Colouring on Metallic paper:
Embossing digital images &
Copic Colouring on Metallic paper:
This will not be new to some of you at all, but I'm hoping it'll be something neat & new for someone out there to discover. I know that I thrill to my toes each time I try it.
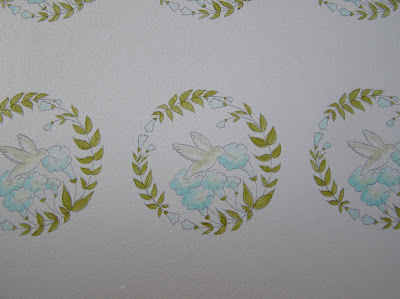
The image is one I drew a while ago, for my most lovely MIL Esther who loves hummingbirds. I scanned it & printed it onto gorgeous Glimmer Cardstock (Beargrass):

With the right cardstock, you can emboss any image from your printer.
My three favourites for this are:
My three favourites for this are:
- Glimmer Cardstock (which I used here; it comes in drool-worthy colours)
- Vellum cardstock (the classic in my book)
- Mica or Metallic cardstock (such vibrant colours!)
These papers let the printer ink stay wet for you to sprinkle embossing powder on.
Some tips that might work for you:

- Have your embossing powder & gun at the ready
- Print images on standard/fast setting (ink stays wetter)
- Sprinkle embossing powder on as soon as it prints
- Heat cardstock from the back first (avoids blowing ep off)
The Colouring:
Copics behave amazingly on this Glimmer cardstock, since they don't soak in. Which means:
A) They're easier to handle (no need to colour in circles)
B) You can capture "brush strokes" (like the little feather lines I got here)
C) You save a lot of that pricey Copic ink (the paper doesn't drink it in)
Perhaps the kewlest thing about Copics on Glimmer cardstock, though, is the glimmer. heehee. The snazzy shimmer of the paper lets the Copics float over it, and your colouring gains a sparkling H2Os quality. It's not too shimmery though, which seems classy to me.
Mixing Marker Mediums:
I may be a freak ;o) but I mix waterbased markers with Copics. It seems to work quite nicely and extends the colour range you have immensely.
Here's how I coloured this...
(Please click the pics if you'd like a bird's-eye view) ;o)
(Please click the pics if you'd like a bird's-eye view) ;o)
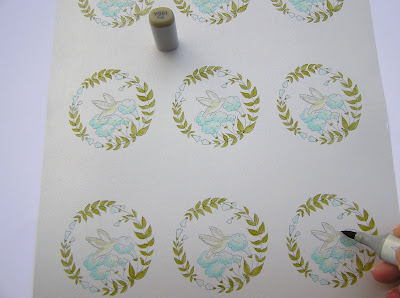
One of the awesome advantages to digi-images is that you can use photo software to print multiple images, so you can print off a full sheet of your image (and emboss them all in one quick go too!) This is embossed with clear embossing powder which made it look like embossed pencil (neato!)
If you colour all your images at once, you'll have a whole gift set (or a stash of images) in no time. Of course, you can divide them into groups for different colour variety too. I coloured mine all in olive & aqua for a set of giftie cards:

Step 1) Colour leaves with a Pale Olive YG-95 copic marker

Step 2) Colour flowers with a Frost Blue B00 copic:
I start with a light over all colour --leaving the center with no colour--and then add more of the blue to the parts of the flower that are closer to you (since dark colours appear to advance & that gives you more dimension.)

Step 3) Scribble Nile Blue BG45 onto an acrylic block or other slick surface (Scribbling on & picking up colour is a great way to get more of a range of colours out a smaller Copic marker Collection.)

Step 4) Pick up the nile blue ink off of the block with the lighter Frost Blue B00 marker & shade the flowers.

Step 5) Scribble Cadmium Yellow Y15 onto the block

Step 6) Pick up Cadmium Yellow with a colourless blender & colour the center of the flowers. This lets you create a super soft yellow out of a very intense marker.
Step 7) Colour parts of hummingbird with a Putty YG-91 Copic. Here's a close view of the putty colour:
and now for the water-based marker. This is a black from Close to my Heart:

Step 8) Scribble black marker onto the block.

Step 9) Pick the black up with Putty marker. Test it on a scrap & add in feather lines.

Step 10) To create a pink: Scribble & Pick up Lipstick Red L-29 with a colourless blender & add a bit of pink to the hummingbird.

Step 11) Scribble & pick up Moss YG-67 with colourless blender & colour a little of it onto the hummingbird
and that's that! :O)

Quick Links:
Little Paper Shop's New Digi Images
Paper Temptress Store
Paper Temptress PCP Party

Step 6) Pick up Cadmium Yellow with a colourless blender & colour the center of the flowers. This lets you create a super soft yellow out of a very intense marker.

Step 7) Colour parts of hummingbird with a Putty YG-91 Copic. Here's a close view of the putty colour:

and now for the water-based marker. This is a black from Close to my Heart:

Step 8) Scribble black marker onto the block.

Step 9) Pick the black up with Putty marker. Test it on a scrap & add in feather lines.

Step 10) To create a pink: Scribble & Pick up Lipstick Red L-29 with a colourless blender & add a bit of pink to the hummingbird.

Step 11) Scribble & pick up Moss YG-67 with colourless blender & colour a little of it onto the hummingbird
and that's that! :O)
P.S. Cathy at Paper Garden Projects has Copics on sale for 25% off (to counteract the price hikes. Yay Cathy!)
Quick Links:
Little Paper Shop's New Digi Images
Paper Temptress Store
Paper Temptress PCP Party


11 comments:
You always come up with the coolest ideas Mel! I will have to give this on a try!
What a fantastic idea. I have to try this out! It's a fast way to emboss a multiple amount of images! I love it.
Thanks for sharing the link to digital images. ..I think I may just have to check it out!
Thanks again for the great tutorial!
maria
Hi Mel, I popped on over to let you know that I have left you something on my blog and what did I get? A fabulous tutorial. I will now have to give this a go. How cool.
Cheers, Irene :)
That is very neat! Thanks for sharing your ideas with us.
Oooooh! Soooo pretty! Love this! You are so dang creative! : ) I posted some challenges on Ning! Come over and have a look see! Hope you are winning the war against all things moldy!
This will be a perfect technique for me so I will definitely try it! thx so much! Lovely work on your card!
Mel, you are a real artist! Love the bird! Thank you so much for sharing all of the tips and techniques!!!
Wow, Mel, more wonderful artistic images and a great tutorial! On the mold, you may already know this, but when I was exposed for over 5 year to it, the specialist I went to told me to take hot 1 hour baths to draw out the impurities. I was exposed to Stachybotrys, Aspergillus, etc. It took me a good year to feel half way normal! Well wishes your way.
Wow! Stunning images.
Hi Mel....haven't been in the loop lately because of family difficulties but you are still "wowing" everyone with your talent and your amazing generosity. You're gonna go far girlfriend!
Mary
www.primitiveseasons.blogspot.com
Wow! I am so impressed with your tutorial on your hummingbird coloring - what a brilliant idea to use the block! Beautiful work!
Post a Comment