1...how to make the zinnias image & the vellum sentiment
2...make the stitched bookmark
3...make a stitched notebook (& assemble the works) :o)
-1-
...make the image & sentiment
(zinnias in glass vases)
(zinnias in glass vases)
shiny! heeheehee

- Zinnas Cling Stamp
- Black ink & clear embossing powder
- Marrakech paper pack (Basic Grey)
- Paper piercer
- Turquoise & orange thread and a needle
- Double-sided tape
- Vellum cardstock
- White opaque marker (CTMH)
- Crystal Lacquer
- Copic markers
- Corner rounder

To create the image:
A) Stamp "Zinnias" & colour (these were embossed on gesso cardstock
B) Round top corners of the image
C) Colour. These were coloured with Copic markers: Apple Green G14 & Moss YG67, & Night Blue B97 with Aqua BG15 & Cadmium Yellow Y15 with Cadmium Orange YR07 & Lipstick Red R29. The table was shaded with Cool Gray NO3 C-3 & blended with a colourless blender)
D) Cover vases with Crystal Lacquer & let dry
E) Mat on pieces of paper (these are from the Marrakech Basic Grey 6x6 pack & they have their corners rounded too) :O)

To make the sentiment:
(that cheating way to make it look like you stuck little letter bits on) ;o)
Step 1} print sentiment on vellum cardstock (using a font you love. This was a typewriter font with round keys)
Step 2} Emboss the printer ink with clear embossing powder & heat set
Step 3} Cut between the letters to make them look separate
Step 4} Colour the letters & distress the vellum with a white marker...

Step 5} Adhere the sentiment to the back of your image & mat; then pierce (to stitch) if you like

Step 6} Stitch away

-2-

- Vibrant teal Prism cardstock
- Marrakech paper pack (Basic Grey)
- Paper piercer
- White & orange thread & needle
- Double-sided tape
- Tombow Monomulti

Step 1} To create a little Vellum Window for the top of the bookmark
A) Fold a piece of cardstock in half & punch with a keyhole punch (SU)
B) Sandwich vellum cardstock in the middle

Step 2} Pierce & stitch it (hiding stitches at bottom.)

Step 3} Add two strips of patterned paper on either side. This is Marrakech (Basic Grey 6x6 pack)

Step 4} Stitch all the way through the bookmark for double stitching (that will show nicely on either side. Just make sure your thread is long enough so you can....

Step 5} Hide the thread ends: tuck the end of the stitch under the patterned paper & hide by adhering (i love that tombow monomulti)

Step 6} Create a decorative panel for it & pierce it

Step 7} Highlight edges with a white opaque marker (CTMH)

Step 8} Stitch the decorative panel & Adhere it to the bookmark

Step 9} Glue on a matching flower.

- Vibrant teal Prism cardstock
- White cardstock (note paper)
- Scor-pal
- Paper piercer
- Turquoise thread & needle
- Marrakech paper pack (Basic Grey)
- Foam mounting tape or dimensionals...
- Scallop punch
- Key hole punch (SU) or any shape you like

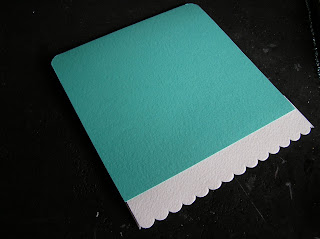
Step 1} Cut Vibrant Teal cardstock (to measure 11 by 6 inches)
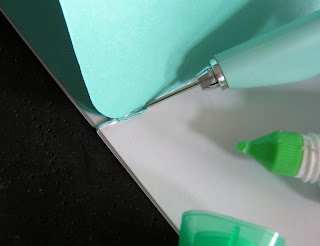
& Score and fold notebook cover & Adhere scallops onto ends

Step 2} Cut, score, fold & scallop the ends of white note-papers (I used 4 sheets cut to measure 11 by 6 inches & folded in half.) In hindsight, I should have rounded the corners, by the spine, too. I'll have to do that when I refill it for her. :O)

Step 3} Open note-papers to the middle (centerfold) and line up inside the notebook cover

Step 4} Pierce for stitching (or Sew on a machine, if you like)

Step 5} Remove the note-papers from book cover for a moment to start off your stitch knot it & adhere end

Step 6} Stitch the spine (of course you could use a sewing machine, if it can handle the layers. I am clueless in that department, so I stick to this.) :O)

Step 7} Hide thread ends after the final stitch

Step 8} Adhere a decorated panel to the front of the notebook. This is that BG Marrakech and some more stitchin'

Step 9} Dry fit the decorative bits-Line up the bookmark behind your image to see where to put foam tape

Step 10} Add foam tape to the back of your image (or dimensionals) with the bookmark in place. [I went a little nutso boingo here, hey?But Kat's worth at least a hundred and seventy three foam bits.] :o)

Step 11} Adhere the image (after removing the bookmark)


Step 9} Dry fit the decorative bits-Line up the bookmark behind your image to see where to put foam tape

Step 10} Add foam tape to the back of your image (or dimensionals) with the bookmark in place. [I went a little nutso boingo here, hey?But Kat's worth at least a hundred and seventy three foam bits.] :o)

Step 11} Adhere the image (after removing the bookmark)

Step 12} Slide the bookmark under the image
Thanks for visiting! Hope there was something useful to Ya in here,


.jpg)


12 comments:
Hello from Spain. I just discover you blog and its amazing.
Thank you so much for the work, for share and for teach us.
Another INSANE project!!!! This is such a showstopper!
Another INSANE project!!!! This is such a showstopper!
what a pretty gift and so much work & love went into it she will love it my b-day is coming LOL
Hugs
Norine
Beautiful as always...
Just lovely Mel! Great coloring of that glass! I think that line of BG paper is just so happy looking!
I think Kat will love this little booklet. Good for little reminder notes, shopping lists and much more.
Gorgeous as ever! You did a fantastic job of matching the colors in your stamped image to the papers.
Wow, Mel! You did a fabulous job! Your ideas are the best! Thank you for sharing it!
Wow-zers Girl, this is so cool, and you are amazing, Love it!!!
Mel, you must have at least 30 hours in your day... my day has only 24 hours in it. I'm so jealous! You are just full of great ideas!
what a fantastic project! I love how much you put into this and the results are amazing!
Post a Comment