First & foremost, I just have to thank you for making me all weepy-eyed-happy in a big way with your kind kind comments about the Cuttlbug DT. You are all just WAY too good to me & it makes my heart ultra happy! Thank You!!!!! OXO
...and now some paper schtuffs:

1...Ways to Cuttlebug without owning a machine
2...Creating a Cuttlebug Quilt
3...Cheap Tricks: Under-used folders & Scrap Use
4...Variations: add a fringe?
5...Digital Stuff: strip from vintage sewing pattern
6...Tool Talk: working multiple thread storage
-1-
Don't have a Cuttlebug, but you want the look?
Here are 5 ways to emboss without a machine:
Here are 5 ways to emboss without a machine:
1) Use a rolling pin (thanks All that Scraps!)
2)Use a pasta machine (thanks Valita!)
3) Dry emboss with brass templates and a stylus
4) Buy embossed paper (anaglypta/textured wallpaper is a great alternative that you can buy in bulk)
5) or you may want to borrow a friend's Cuttlebug (or big shot or what have you) to pre-make some squares to take home with you. You can make them in white & dye 'em with reinkers later (or chalk 'em up or whatever) :O)
-2-
...make a Cuttlebug Quilt.

QUILTING:
- Cardstock: Neenah White
- Patterned paper (from my beloved Urban Prairie 6x6 pack here)
- Paper piercer
- Anya stamp from here
- Dress template (from the post here)
- cardstock painted with gesso (to print dress)

Step 1) Emboss little squares. (These are 3 and 2/8 inches square)

Cutting: If you have a square punch, that's a speedy option.
Embossing: You can run more than 1 square through the Cuttlebug at a time.

Step 2) Adhere the squares to a mat (or cardstock piece) so you can hide the stitch mess on the back by sticking the mat to your card-front.
Avoid putting adhesive where you plan to stitch. {You could create a grid with your Scor-Pal, or scoring other methods, to help you lay your squares out evenly.}

Step 3) Distress the edges, if you like. I used my scissors along the edge.

Step 4) Sneaky time saver: If you have your layout planned in advance--and you know that you're adding an image over your quilt--you can save stitches by placing your image on the un-sewn squares and marking where you do not need to sew.

Step 5) Pierce around the squares & stitch away. Changing up colours is fun. :O)
-3-
(Under-used folders & Scrap Use)
Using your under-used embossing folders: This is really supah simple, but i had to share 'cause the cool thing about it is that you can use folders you might not normally use. Since you can use little portions of them you can omit seasonal things. For example, the somewhat Halloweeny folder in the photo here [the skull one (skeleton scroll)] i LOVE it for some things, but it can be pigeon-holed to halloween if you don't do the skull look. However, small squares embossed just using the little scrolls gives you elegant & simple squares (with no skulls). ;o)
Using just sections of neglected folders gives you a lot more variety. (Really, it's like having a brand new folder, and it has a more original look to it since it's a folder that people may not use a lot--sneaky, huh?)
Scrap Use: This is a nifty way to use up your scraps (especially wee bits of treasured patterned paper) :O)
-4-
-5-
This little bit is the section of a sewing pattern package
...please feel free to use it if you like. :O)
-6-
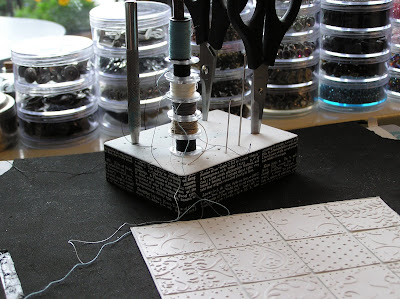
working thread storage
This foam pin cushion (and tool & bobbin holder) was made with some foam that came in decorative brad packaging (from the dollar store.) I just stuck the two rectangular foam pieces together & then wrapped it in black gaffer tape to dress it up. It also holds tools (paper piercer, scissors...) and it holds bobbins too.
To make a bobbin holder:
1} Create a foam pin cushion
2} Pierce foam with sharp object to create a pilot hole...
3} Insert in that hole: a paint brush, a pencil, or another dowel-like item that bobbins will fit on.
4} Slide bobbins (of the colours your using) over the brush/pencil
I like that the foam sits on my 12x12 fun foam piercing mat (which fits in my Scor-Pal.) It holds neutral threads on a regular basis for a quick grab.
Hope this chatter was handy in some way.
Thank you so very muchly for being You!


4 comments:
Mel You are very talented,this projects you make are awesome,would love to meet you in person,when I come to the coast the next time.
You are an inspiration to all of us.
Jocelan P
What a wonderful idea, this is fabulous. I just made a thank you card using this idea. Here is a link if you would like to see it.
http://karensinspirations.blogspot.com/
beautiful!! Love the quilt & armoire!
You are AMAZING!! your posts are always full of great information.Thank you for always sharing!
Post a Comment