


(This post ain't pretty it just feels that way)
You might be turning into a computer geek if...
You like the idea of
Multiple-image PDF making the really easy way!


from this:

(computer folder)
...to this:

(speedy multi-image PDF!)
(envelope liner tutorial & PDF download
available in the blog post here)

This is for any of You who would like to
make your own
one-page reference PDF of a project or tutorial,
but don't want to buy software,
upload photos, or mess around with formatting.
I was SO excited when this weird happy
little thing hopped into my head!

(for blogging tutorials)
I find it handy to name my photos with the
tutorial steps as the file names
then cut & paste that text from the file name
into a Blogger tutorial (it doesn't mess with formatting)
so taking it a little bit further this way
involves next to no work...

...make a speedy PDF:
Basically, it involves these steps:
A) Make a folder on your computer that contains the photo files that you want in your PDF & name the files appropriately (e.g. instruction steps for tutorials).
B) Set the file view to ‘extra-large icons’
C) Take a screengrab (with one click of the PrtScn button on your keyboard)
D) Paste it in Photoshop (or the like)
E) Tweak the size, add a little info, & save it as a PDF.
B) Set the file view to ‘extra-large icons’
C) Take a screengrab (with one click of the PrtScn button on your keyboard)
D) Paste it in Photoshop (or the like)
E) Tweak the size, add a little info, & save it as a PDF.
Here's the PowerPoint with
step-by-step directions:
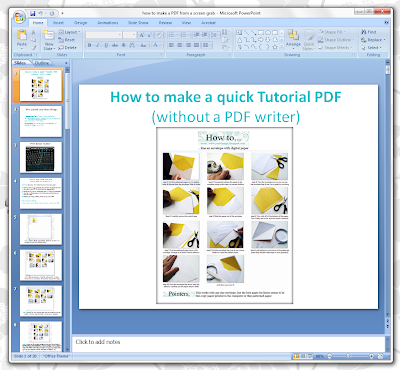
Click the picture if you'd like to download it.
I've done this tutorial as a PowerPoint because it's easier
to see how to do every little thing in that larger format
but
if the PowerPoint presentation doesn't float your boat,
and you'd like to see it another way, then
please just let me know.
Hope you can use this!

P. S. Don't have PhotoShop? Gimp is an open-source (shared for free) photo editing software that you can download here.
P.P. S. I still have some fun Amber Ink cards to share
with Youse this weekend; it's just been a very hard week.


10 comments:
Thanks for the tutorial Mel. You always have such great instructions. I am looking forward to taking a minute to try this. I hope you weekend is better than your week was. Hugs,Kathy
You are awesome to share this!!!
LOL you used PrntScrn for this!!!! How genius!!!
oh and thanks for the quote Mel and the wonderful comments. Made my day.
I LOVE it when things just "pop" into your head!!! No time now, but I'll be studying this and for sure using it...just like so many of your other ideas!!! pure genius, gf!
hope your weekend is M free!
xoxo
that is absolutely brilliant! Thank you!
how cool! thanks so much for sharing your tips... happy weekend my friend! malia
This is so cool! I have spent hours trying to make sure pictures were all lined up neatly. Great tutorial. Now, how do you get a screen print of all of your pictures if they don't all show up on my screen? Do I just have to paste them together?
Thanks for the tutorial. I have to try it this weekend. Hope the rest of your week is better.
Cool, thanks! I <3 GIMP.
Post a Comment