


Do you line your envelopes?
Or have you always wanted to?
Confession time... I want to line envelopes; I just never do.
There are so many great envelope liner tutorials out there that
show you how to get fun looks with things like maps, comics and the like,
but I'm usually too lazy to worry about envelopes at all
let alone lining them.
But I finally found a way that is so easy
(and gets done in about a minute)
so now I can be lazy & stylish! ;O)
...make a quick liner for any envelope:

A) Cut patterned paper to fit inside your envelope.
B) Trim the patterned paper-along the flap shape.
C) Pull the patterned paper out & trim a bit off of the straight bottom.
D) Put it back in the envelope.
E) Fold the flap over to get a nice fold.
F) Add adhesive to the back of the patterned paper flap.
G) Then simply press the flap down to finish it.


Step 1) Cut thin patterned paper so that it is slightly taller & thinner than your envelope. Slide it inside the envelope.

Step 2) Temporarily adhere the patterned paper to the envelope. If you like, you can use scotch tape, to prevent shifting.

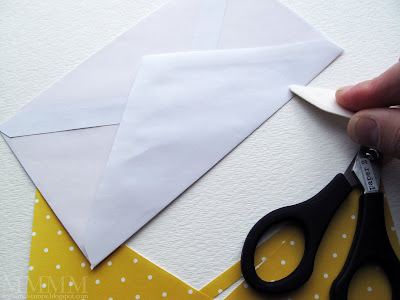
Step 3) Cut the excess patterned paper away. Turn the envelope over so you can see the envelope flap & use it as a guide to cut (and mimic the shape of the envelope flap.)

Step 4) Carefully remove the scotch tape.

Step 5) Slide the paper out of the envelope.

Step 6) Trim a bit off of the bottom of the paper: Trim a little at a time, then test it out for fit in the envelope and trim it more if need be.

Step 7) Put the patterned paper back in the envelope. Arrange so it doesn't block the adhesive that is on the envelope flap. (If the patterned paper does block the adhesive too much, then just trim off a little more.)
step 8) Fold the envelope flap over & press to create a nice crease in the patterned paper (use your hand or a bone folder).

step 9) Add adhesive to the back of the patterned paper flap (double-sided tape or even gluestick.)

step 10) Press the envelope flap down onto the adhesive (making sure that the paper doesn't shift).

 Thin paper seems to fit & fold much nicer than thicker paper. You can print digital paper or even print images or photos out onto copy/text-weight paper. You could even scan your favourite fabric or anything else to make images to print out for unique looks.


P.S. Want to make your own custom envelopes?
100+ envelope templates & projects here:

(and gets done in about a minute)
so now I can be lazy & stylish! ;O)

...make a quick liner for any envelope:

It's speedy! Takes more time to read this than it takes to do it. :o)
A) Cut patterned paper to fit inside your envelope.
B) Trim the patterned paper-along the flap shape.
C) Pull the patterned paper out & trim a bit off of the straight bottom.
D) Put it back in the envelope.
E) Fold the flap over to get a nice fold.
F) Add adhesive to the back of the patterned paper flap.
G) Then simply press the flap down to finish it.

- An envelope (in any shape or size)
- Thin patterned paper
- Scissors
- Scotch tape, double-sided tape or glue stick
- optional: bone folder & paper cutter

Step 1) Cut thin patterned paper so that it is slightly taller & thinner than your envelope. Slide it inside the envelope.

Step 2) Temporarily adhere the patterned paper to the envelope. If you like, you can use scotch tape, to prevent shifting.

Step 3) Cut the excess patterned paper away. Turn the envelope over so you can see the envelope flap & use it as a guide to cut (and mimic the shape of the envelope flap.)

Step 4) Carefully remove the scotch tape.

Step 5) Slide the paper out of the envelope.

Step 6) Trim a bit off of the bottom of the paper: Trim a little at a time, then test it out for fit in the envelope and trim it more if need be.

Step 7) Put the patterned paper back in the envelope. Arrange so it doesn't block the adhesive that is on the envelope flap. (If the patterned paper does block the adhesive too much, then just trim off a little more.)

step 8) Fold the envelope flap over & press to create a nice crease in the patterned paper (use your hand or a bone folder).

step 9) Add adhesive to the back of the patterned paper flap (double-sided tape or even gluestick.)

step 10) Press the envelope flap down onto the adhesive (making sure that the paper doesn't shift).
...and there you have it:

 Thin paper seems to fit & fold much nicer than thicker paper. You can print digital paper or even print images or photos out onto copy/text-weight paper. You could even scan your favourite fabric or anything else to make images to print out for unique looks.
I used cute polka dotted


(Here's a one-page reference sheet)

Next time... a speedy sneaky trick for making
quick multiple-image Tutorial PDFs like the one above.
No PDF software needed (just Photoshop or similar software)
quick multiple-image Tutorial PDFs like the one above.
No PDF software needed (just Photoshop or similar software)
P.S. Want to make your own custom envelopes?
100+ envelope templates & projects here:


29 comments:
I've never made envelope liners. Now I will cause you've showed me an easy way! And given me 100 custom envelope tutorials as well! Thanks!!
What a GREAT tip, thank you!
Can't wait to try this.
Thats a great workshop. Thank you
Okay, I'm in the midst of making my son's birthday invites and had to line my envelopes after seeing this. Loving it!! Will give you some link love next month when I share the project! :)
Thanks, Mel! That's simple and fast enough that I might actually do it!
R/
Fantastic tutorial. I have not thought to do this before but will now definetly give it a try. :-)
Holy Cannoli~ this is SO So cool. In college my fave envelopes from my mom were created from trendy Seventeen magazine pages w/a big cheap office addy label plastered on top. As a Hawaii girl my fave was to mail a hand painted coconut w/a big cheap office addy label plastered on top. I tend to be cheeky, so this is a classy in between. I'll play w/this. I love it.
Fabulous Mel. Thanks!!
I've always avoided lining my envelopes because of the fiddliness, but your tutorial makes it so easy. Thanks so much, you're awesome!
Well, this is one of those now why didn't I ever think of that?! LOL Thanks, for the great tip. The pictures were great!
I love this project, the envelope turned out super cute, thanks for sharing this great tutorial!! :)
Well, Mel, you did it again. Thank you for the cool, and wonderful, tutorial. You're good.
I love the look...why don't I take the extra time to do this!! yes, laaaaazzzy! you've inspired me once again, kiddo!
xoxo
Holy, moly! This is so stinkin' EASY now that you've given us pictures. I think I've just decided to use up ALL of my hoarded DSP! Whoot!
Mel you are so sweet for giving us these instructions and the one-page reference sheet too! Thanks so much - a brilliant idea and so easy (when you know how!)
Thanks for another brilliant tutorial, Mel, and thanks for the free pdf download too. I've lined envelopes in the past and always forget how to do it and spend ages trying to find some instructions! You're a wealth of information and your blog is very useful!!
Great Tutorial! Thanks!
Blessings Bernie
Love the one page reference sheet. I truly appreciate the multitude of ways you give us to complete a project; I can read, I can rad and complete step by step or I can use the one page. You are extremely generous with your brilliance.
Regena
Thank you so much! What a wonderfully clear descripton. Pinned this and will blog about it later this month!
I've always wanted to do this. Great post!
What a fantastic easy way to do this!
I just love your idea! Thanks.
Mrs Busy
thank you, love this :)
Such a lovely simple post...got to try this:)
Wow Mel - you have solved my envelope lining problem... I used to try and cut out the paper flaps a bit lower that the edge of the flaps - and of course, i'd always cut them wonky and off angle because I hadn't used your method or cutting flush with the flaps then trimming off the bottom instead. Genious. You're just one of those people that would find a perfect and easy to do solution to anything - your blog rocks... so does the different ways in which you teach us things - you might not appreciate that you are teaching people things and passing on your brilliance all over the globe - and this is one happy crafter in the UK saying a big massive thank you. That goes for everything on your blog because I subscribe and enjoy reading all your tutorials, even if I never do them.
Thanks again,
Paula Gale, (Chesterfield, Derbyshire, UK)
I know an even easier way.. have your talented friend Mel do them for ya. hee hee. Where is the posting of the lovely cards you made me to give as thank you cards to the ladies that hosted a Lia Sophia jewellery party? Those are fab!
Hi Mel, I found this link via pinterest. I love love love this post and was suprised to see its age :) I have linked it to my new blog, I have given you credit. hope you don't mind! Jodie
Excellent Excellent Excellent!!! Thanks so much Mel :)
This is a lot easier than the way I have been doing it. Thanks you Mel. I will be doing it ths way from now on for sure.
Post a Comment