


Do you love hybrid crafting?
I've been bonkers for it for ages, so wanted to share this
digital technique with you, even though these cards were made quite a while ago.
The technique is basically: filling part of a digi image with pattern & adding colouring.

Do you want to know a little known secret? Something that I sorely regretted
not having the time to blog way back when... I had an article published
in this December 2011 Papercraft magazine issue (my very first official publication!)

Papercraft Inspirations is one of my favourite magazines. They share so
many free templates and printables and tutorials. And there's always
something in there that makes me wish I'd thought of it.
So when, in the summer of 2011, the deputy editor Ruth Southorn asked me to write a tutorial for the magazine on hybrid cards in a traditional style I said 'absolutely!' And then I asked the amazingly talented Tammy (of A Day for Daisies fame) if she would be interested in drawing some traditional Christmas images for the article, and thank goodness she said 'yes!'
So, here are her beautiful images turned into hybrid cards - with all the details...
Peace & Joy:

The image is from A Day for Daisies and it's called

& the sky is patterned with my pencil damask pattern digital freebie
from this post in 2500px size for Photoshop brushes:
from this post in 2500px size for Photoshop brushes:

If you'd like to see a tutorial showing how to make your own
custom own photoshop patterns, you can find that here.

I used the Robin in Winter image again on the inside of the card, where you'd write
your greeting. (It's lightened to a very pale grey & I added some scorelines for a frame):

Here's a little look at the colouring and detail:

I shaded the sky with pale pink copic markers and the fence with browns. For snow,
I added some daubs of acrylic paint with glitter pressed into it while the paint was wet.
The fence posts were really easy to colour because they got all of their detail from filling with
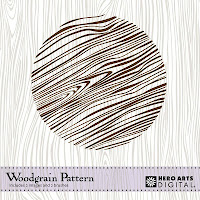
a Woodgrain Pattern digital image from Hero Arts (not sure if it's available anymore, sorry)...
I shaded the sky with pale pink copic markers and the fence with browns. For snow,
I added some daubs of acrylic paint with glitter pressed into it while the paint was wet.
The fence posts were really easy to colour because they got all of their detail from filling with
a Woodgrain Pattern digital image from Hero Arts (not sure if it's available anymore, sorry)...
I pierced holes and stitched on some tiny iridescent beads for falling snow:

The sentiment was printed from the computer & heat embossed using Borden & Riley's Paris Bleedproof paper for pens. (There's more info on how to digitally emboss using that paper here.)

• "Robin in Winter" Digital image, from A Day for Daisies
• Hero Arts wood grain digital image, from Two Peas in a Bucket
• Pencil damask image
• White cardstock, Inkjet printer
• 140lb Watercolour paper
• Baja Breeze cardstock from Stampin' Up!
• Copic Markers: Cool Gray No. 1; Warm Gray No. 3; Warm Gray No. 7; YG91 Putty; E29 Burnt Umber; R35 Coral; Colourless blender
• White thread; metallic seed beads; a thin needle; paper piercing tool
• Versamark ink; white embossing powder; heat gun
• White acrylic paint for snow
• Impression Obsession Tapestry -Cover a Card background stamp
• Font for Joy & Peace sentiment: Garamond 14
Seasons Greetings from Our Family to Yours!

I coloured the image with copic markers and added dots of snwo in the sky with
a white Sakura gel pen. Then I added sheer glitter along the fence top snow.
This image is also from A Day for Daisies and it's called

The trees are digitally filled with pattern
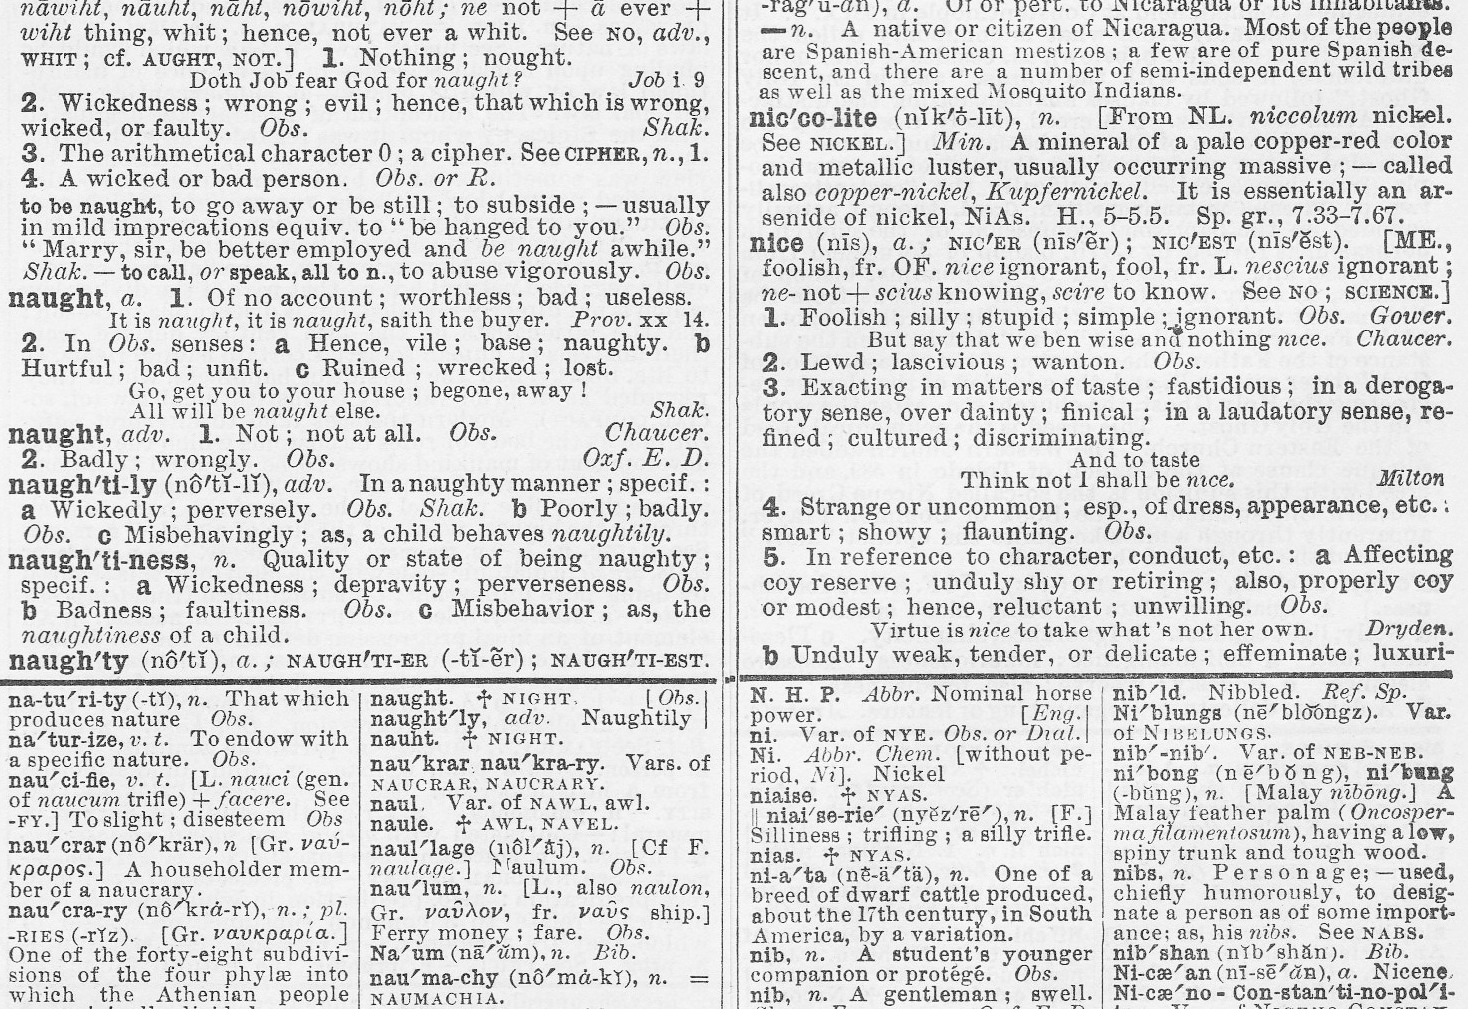
this 'naughty or nice' antique dictionary freebie:

available here (high resolution, sized 2199 x 1878 pixels).
...or here on flickr in different sizes
...or as the original full page scan of the dictionary page here
(and the original here in different sizes)
There's an A2 card sized version here:
or the A2 size is also here on flickr
There are also some 'Merry Christmas' dictionary papers here:


This digital work is offered up for free, but mainly for personal use only.
Please do not use these to make digital papers or kits for sale, nor mass produced items.
& Please be sure to read my terms of use here. Thanks!
& Please be sure to read my terms of use here. Thanks!
The text looks kind of like birch bark detail (I added shading with a light
brown Copic marker to the tree trunks to play up the birch look):

Again, I lightened the image & reversed it for something different inside the card:

I also used Five Robins in Winter to make a little Thank You card:

(It was so speedy to make!)
• "Robin in Winter" Digital image, from A Day for Daisies
• Digital Patterns: Hero Arts wood grain digital image and Merry Christmas dictionary definition
• White cardstock, Inkjet printer; 140lb Watercolour paper
• Cookie Crumb and Basic Black cardstock from Stampin' Up!
• Copic Markers: Cool Gray No. 1; Warm Gray No. 3; Warm Gray No. 7; YG91 Putty; E29 Burnt Umber; R35 Coral; Colourless blender. White Sakura Soufflé pen for dots of snow
• Textile Texture Cuttlebug embossing folder
• White thread; sewing needle; paper piercing tool
• Crystal Effects Lacquer glue and Iridescent Ice glitter
• White May Arts 3/8 inch Sheer polka dot Ribbon
• Font for sentiment inside "Season's Greetings... From our Family to Yours" Harrington (size 14)
A Visit with Father Christmas:

The digital image is from calledA Visit with Father Christmas. (Though it appears to be
discontinued. Tammy does take custom orders though, so perhaps she might still sell it...)
discontinued. Tammy does take custom orders though, so perhaps she might still sell it...)

The wall paper is a Hero Arts floral background pattern
from their older digital set called Just for You (discontinued I think...)

And here's a little close-up of some of the digital pattern filling
(Santa's list was filled using my 'naughty or nice' antique dictionary scans from above):
(Santa's list was filled using my 'naughty or nice' antique dictionary scans from above):

It was such fun to combine Copic marker colouring & glitter with digital pattern!
And the best part? The talented Jenny turned my tutorial and A Day for Daisies' Father Christmas image into a video using Photoshop elements. She did an amazing job (I hope to be able to make videos even half as good as Jenny's one day). 
The Damask pattern Jenny used in the video is another freebie
I made to share with you, and it's available at the bottom of this post, here:

• "A Visit with Father Christmas" Digital image from A Day for Daisies
• Other digital supplies from Two Peas in a Bucket- Carpet: Jen Allyson "Formal Affair Papers (lace)" Wallpaper: Hero Arts "Just For You" (pattern colour changed) Green paper printed solid digital paper: Jen Martakis Two peas "This Year" solid papers.
• Naughty & Nice text pattern scan of an antique dictionary (a scan of my antique dictionary).
• Spellbinders Nestabilities Labels 5 die
• White cardstock; Inkjet printer; Watercolour paper; real red cardstock
• Impression Obsession Craqueleure cover a card background stamp; white pigment ink; clear embossing powder.
• Green embroidery thread; white thread; paper piercing tool; needle; double-sided tape.
• Copic Markers: Cool Gray No. 1 and no. 5; Warm Gray No. 1 and No. 3 and No. 7; YG91 Putty; R29 Lipstick Red; R35 Coral; R59 Cardinal; RV29 Crimson; YG23 New Leaf; BG15 Aqua; E50 Egg Shell; E00 Skin White; RV02 Sugar Almond Pink ; E71 Champagne; E44 Clay; B00 Frost Blue; BG10 Cool Shadow; Black 100; Colourless blender. Silver metallic pen.
Anywho, sorry for the datedness of some of this info; I'm trying hard to exile the perfectionistic meanie-pants who lives inside my head and keeps me from sharing things, by just going for it (no matter the flaws in things or the digital papers that are no longer linkable and so on...)
Hope your days are filled with craftiness & joy,

P.S. Don't have Photoshop? You might want to try gimp which is a free opensource program that's very similar.Here's a tutorial on youtube for how to fill with pattern using gimp
P.P.S. If you want to see more back issues of Papercraft magazine, you can find them here.


18 comments:
OMG- I am not sure I will be able to follow all of the steps here-but will bookmark it so when my daughter is home at Christmas from college she can help me! OMG you are so brilliant!!! Amazing! Thanks for all you teach and share : )
Holy Wow! These cards are so adorable and so kewl! Thanks for sharing all the images and for taking the time to give detailed instructions.
Thank you so much!! Becoming Photoshop literate is on my bucket list - your tutorial will be so helpful when I finally put my big-girl panties on and take the plunge.
Oh my dear Mel!! You are always amazing me... you always leave me in such awe and admiration!! YOU are such an artist and so unbelievable. Thanks for the delight in each post. Hope all is well and good and happy with you. Any time you are ready to create the offer is always there. Big hugs, Kathy
oh.mi.gawsh!!! This is amazing!
Wow! You are so good with computer and so crafty with all the new techniques you create, Mel!
I didn't know you was published in this magazine, I can imagine how you felt when they asked to write an article.
I am glad you continue blogging and inspiring others!
your cards always amaze me! Thanks so much for sharing so much!
Gorgeous, Mel! They SO deserved their own (expansive!) article!
Mel,
Congratulations on publication of your paper in this excellent magazine. We who live in other countries are happy for his publications on the blog as well have free access to their beautiful creations.
Thank you and many successes is what I wish for you here in Brazil!
I've said it a gazillion times... I love how your brain works! I imagine steam pouring out at all hours!!! If I only had the tip of your pinky fingernail's talent, I'd be a happy camper!
Fab designs, congrats on that first pub....
I've learned soooo much from you, I'll be studying this....
big hugs, kiddo!
Congratulations!!!! Your work is just amazing.
wow, congratulations!!Thanks for sharing all the images and for taking the time to give detailed instructions.
Your cards are beautiful, Mel. Love how you used the fills in your backgrounds--absolutely brilliant. Thank you so much for your generosity in sharing tips and resources. Your talent is beyond inspiring.
And congratulations on being published!
Wow, beautiful cards!! Thank you for the freebie papers too. I just made my first hybrid last night!
So beautiful...this is why I wait for your posts with baited breath! :) Hope you are feeling well these days!
A great post Mel! And Oh I must get that Robin digi...gorgeous!
Well if that's not the most thorough and beautiful blog post ever, I don't know what is!
Thank You Mel. Your cards are amazing, you are amazing!
Hi Mel! First off thank you for your visit to my blog. I have been following you for a long time. :-) I wish I understood how to use PS as well as you do. Thanks so much for the great tute. I'd like to give it a try sometime. Hugs!
Post a Comment