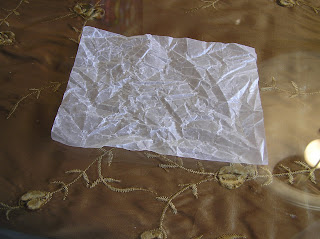
More Mod Podge & wax paper! This weird little technique offers a way to get more mileage out of those adorable Cuttlebug border sets. The border folder I've used here is part of the Frills Embossing Folder Border Set.

- Cuttlebug border folder (or full size)
- Cardstock
- Waxpaper (or tissue paper or wrinkled vellum for a different look)
- Mod Podge & an old brush
- Ink
- Sanding block

Step 1) Cut & wrinkle wax paper

Step 2) Cut cardstock & apply a good coat of Mod Podge Matte. It dries fairly fast, so working quickly is important.
Please note: It's a good idea to use an old brush (Mod Podge will wash off, if you get it asap, but it is hard on the brush)

Step 3) Smooth wax paper down while Mod Podge is still wet & sand

Step 4) Ink it up (I used Sahara Sand ink by Stampin' Up!)

Step 5) Sand the wet ink

Step 6) Sand it & ink some more

Step 7) Cuttlebug it with borders sideways. (I wasn't worried about lines since they added more shabby to the chic.) ;o)

Step 8)I nk the cuttlebugging. Any ink seems to work fine.

Step 9) Sand it. Repeat inking & sanding, if you like.
Here's a close up of the texture:
Click if you wanna see it even closer. ;o) It looks kind of marble-y
in person. It's pure craziness how that Mod Podge really really holds the embossing deeply.

If you trim your piece to put on a card you can use the scraps too: one way to use 'em is to colour the scraps with alcohol/solvent inks to create a matching accent:

I coloured this piece with Brown Copic, Brown Stazon, & Stream alcohol ink. Messy, but fun! These two strips will be covered by that embossed ribbon on the right. (If you'd like to know how to emboss ribbon with no starch, pop by next post.) :O) This schtuff will morph into a finished card then. ;o) It took me all day & I ran out of sunlight to shoot it...
-->More ways to use those border
embossing folders here:

-->Other Mod Podge posts here:
- Mod Podge Paper (verdigris coloured with alcohol inks)
- Mod Podge wax paper fresco (this uses any old dye ink so it's way less messy than the one with alcohol inks.)
- Mod Podge, tissue paper, & Shimmerz (to emboss)
- Decoupage Nestabilities hands-free Storage (cork board)
- Mod podge to make DIY embossing plates (with cereal boxes)
- Mod Podge Grungeboard embossing plates


19 comments:
brilliant gleaning there grasshopper!!
It's a t'riffic tutorial Mel - TFS! I'll post again when I try it out!
Goodness...every time you post I keep thinking...she must dream this stuff in her sleep LOL! I bet you do ha...
Wow this is such fantastic info and creativity Mel, I will HAVE to try this thanks for inspiring, gorgeous texture ♥ HuGs Kim x
How do you think up your ideas Mel?
Thanks for this one, I may give it a go as it looks great.
Cazzy x
Great technique Mel! How do you even think these things up???
FIRST TIME I SAW A SHOT OF CUTTLEBUG,LADT LOVE
Holy Cow!! I am going to have to try this one. You do have the best Ideas.
Thanks for sharing:)
I have to tell you: I LOVE your work. So detailed. Thanks so much for sharing them. -luiza
I have so missed visiting your blog !
Thanks for sharing yet another fab technique , Mel !
I missed Donna Downey's Fabric Scrapbooking workshop here in Singapore this weekend so I think I'll comfort myself trying out some of your Gesso & Cuttlebugging techniques in the near future ! lol
Very cool technique Mel! TFS!
smiles,Deena
Mel,
as always YOU ROCK!!!
Love your creative spark and all great techniques you have been sharing on your blog.
I'm glad you got a Cricut Expression as a BD gift. From now on we will wait for more awesome crafts from you.
I'd like to suggest you to get Sure Cuts A Lot program too...so you can be free to cut any design you like not only from the Cricut Cartridges.(no affiliations here).
Meanwhile you can take a look at:
http://forums.surecutsalot.com/
and register in order to see how many crafters are sharing wonderful cut files.
Happy cutting,
paulo/brazil
http://tinyurl.com/czqfk7
WoWzA, Mel-a-Licious, this is w-a-y to kewl fer skewl!!
I gotta try this idea of yours; thanks for sharin', Kiddo!
Hope all is well with you?!?
~Huglettes!
Mel- I loved this so much I used it to make a mini birdhouse- and linked to your wonderful tutorial http://lauriewe.wordpress.com/2009/04/25/cuttlebug-challenge-be-inspired-28/
Wow! This idea is terrific!
Thank you so much for showing it!
Just wanted ya to know that you enabled me more times than I care to count. the latest...I just ordered the Copic multi-liner pen and a Tim Holtz ruler. Recently, you have hooked me onto the Paper Temptress line of cs. It's awesome. I told her you sent me.
Hope she gives ya a discount. With your many recommmendations for products, I'm sure there will be more.
Thank you Mel, lovely technique! I found it through one of DawnL's cards as she was featured stamper at SCS yesterday and I used it to make my "inspired by Dawn" card which is here at SCS if you'd like to see!
Genial! I love your wonderful Backround Ideas!
You have amazing techniques! Can't wait to see what else you create. Thanks!
Post a Comment