


I'm so lucky that You're so bloomin' wonderful!

(MFT Pure Innocence 4 leaf clover turned flower)

(MFT Pure Innocence 4 leaf clover turned flower)
Hey, You lovely crafty people You! Thank You so much for your continued wonderfulness. I feel so stinkin' lucky! You're beyond amazing. I went for a fabulous walk on the trails near us the other day & have been getting things in order around here: taxes; cleaning; unpacking some more; enjoying Mouse's antics. It's great!

This project came complete with one of those "DUH, Why on earth did it take me so long to think of that" moments....
You guys know I love a collage texture look, and I've rambled on in the past about how it can make faces look splotchy when you stamp on it, and about how you can use paint to fix that...
Well for this, I just collaged the background & did the Pure Innocence figure normally on regular paper; then, cut her out and stuck her on.

Et voila! No blotchy complexion! (DUH! Something that probably occurred to all
of y'all a million years ago, but I was excited. LOL)
of y'all a million years ago, but I was excited. LOL)

Today's way to "work smarter not harder" is to try what some crafty gurus of mine seem to have mastered: combining challenges. Is it a major no-no? I'm not sure, but here it is anyhow... lol
So, this card & how-t0 is for both...
This is for the

Core-dinations Monochromatic
Challenge here.
Sponsored by

&
this is inspired by
the Cuttlebug Challenge Blogspot
Shadow Box Challenge #80 which you can see here.
&
There are some fabulous tutorials by Maggie here & Tammy here.
I didn't get my photo to Meda in time to join in on the Cuttlebug Blog (sorry Meda) but I did want to try and get back into the swing of the challenge thing by posting this tutorial even if it was late. Challenges add so much zeal to your crafty life, don't they?

...make this collage shadow box:

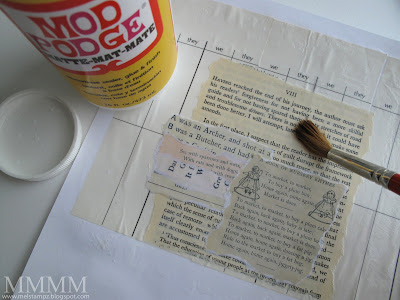
Step 1) Glue some torn bits of paper to a piece of cardstock (I used Mod Podge matte; I wish I had the acid free Mod Podge. Next time I get a Michael's coupon.) ;o)
(These papers are from an old book & that Nursery 12x12 paper from my way too sweet BFF Kim.)
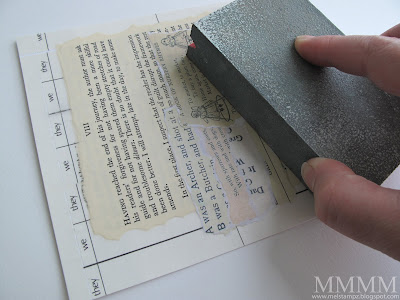
Step 2) Allow the Mod Podge to dry & sand it a little.

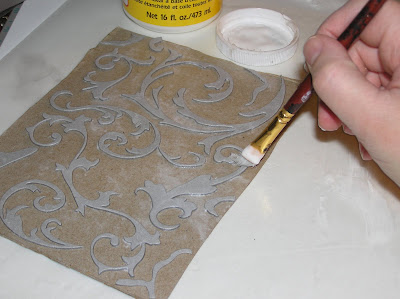
Step 3) Paint on a thin layer of white acrylic paint (to reduce the contrast a little & let your image stand out.)
Here's a photo of the texture
(click to see it big in Blogger, if you like)

Yay for paint! :o)
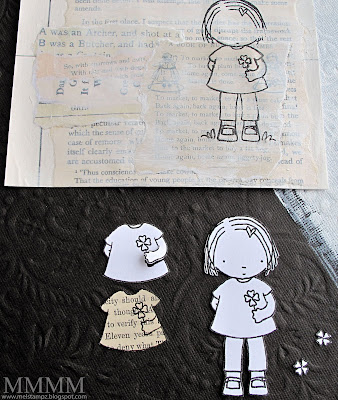
Step 4) Stamp these images (with the one MFT stamp):
(I used the MFT Pure Innocence 4-leaf clover clear stamp set (but made a flower out of the clover instead & heat embossed these all in black ink with clear embossing powder.)
(The only slightly tricky cut was her arm)

In the photo above: the dress in white cardstock with the arm raised (one cut so it will sit over the paper pieced dress)

In the photo above: The shirt/dress paper pieced on book paper.

Step 5) Use the stamped body as a guide to position & stick on torn tissue paper (to make texture for the ground & clouds.)
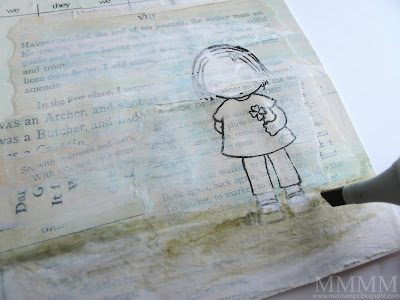
Step 6) Shade the ground.
Little tip for colouring on paint/mod podge: I used the chisel/broad tip of my copics, since that's the end I reserve for potentially messy colouring; the paint/mod podge might clog the tip. You could paint on refills or use a dedicated "messy" colourless blender to pick up Copic colours that you have scribbled on a block.
Or you could use markers other than Copics. Some other marker types (like SU/Tombow) may require embossing with clear embossing powder when they're added over paint/gesso/mod podge.)
Acrylic paints would work wonderfully.

Step 7) Glue full image onto the background & colour lightly

Step 8) Glue the white dress on (with the arm lifted) & then glue the book page dress over that.

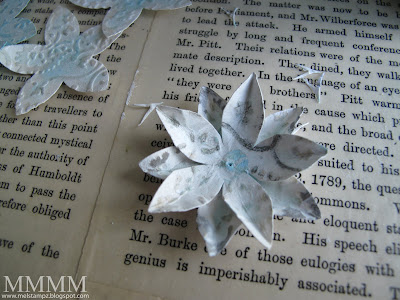
Step 9) Glue one of the clovers on (coloured blue to make a flower instead of a shamrock)

Step 10) Glue on a second shamrock on to finish the flower (I also stitched on a teensy seed bead & added a wee leaf (doodled & cut out)

Step 11) Shade the clouds with pencil & add white details: The pencil is smudged using my finger tip & I added white raindrop & grass details with a white Souffle gel pen
Here's a close up of the pencil & Souffle pen details:
(click to see it big in Blogger, if you like)

(the Souffle pen is by Sakura. It goes on clear & dries white)
Step 12) Pressure emboss part of the image (I used a homemade grungeboard embossing plate (above). Details on how to make it here. It left a subtle impression since I didn't wet the cardstock...

Step 13) Sketch shapes around the image & the embossed texture and pierce: I sketched a cloud shape & a line for the ground & pierced holes along the sketched lines with a paper piercing tool.

Step 14) Stitch the scene with embroidery thread.

This is for the
Core-dinations Monochromatic
Challenge here.
Sponsored by
&
this is inspired by
the Cuttlebug Challenge Blogspot
Shadow Box Challenge #80 which you can see here.
&
There are some fabulous tutorials by Maggie here & Tammy here.
I didn't get my photo to Meda in time to join in on the Cuttlebug Blog (sorry Meda) but I did want to try and get back into the swing of the challenge thing by posting this tutorial even if it was late. Challenges add so much zeal to your crafty life, don't they?

...make this collage shadow box:

- Core-dinations Jenni Bowlin Studio Core Impressions Collection
- MFT Pure Innocence 4-leaf clover clear stamp set...
- ...stamped on Perfect paper panels
- ...with Black Brilliance ink, clear embossing powder & a heat gun
- Heavy weight 100lb white Sweet tooth cardstock (to glue everything to)
- Mod Podge & a brush to collage: Old book pages, Nursery Boy RP 78 paper by the Bottled Image Paper Co., vintage bridge score sheets, & white tissue paper.
- Sanding block, White acrylic paint, Copic Markers
- Paper cutter/Scissors, Scoring tools, Paper piercer
- Glue Glider Pro Perma Tac, Beacon's 3-in-1
- Paper piercer, needle and blue & beige embroidery thread, seed bead
- Homemade flowers

Step 1) Glue some torn bits of paper to a piece of cardstock (I used Mod Podge matte; I wish I had the acid free Mod Podge. Next time I get a Michael's coupon.) ;o)
(These papers are from an old book & that Nursery 12x12 paper from my way too sweet BFF Kim.)

Step 2) Allow the Mod Podge to dry & sand it a little.

Step 3) Paint on a thin layer of white acrylic paint (to reduce the contrast a little & let your image stand out.)
Here's a photo of the texture
(click to see it big in Blogger, if you like)

Yay for paint! :o)

Step 4) Stamp these images (with the one MFT stamp):
(I used the MFT Pure Innocence 4-leaf clover clear stamp set (but made a flower out of the clover instead & heat embossed these all in black ink with clear embossing powder.)
- 1 whole image on the collage background (only as a reference, since it is TOO messy!)
- 1 whole image on good colouring paper (thick cardstock makes it sturdy after you cut)
- Two shamrocks (to make a flower.
- 1 shirt/dress on cardstock with the arm raised
- 1 shirt/dress paper pieced on book paper
(The only slightly tricky cut was her arm)

In the photo above: the dress in white cardstock with the arm raised (one cut so it will sit over the paper pieced dress)

In the photo above: The shirt/dress paper pieced on book paper.

Step 5) Use the stamped body as a guide to position & stick on torn tissue paper (to make texture for the ground & clouds.)

Step 6) Shade the ground.
Little tip for colouring on paint/mod podge: I used the chisel/broad tip of my copics, since that's the end I reserve for potentially messy colouring; the paint/mod podge might clog the tip. You could paint on refills or use a dedicated "messy" colourless blender to pick up Copic colours that you have scribbled on a block.
Or you could use markers other than Copics. Some other marker types (like SU/Tombow) may require embossing with clear embossing powder when they're added over paint/gesso/mod podge.)
Acrylic paints would work wonderfully.

Step 7) Glue full image onto the background & colour lightly

Step 8) Glue the white dress on (with the arm lifted) & then glue the book page dress over that.

Step 9) Glue one of the clovers on (coloured blue to make a flower instead of a shamrock)

Step 10) Glue on a second shamrock on to finish the flower (I also stitched on a teensy seed bead & added a wee leaf (doodled & cut out)

Step 11) Shade the clouds with pencil & add white details: The pencil is smudged using my finger tip & I added white raindrop & grass details with a white Souffle gel pen
Here's a close up of the pencil & Souffle pen details:
(click to see it big in Blogger, if you like)

(the Souffle pen is by Sakura. It goes on clear & dries white)

Step 12) Pressure emboss part of the image (I used a homemade grungeboard embossing plate (above). Details on how to make it here. It left a subtle impression since I didn't wet the cardstock...

Step 13) Sketch shapes around the image & the embossed texture and pierce: I sketched a cloud shape & a line for the ground & pierced holes along the sketched lines with a paper piercing tool.

Step 14) Stitch the scene with embroidery thread.

Step 15) Pierce holes along the hem of her dress & add knots.

Step 16) Make the Core-dinations cardstock piece for the back of the shadow box.
Cut some cardboard to fit a shadowbox frame & cut a piece of Core-dinations paper. Glue them to each other.

Step 17) Affix the Core-dinations piece to the shadow box (Beacon's 3 in 1 really holds.) Just be sure to use ventilation (as it says on the bottle.)
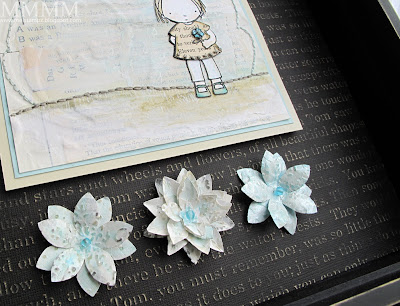
Step 18) Adhere the image & add some flowers...

(These were made using an embossing folder in the Cuttlebug, copic markers, punches, white paint, & sandpaper) There's a pictorial here, if you're curious:
 Thank You sooooh much for stopping by!

(Please click if you'd like to visit the blog
from an email or reader)

Step 16) Make the Core-dinations cardstock piece for the back of the shadow box.
Cut some cardboard to fit a shadowbox frame & cut a piece of Core-dinations paper. Glue them to each other.
Step 17) Affix the Core-dinations piece to the shadow box (Beacon's 3 in 1 really holds.) Just be sure to use ventilation (as it says on the bottle.)

Step 18) Adhere the image & add some flowers...

(These were made using an embossing folder in the Cuttlebug, copic markers, punches, white paint, & sandpaper) There's a pictorial here, if you're curious:
Embossed fresco flower tutorial:
(embossing, colouring, painting...)


...and then you have a shadow box collage:

(embossing, colouring, painting...)
...and then you have a shadow box collage:
 Thank You sooooh much for stopping by!
from an email or reader)


15 comments:
AMAZING!!! what a wonderful project! i love it!!
I'm gonna havta find me a book like that that I can rip up and try. I am definately trying this project out! Thanks Mel! I posted a project that borrowed your gesso covered and embossed digi paper that gives the coolest texture! Killed my printer tho, lol :)
such a wonderful project and love the muted colors!
Too dang cute! And I just love all of your techniques... fabulous!
WOW....just WOW. You rock girlie!!
this is so cute :) Niceee...
so totally adorable!! love it sweetie!!
take more walks....enjoy!!!
xoxox
nice tutorial!
wow what a fabulous project
Take care
Tracy
MEL, HOW did you make the black background with the coordinations? Is it embossed?
Totally fabulous - you are amazing Mel! Jo x
Terrific...love the PI girly here. What did I tell you about these crazy long posts? Bad girl. (Psst...have you ever polled your readers to see if they read all your info? I do when I want to know something but normally I just look at the pics!)
That's so gorgeous! I instantly went to buy that stamp... but I can't find it! Is it current??
this project is so cool and looked like a lot of fun to make as well! Thanks for sharing your inspiration and creativity! love it!
Hi Mel! This post made me just HAVE to get this stamp! I haven't used her yet, but I have had a go with My Umbrella here. I love your blog!!
Post a Comment