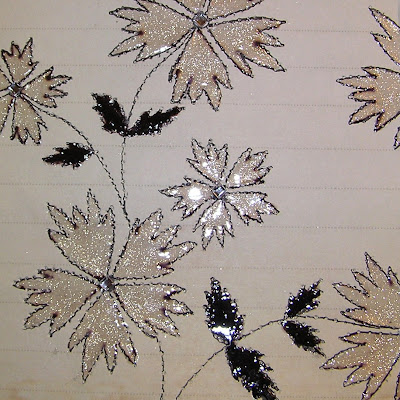
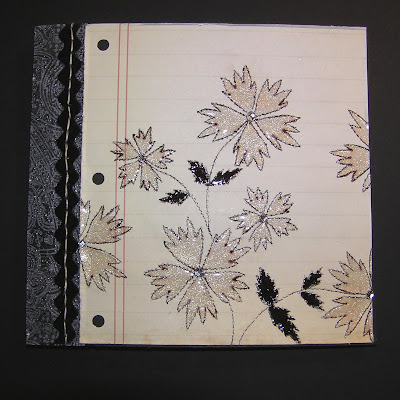
This handmade artsy paper gives kind of a funky look because of the piercing & the sparkle of glitter covered in the glossy Crystal Lacquer. (Click the pic for a HUGE close-up look.) Piercing & faux enamel works great with embroidery patterns, but is a really flexible technique. You could use any clip art, any stamp, or any line image (You could even pierce the images on designer/patterned papers & "enamel" them.)
I'm dyin' to try piercing Gesso cardstock (or any paper that you paint Gesso on --which makes it very strong) You could also pierce fabric papers (I love Linen StickStock from Close To My Heart.)
Supplies:
- Paper piercer & mat
- 3 straight pins
- Cardstock/paper. This lined paper is from Close To My Heart
- Marker (waterproof if you like)
- Gems
- Sakura Glitter pen
- Crystal Lacquer
- Template I got this from Martha's Dot-Painted China project but you could use any stamp image, any embroidery pattern (or any image at all.)

- Lay your cardstock or patterned paper on a piercing mat (if it is thin paper you can reinforce it with another piece of paper under it.)
- Lay the template/pattern over top of it.
- You can anchor your pattern with three pins poked into holes of the pattern (this will let you move around and pierce it without messing up the pattern)
- Pierce the holes to create the pattern (being careful not pierce to closely together or it may tear.) You can use your pierced pattern as is or you can continue and embellish it...
I just love the deep sparkle & shine that you can get if you colour with a Sakura Glitter pen & go over it with Crystal Lacquer:
Add a layer of Crystal Lacquer over it all & let it dry well.
- Glue thin paper down to a heavier cardstock with an allover adhesive (even good glue stick.)
- Use watercolour paper
- Experiment with types of Crystal Lacquer

You can see that the SU stamp'n'write marker bleeds to give a sort of vintage water-stain look to it (the marker runs from the lacquer.) If you don't like that distressed look, you can just use waterproof permanent marker (if you're stamping before piercing use Stazon or a waterproof equivalent)
Some ideas...
- You can use a little or a lot of colour. (Some markers/other mediums may bleed.)
- You can embellish with beads or gems...
- Different papers will work differently. Thin paper can tear, but you can prevent tearing by supporting thin papers with a sheet of cardstock under them.
- You can pierce more than one image at once (for multiple projects)
- You can leave the holes plain, circle them with a glitter pen, or draw stitches between them (you can draw stitches with a Sakura quickie glue pen & sprinkle on embossing powder for heat embossed stitches. Of course you can also hand stitch after piercing if you like :O)
- You can turn your finished pierced pieces into luminaries, window hangings, or add them to lampshades because the light shines through the holes prettily. I think the technique might make nice Christmas ornaments with Christmas lights shining through them...
(This finished project is going to be a notebook. I'm workin' on a tutorial for a really speedy way to make cards into notebooks... I'll be posting it this week in case you'd like to give it a go. And I'm workin' on a tutorial for trying this with stamping too.) :O)
Thanks for taking time from your busy day! :O)
This paper piercing pattern
Any of these flower templates
- 5-petal Flowers
- Dahlias or Mums and cornflowers
- Lotus/Mirkwood Flower
- Resized 8-petal Mirkwood flower
- Rounded flower in three sizes
- Daisy
- Hot Crafty Flowers (58+ tutorial/template links)


18 comments:
This is so pretty Mel, very simple but really effective. I reckon this would look pretty neat with H20s or other shimmering stuff...another project to try when time allows!! Hope all is well with you me dear!
wow this looks just wonderful! reminds me of something but its too early to think LOL
What a great effect with not a lot of steps or prep time.
Going to give this one a try.
thanks again Mel
happy Monday to you
Gorgeous! Gorgeous! Gorgeous! It is so elegant and fun! I love the black and white!
That's a neat idea!
another fun idea! Love the vintage feel to it!
This is awesome. Great idea. Are you giving me hints with your links to those papers :-)) I might just send you half of my paper pack. You and Deb seem to know every little product CTMH has to offer. She knows every page on the catalog and you seem to have every thing from the catalog :-)
Your lacquer application skills are perfect.
Beautiful! I love the glitter pens, too... no mess w/ a lot of pop!
jeez mel where do u find the time to look up all this wonderful templates and goodies?! now i need to try them all :)
I love your design.. and the way you colored and finished it! Beautiful!
Swedie
I've been away for a while helping my SIL and look all that I've missed!!!
Mel ~ you are the BOMB baby!! I just love your blog!
Hugs,
Joani
Has anyone told you lately how awesome you are?
Oh, and hey...I tagged you.
What a great tutorial, journal, and wonderful lot of techniques. A great pleasure watching you do your thing.
An excellent turorial... I love how easy you make it look. All of your projects are great and I think this is fabulous. TFS
This is awesome and congrats on DT! I look forward to working w/ you for the Little paper shop and can't wait to get to know you better! Congrats!
Wow, awesome shimmery stuff, Mel! I love the way it looks. . .must be much more prettier in person!! I love how you also stitched the ric rac ribbon! Very cool!!
Maria
very cool, just like I imagined! :)
did you get my email?
I have to catch up on your posts, have a house full of sick people :(
Verry pretty card! Fabulous tutorial! You can see new things in unexpected ways! Thank you very much, Mel!
Post a Comment