Monday, September 29, 2008

Turn Rub-ons into Pastel Primas!


This started as a muck-up, but I'm likin' having a new 3D use for rub-ons. I failed at the rub-0ns trick from page 23 of the autumn/winter 2008 Close To My Heart Idea Book. I just love that catty; thank you lovely Anna DaGenerous! (So anywho, this was a technique where you add pastel to the rub-on & then rub it on. It gives a halo.) However, I flopped. I used Stampin' Up! rub-ons & pastels so maybe that's why it didn't work. But... it did turn into something else: homemade pastel primas out of rub-ons.

I didn't want to waste the rub-ons when they wouldn't stick, so I decided to add 'em to a project another way. It was really easy to cut them into flowers and curl them a little for shaped primas. Here's how-to:


Supplies for Pastel Rub-on Primas :
(I used Stampin' Up! supplies; I'm not sure how other brands perform.)

For the flowers:
  • Rub-ons (SU)
  • Pastels(SU)
  • Bone Folder
  • Gem Brads


Making the Flower:

  1. Cut a rub-on & remove its backing
  2. Dab pastel onto the sticky side of the rub-on ( I used 2 colours red & turquoise)
  3. Dust off excess pastel powder
  4. Trim around the shape with scissors
  5. Curl them (I used a foam mat under them & rubbed a bone-folder over them)
  6. Add a brad through it...


This is the back view of the rub-on. From the front, the white (or whatever colour rub-on you have) will show through with a halo of colour around the edges.)

Intricate rub-ons like these dotted ones from Stampin' Up! are good for this since the colour shows through the spaces inside the design. I can just picture the snowflakes from "Word Flurries" or the flowers in "Hidden Garden!" Ouuu dreamy! (For you Demos, it'd be a fun way to show customers another use for pastels & rub-ons.)


One way to use pastelled rub-ons...


I used these pastel rub-on flower thingies on this little notebook I made as a thank you for someone special. I'll post a notebook tutorial for you soon; it's SO easy! (Just pierce the card center & stitch some folded paper in the center.)

Schtuff for the notebook:
  • Close To My Heart Perfect Day paper
  • Hole punch (to distress the CTMH paper with holes)
  • Red Ridinghood In-colour cardstock (matches the CTMH paper perfectly)
  • Cardstock to form notebook (Naturals Ivory 12x12)
  • Paper for inside of book
  • Sakura Glitter pen or silver pen
  • White embroidery thread
  • Paper piercer, foam mat & needle
  • Metal frame thingy (Dollarama store in Ontario) :O)
  • Quickie Glue Pen
  • Silver embossing powder
  • Crystal Lacquer

To decorate this Notebook....
  1. Add rub-ons where you'd like them
  2. Doodle lines for stems or a flourish or something ( I use a silver or glitter pen so it's pretty if it shows under the stitching.)
  3. Pierce holes along the lines
  4. Stitch along the design
  5. Stick 3D pastel rub-ons on over top


The sentiment (A) is made by glue embossing a letter:
  1. Draw out the letter in Sakura Quickie Glue Pen
  2. Sprinkle with embossing powder
  3. Heat it & Punch out the letter
  4. Glue onto the back of the charm with Crystal Lacquer


Here's a quick look at the inside (I stitched some paper in the middle and added a little area at the back for notes. This gorgeous distress-look blue graph paper is also from Close to my Heart. (Thanks again Annapurna! You ROCK!)

Thanks for poppin in! :O)

Sunday, September 28, 2008

Pierced Paper Patterns (with faux enamel)


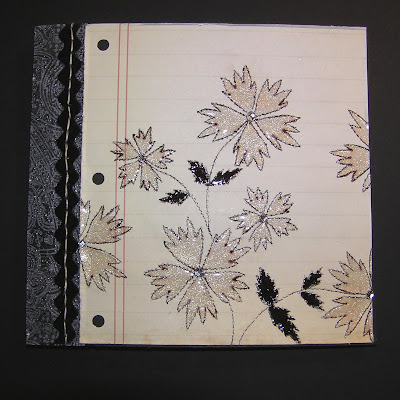
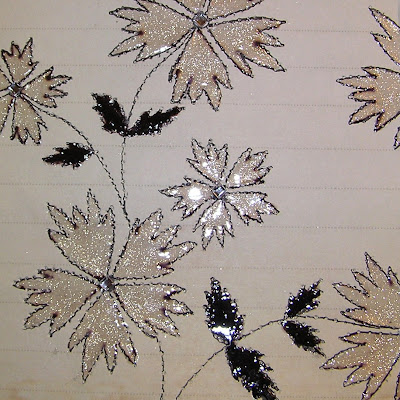
This handmade artsy paper gives kind of a funky look because of the piercing & the sparkle of glitter covered in the glossy Crystal Lacquer. (Click the pic for a HUGE close-up look.) Piercing & faux enamel works great with embroidery patterns, but is a really flexible technique. You could use any clip art, any stamp, or any line image (You could even pierce the images on designer/patterned papers & "enamel" them.)

I'm dyin' to try piercing Gesso cardstock (or any paper that you paint Gesso on --which makes it very strong) You could also pierce fabric papers (I love Linen StickStock from Close To My Heart.)

Supplies:


Pierced Paper & Faux Enamel:


Pierce Images into Cardstock:
  1. Lay your cardstock or patterned paper on a piercing mat (if it is thin paper you can reinforce it with another piece of paper under it.)
  2. Lay the template/pattern over top of it.
  3. You can anchor your pattern with three pins poked into holes of the pattern (this will let you move around and pierce it without messing up the pattern)
  4. Pierce the holes to create the pattern (being careful not pierce to closely together or it may tear.) You can use your pierced pattern as is or you can continue and embellish it...

I just love the deep sparkle & shine that you can get if you colour with a Sakura Glitter pen & go over it with Crystal Lacquer:


Colour areas with Glitter


Colour some areas with marker for interest


Add a layer of Crystal Lacquer over it all & let it dry well.


It may buckle a little from the moisture in the adhesive (bit it should dry flat.) Stuff that will help prevent permanent buckling:
  • Glue thin paper down to a heavier cardstock with an allover adhesive (even good glue stick.)
  • Use watercolour paper
  • Experiment with types of Crystal Lacquer


You can see that the SU stamp'n'write marker bleeds to give a sort of vintage water-stain look to it (the marker runs from the lacquer.) If you don't like that distressed look, you can just use waterproof permanent marker (if you're stamping before piercing use Stazon or a waterproof equivalent)

Some ideas...
  • You can use a little or a lot of colour. (Some markers/other mediums may bleed.)
  • You can embellish with beads or gems...
  • Different papers will work differently. Thin paper can tear, but you can prevent tearing by supporting thin papers with a sheet of cardstock under them.
  • You can pierce more than one image at once (for multiple projects)
  • You can leave the holes plain, circle them with a glitter pen, or draw stitches between them (you can draw stitches with a Sakura quickie glue pen & sprinkle on embossing powder for heat embossed stitches. Of course you can also hand stitch after piercing if you like :O)
  • You can turn your finished pierced pieces into luminaries, window hangings, or add them to lampshades because the light shines through the holes prettily. I think the technique might make nice Christmas ornaments with Christmas lights shining through them...

(This finished project is going to be a notebook. I'm workin' on a tutorial for a really speedy way to make cards into notebooks... I'll be posting it this week in case you'd like to give it a go. And I'm workin' on a tutorial for trying this with stamping too.) :O)


Thanks for taking time from your busy day! :O)


P.S. Patterns that might be fun for this:

This paper piercing pattern

Any of these flower templates
Patterns from these posts:

Friday, September 26, 2008

Wee Houses (124 links: templates, tutorials, etc.)

There's something ever so precious about
wee little houses, isn't there?

over 100 house links - templates too

Here is a round-up of a just few really cute house tutorials,
templates & inspirational links.
(I can just picture a whole wee village of them!) :O)


photo by Linda Albrecht linked here:

1.
my very fave: Victoria magazine's Harvest House template
(with 3 different house style templates in one PDF)
Gorgeous versions of the houses here by Linda Albrecht.

4. Country Home paper town (4 templates):


16. Paper model houses from sticksite
17. DLTK's printable paper house
18. Elaborate paper houses from Paper Craft Art Creative
19. Carolyn's holiday house place cards


21. The most adorable houses from
Delphine Doreau on her blog Non Dairy Dairy
which has the sweetest paper toys:


22. La Maison de L'ourchon (Bear in house)
23. Putz, suite (Bird in house) & Putz (Elf in house) found thanks to Meggiecat


26. House templates for gingerbread houses (or regular house) Martha:
(cookie recipe here) Photos shown here are from Studio SlyterLink

27. Town house gift boxes & templates (Martha Stewart):


28. Winter Village tree ornament tutorial here & the template (Martha)
29. Tent box which would make a cute house box
30.Simple 3D house template from Crafty Visions (scroll to the bottom)
31. Pumpkins carved as Houses -jack'o'lanterns

32. File folder houses & templates (Martha Stewart)


35. Kid's Craft Ideas Bird House
36. Scor-Pal gingerbread house Brownstones by Diana
37. House book
38. Moomin Gingerbread House
39. Classic simple house shape

40. School House pattern at About.com


40. Bird house patterns for paper piecing
41. Howard's haunted house pattern
42. Janene's hand drawn house box pattern
43. Grace's house box FRONT & SIDES Pattern & BACK from Kaboose
44. House Box Bank template
45. Shoe Box Apartment House (vintage inspiration scroll down)
46. Simple Bird house pattern
47. Habitat for Humanity Paper fab house template from The Toymaker's paper toys

48. Dollar store Crafts blog's village out of recycled cardboard tubes:


49. Victorian House, Church, Apartment building, & Barn from Ben & Jerry's
50. Stampington Company's tempting paper house template
51. The White House pattern
52. house template search on Flickr
53. Paper house from Inkless Tales & Template here
54. Tea-light House

59. Haunted House from Maya road (they sell the premade house) & another house
60. Awesome haunted house template from Martha Stewart et al Would work for house or church card.
61. Waltzing Mouse's little Gingerbread template & Her example of it made here. Or find it on her site in freebies here.
62. CPeep's amazing house She has great pointers & links to a variety of them too.(as well as her other house posts at the bottom.
63. Ravensblight haunted house
64. Sally Lee Books (the sweetest site!) shares these great houses in Lucy's Toy Box: Coloured house by Black & White house & coloured house #2


66. Simple bird house card-shape template from Chia's Rubber Stamp Art
67. House-shaped cookies by Erika
68. Etsy visual search for House Box


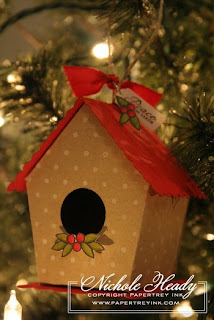
70. Birdhouse & template by Nichole:

71. Gingerbread birdhouse:

by Torie Jayne-with template

72. my old house box:(Template there)

73. Qbee's sweet house template:

74. House box template from Cathe at Just Something I Made:


75. More Bird Houses: Vicky's adorable version of a birdhouse box by Jo. Jo's template here. Vicky's template here
76. Bird House printable-would make a neat house house without the hole


79. House templates & tutorial from Bubbly Scrumptious:


80. Mini Houses from Just Something I Made:


81. Big Indoor Trains DIY Bay Window House:


82. Christmas house printable from twelve22:


83. Rhonda's detailed tutorial for DIY paper houses
(she links the template too)


84. Fold kit for sale on etsy by hutchstudio:


85. Paper house on flickr by charmedgirlnc:


86. Advent calendar with house scene on top
from Pam's flickr gallery here:


87. my Winter Village Diorama (tutorial)
<span class=<span class=

88. my Haunted House window card:
Hero Arts haunted house window card by mel stampz

89. House printables from About.com:


90. Felt house & template from Poopscape Projects:


91. Fabric covered house template & tutorial
from the cart before the horse:


92. Snow village ornaments - 3 house style downloads
from Better Homes and Gardens (scroll down for templates):


93. Building the Little Charmer
from Big Indoor Trains:


94. Glitter house by Michelle using Memory Maker's template


95. Houses from Holiday wedding ideas by Lucinda via Style me Pretty:


96. Martha Stewart village template & tutorial:

direct link to template PDF

97. Better Homes & Garden's mini Holiday Village


98. Birch bark house tutorial by :


99. Recycled jug houses from filth wizardry:


100. Teeny house webcam turns you into a giant:


101. Sweet boxes from Torie Jayne
Link
102. Spellbinders birdhouse box:


103. Moving House?
Clear & Simple Stamps tutorial & template:


104. Letter press paper houses from 1canoe2:


105. House box template from PaperCrafts magazine
(you need to scroll down a fair ways):


106. Gorgeous house box by Lucy
(using the template above):


107. Cereal box scenery from mini eco:


May your day be ultra crafty!