Friday, January 30, 2009

New LPS Release! It's {Tea Time!} (Tea Cup Template & Copics on Fabric)


Finally I got a picture of this puppy, well make that bunny! ;O)
So here it is: a new shaped card template to celebrate
the new Little Paper Shop set: {Tea Time}!

The Stamp Set!


This card was so fun to make. Made me feel like havin' a tea party! When I was little, I used to love to dress up my Walking Wendy doll and take tea cups & goodies on outdoor tea parties. Walking Wendy was as tall as me, heehee. I never had a cute lil' anthropomorphized rabbit as company, but I did play with bunny droppings in the woods (I thought they were marbles, yup really! I guess a little rabbit poo never killed anybody, ROFL.)

The Template:

There are two versions to this template: with or without instructions printed on it.


(Click pics for JPGs & Click big link up there for PDFs)

The Teacup Measures:
  • 5" across the top (6" if you include the handle)
  • 3" across the bottom
  • 4 1/2" tall
The Tag is the size of Stampin Up's small Tag Punch. I included it for those of you who might not have the punch. :O)

You can also make two projects with the tea cup shape: a card, or a box (to make a box just adhere it to the "LIL' TALL BOX" template.)


(Click pics for JPGs & Click big link up there for PDFs)

The Lil' Tall Box
is an altered SU template that used to be the glitter purse. It now measures 2 1/4 deep & wide by about 3 1/4 tall (and fits in behind the tea cup without showing.)
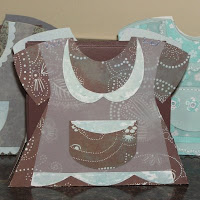

Makin' the Card:


Step 1) Print the template onto scrap cardstock


Step 2) Cut the template out. The stripe across the top lets you choose the height. (You can make it shorter if you like. I wanted room for the scallop on mine...)


Step 3) Cut the cup handle out with a hobby blade/exacto knife.


Step 4)
Trace the template onto good folded cardstock
(with the fold at the top of the cup.)


Step 5) Cut the cup shape out (leaving the fold at the top of it intact & cutting out the hole for the handles. If you leave it folded to cut the handles & you have a nice sharp exacto knife blade then you can cut the holes just once for both.) :O)


Step 6)
Erase the pencil lines.


Embellishing:


Step 7) Cuttlebug emboss the cup (if you like.) With certain embossing folders, you can overlap the folder to cover the whole thing with pattern. (Swiss Dots works wonderfully for this & Argyle and Houndstooth do too.)

A little trick to make less lines/ empty spots in the repeated embossing: on your second pass with the folder, line the folder up so that it overlaps a good deal of the previously created pattern. Then put it through the machine, but stop before you reach the folder's edge & back out of your machine instead of passing it all the way through. Clear as mud? Let me know if I don't make any sense, k?)


Step 8) Create a band to embellish the cup (Trace the template onto another kind of cardstock.) I've made this one out of Glimmer Cardstock from Paper Temptress. It's called Starburst Lichen & the sparkle is so lovely! I embossed it with the textile embossing folder & then added highlights with a Copic marker.


Step 9) Copics stick nicely to the Glimmer Cardstock & the metallic finish lets you remove colour if you use a Colourless Blender. (A fun way to start using Copics if you only want to try out a couple of them at first.)


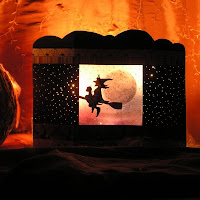
Step 10) Attach the image & Pierce holes for stitching (I stamped this cute tea party on fabric in Chocolate Chip craft ink & heat set it gently. Then I stuck it onto wide double-sided tape (carpet tape, actually!) & coloured it with Copics. (If you account for bleeding it works out well. It's handy to stamp a practice image so you can get the feel of colouring. I tried other markers (S.U. & C.T.M.H.) but they bled way more than the Copic markers.

I loves me my Tim Holtz Design Ruler for piercing (with a making memories paper piercer.)


Step 12) Stitch the edges of the image. (Mostly a decorative step, but it can't hurt to prevent fraying either, hey?) :O)


Step 13) Emboss the whole image & band, lining it up with the previous embossing. (I was CHICKEN to try this step, but I had to see what happened.) Which was this:


The carpet tape made the fabric hold the embossing nicely, but the image wasn't distorted at all (as I had feared in my chickeness.) Whew, disaster averted! ;o) If you emboss over stitching it holds well, but becomes slightly less pronounced.


Step 14) Create a scallop for the lip of the cup. (I used Stampin' Up!'s Slit Punch) & then embossed the edge of the scallop using a Stylus. The fun foam mat I work on lets the paper take the embossing...


Step 15) Use that good ol' Design Ruler again to create a solid line of embossing (on the top straight edge of the scallop.)


Step 16)
You can use a Copic Marker to create shadows on the cup for dimension.
(If you told me I could only have just one Copic ever, (perish the thought!) I would choose this one: Warm Gray No.1.

By the by, Copic Markers are on sale right now at Paper Garden Projects for 20% off! (And 40% off all clearance items too...)


Step 17) You can add Crystal Lacquer to the tea pot & tea cups for cute shine (had to shine her shoes too!) :O)

The Tag:


The tag is stamped with one of the cutie patootie sentiments
from the {Tea Time} set.
Here are the steps to making it...
  1. Cut the acrylic stamp in half so I cold mount it to fit inside SU's small tag punch. (If you cut in a V shape it fits together again perfectly, so you don't lose the lovely alignment of the phrase; you just gain a second option. I lurrrrrve acrylic stamps!
  2. Punched two vellum tags
  3. Covered the stamp with Versamark & then Close to Cocoa ink
  4. Stamped the 2 tags with "You're my Cup of Tea" & embossed with clear e.p.
  5. Adhered them onto a 3rd tag (cut from Starburst Lichen cardstock & cuttlebugged) with the string (from a real tea bag) adhered under the back layer.
  6. Pierced & stitched the top to embellish


Inside the tag is a layer of Cuttlebug embossing.
Yay for texture & shimmeriness! :O)

Thank you so much for stopping in! Hope you have a Terrific day!


Quick Links:

You can find the Tea Time stamp set here
& see some lovelies in the Tea Time Gallery here!

Thursday, January 29, 2009

Nestabilities Corkboard (no-hands storage)


Off to a Dr's appointment (and no sunlight to shoot that card yet, ugh!) but here's a tut. on how to make your own no-hands Nestabilities storage. (A painted cork board.) I like it because I can use one hand to grab the Nesties when I'm working, instead of having to open a book or CD case. I also like the lack of magnets, since not having to shop for them made this really simple to make. I just used a cast off cork board that I found. :O)

Sorry for the bad flash photography....


Step 1) Paint cork board whatever colour you like. (I used black acrylic paint.)


Step 2) If you'd like to decoupage your cork board, just prepare your bits (mine are old book pages folded & torn into squares.) Lay down some Mod Podge...


Step 3) Stick on the bits


Step 4) Apply a topcoat of Mod Podge, press out any bubbles during the topcoating, & let dry. :O)


If you are short on wall space, like I am, you can mount it in a shelf. It's not as much of a waste of space as you might imagine, since you can use the sides of the shelf too. :O)

Hope you have a great day!


ETA: P.s. The thingies they're hanging on are just clear cheapie pushpins with buttons glued on them. For how to make button pushpins, please see this post.

Wednesday, January 28, 2009

VELLUM Links in Volume (100+ Vellum techniques/tricks/projects) :O)


Hi Galz n Guyz!

A whole whack of Vellum Links for ya today. I have one more new release post ready to share with you for Little Paper Shop! But I had no chance to shoot the photos of the finished project today (Dr's appointments & a day of bed rest for this gucky lung & bronchial schtuff. I tell ya, I could sleep all day & night...moan groan whine... LOL) Well, that's a sneak peek at the card, up above. It's a shaped card; can you guess what it is? :O)

And I have a new obsession! I learned how to make vellum flowers from Godlieve's fantastic tutorial. I'm hooked on making 'em now. :O) Those ones (up there) have knots stitched in the centers. I also have some vellum-y lookin' beads that might be neat & glitter centers would be cute don't ya think?

A tip for you, if you'd like to try vellum flowers: Set a dampened sponge in a dish & lightly wet your punched vellum before working it. Keeps it from tearing. (Works for embossing Vellum in the Cuttlebug too--though the moisture might make large pieces curl on you but you can let it dry in the folder (under a book maybe?)

I'm looking forward to using Sizzix dies for vellum flowers (got the Birds & Blooms dies a while back.) I was heartbroken when I tried to cut felt & fun foam with them. My Duh. They're only supposed to cut paper, but they should cut vellum!?! The shape of that 6 petal flower is just right for the flower shaping technique too. :O)

I'd also like to see if they cut crepe paper, which I have to find, since I love these crepe paper fleurs à la martha & these too. Anyone tried that?


Vellum Links:


Adhering Vellum (Videos):

1) Scrapbook TV how to attach vellum
2) Docraft's vellum adhering tricks
3) How to use Vellum Adhesive by Chrystal

Miscellaneous Craftiness with Vellum:

1) Godelieve's Stunning Vellum Flowers
2) Her Vellum Candle holder
3) & her vellum gift tags
4) & Godelieve's Vellum Sampler Post
5) Ana's Vellum Heart treat Box Tutorial
6) & her tall vellum box
7) Nancy's tips on pressure embossing vellum (Cuttlebug etc...)
8) Vellum in Label Maker by Julia
9) & Julia's vellum pocket card
10) Layering Vellum over Hand-stamped papers by Marie
11) Copics on Vellum by Marianne
12) Papermania Vellum Video
13) Debossed Vellum tutorial by Niki & Another Stunning Example by Beate
14) & Niki's super easy vellum lanterns
15) Vitalized Vellum (video) by bernzweig12
16) Embossing on Vellum (video) by jennifermcguireink
17) Another Vellum Debossing video by Jennifer (great tips)
18) How to Emboss on Vellum by "EmbossTips"
19) Vellum snowflake embellishments by GinaK
20) Nesties Vellum mat on a Pocket Card by Debbie
21) Nichole's Double-Vision Vellum window
22) & Nichole's dimensional Matting with Vellum
23) Die Cut Vellum Bag by Darya
24) Damask Vellum Lampshade
25) A tutorial by Faith for Vellum Lampshades
26) Pierced, Punched, & Painted Vellum by Michelle
27) Luminary instructions from Paper Source
28) Holiday Vellum Photo Card (commercial link)
29) Clipart Vellum Luminary from Vintage Image Craft.com
30) Paper-Trimmed Votives (would look great in vellum)
31) Suzy's Embossed Vellum Butterflies
32) Lunimari by by Heidi (with new Spellbinders "Frameabilities")
33) Andrea's Stamped, Markered, & Glittered Vellum Embellishments
34) Vellum Sentiment (Hero Arts Blog)
35) Very Vellum Video by Stamper Dog
36) A Vellum Masterpiece by Loretta (& kewl flower template too!)
37) Flocked Vellum (Gothic Candles) by Jennifer & Kitty
38) Vellum-doored Cabinet by cyndiestamps
39) Ann's Vellum Cup Card tutorial (on SCS)
40) Amy's Crayons on Vellum
41) Glow Vellum Technique by Cindy
42) Luminous flower garland (on fairy (mini) lights! (from a Michaels book edited by Dawn & Megan)
43) Vellum Sleeve template (lovely but I couldn't find whom to credit)
44) Iron-ons & Vellum Scrapbook cover (or for anythin') by Heidi
45) Laurie's Vellum Background
46) Melanie's "The Magic of Vellum"
47) & her Antiqued Votive Lantern Tutorial & Haunted tealight
48) Irene's (Scrapperlicious's) Magic Mesh on Vellum Leaves
49) & her Vellum Flowers Tutorial
50) Godelieve's White on Vellum
51) Jen's Vellum Tuck in
52) Maria's Stunning "Metallic Vellum" Tutorial
53) & her Colouring on Vellum Tutorial
54) Vellum Pyramid box from creativepapercrafts.com
55) Lauren's sweet Vellum Wedding Card
56) & her vellum bird (4 photos down)
57) & Lauren's vellum Gift Box
58) & Dove Chocolate Vellum Box (with tutorial)
59) Vellum Handbags video from Crafting Direct.com
60 Working with vellum & heritage photos
61) Deena's Playing with Vellum (Part I)
62) & Deena's Vellum Part II
63) & Her Colouring the Back of Vellum
64) Folding & cutting Vellum Snowflakes by Rebecca
65) Scrapbook Lounge video by Tricia ("Power Tools") vellum overlay +adhesive tricks
66) Scrapbook Lounge Video by Michael ("Vellum Adventure")
67) Papermania's Patterned Vellum ideas
68) Marie's 7 tricks for Vellum
69) LeeAnn's Tag Starbursts with Vellum
70) Raissa's Heartfelt Pocket Surprise Tutorial
71) Julie's Frosty Vellum Beer Mug (kewl!)


Martha Stuart et al:
1) ...with these luminaria templates from Martha et al?
2) ...or with doilies in your project?
3) Vellum as a material for stencil guide
4) Vellum Bunny Garland (or any shape, of course)
5) Vellum Shields
6) Packaging Cookies with Vellum
7) Party Blowers (with vellum)
8) Vellum-lined Party hats
9) Striped Vellum Candle Holders & the templates
10) Vellum-lined Boxes
11) Vellum Cherry Blossoms
12) Photo centerpiece (printed on Vellum)
13) Vellum 8 point Star & Instructions
14) Vellum Flower Girl's Basket
15) Vellum placecards (3/4 of the way into video) & templates here: place setting card (lovely patten for any craft) & tag
16) Vellum Flashy-lights
17) Vellum Doily Candleholders
18) Illiminated House Number Boxes
19) Mesh Votive Holders (by Tom)
20) Cherry Blossom Place Cards

Articles:
1) Tips for Printing on Vellum & project ideas from HP
2) Vellum Tips by Adrienne
3) Article on how to use Vellum for your cardmaking by Vicki

ETA: The Vellum Jackpot!:
All of Bentov Anat's lovely lovely vellum work.


Adhesive-Vellum Window Stickers:


Tinted Vellum:


Faux Bleached Vellum
& Tinted Vellum Scallop:


Vellum Butterflies:


& Yesterday's Printing on Vellum
(and embossing & tinting it):


May all your Vellum adventures be very marvelous! ;o)


P.S. Do you have a favourite trick with Vellum? Please Do tell! :O)

Monday, January 26, 2009

Little Paper Shop has a new set...and they called it Puppy Love (+Embossed Tinted Vellum)


This post is dedicated to those of you who are old enough wise enough to remember the song "Puppy Love"! <--Click there to hear good ol' Paul Anka. :O)

I'm SO late with this sorry (Still having a hard time shaking this respiratory junkola, ugh!) ...But to celebrate the new Little Paper Shop stamp set, called {Puppy Love} I made a word document with the lyrics. (YOU CAN DOWNLOAD THE TEXT HERE.) It was printed on vellum, and embossed, and tinted to get a coordinating paper for the scallop mat.

The Embossed & Tinted Vellum:


Step 1) Prepare supplies before printing (Clear embossing powder & anti-static bag & vellum)
Step 2) Stick vellum in printer & print text out
Step 3) Sprinkle with embossing powder a.s.a.p & heat it gently
Step 4) Let cool & use as is or wipe with ink
Step 5) Remove excess ink

Tip: You can cut your sheet up before tinting (if you know what size you'd like) or just tint half to get 2 or more colours that coordinate. :O)

The Bee:


I am crazy in love with this lil' Bee (so is this Puppy if his blushing is any indication) ;O)

ETA: Some details I left out: The black on top of the embossing was done with a sharpie (for the bee's eyes & the pup's eyes and nose.) To get the puppy to have a healthy wet nose, lol, I just added Crystal Lacquer over it. His colour has lacquer & glitter and a brad. :O) The rest of the image is coloured using a red marker & a Niji watercolour brush (puppy), & the shimmer is from Pearlescent paints (sky & grass). The yellow dots are embroidery thread knots.

To make the Bee 3D I just...

1) Stamped the sweet Bee on watercolour paper in Silver Encore ink
2) Embossed him with Ranger Silver e.p.
3) Coloured him with a yellow Copic & a Black permanent marker
4) Added Crystal Lacquer to his wings & Dazzling Diamonds glitter
5) Stamped his antennae onto the main image
6) Stuck him on Foam Tape for dimension

The Ribbon Tag:


Step 1) Stamp the {Puppy Love} sentiment in black craft ink on the ribbon
Step 2) Sprinkle it with embossing powder & remove excess powder (i used a paper piercer for that)
Step 3) Heat the ribbon gently to melt the powder (seals ink in, but isn't shiny)
Step 4) Fray sides (pull out threads & seal the white stitching on the back with Crystal Lacquer)
Step 5) Cut end in points & melt slightly with a lighter to prevent fraying end
Step 6) Adhere & stitch on


The Stitchin':

Here's one way to get a custom stitching shape (or faux-stitching too):

After you have your card elements placed how you'd like them...


Step 1)
Cut the shape you want from scrap paper

(I folded & cut the heart just like in grade school-yup I was a paste eater, heehee.)


Step 2) Temporarily adhere your paper shape & pierce the outline
(I used regular double-sided tape since I was working on vellum, you can make tape repositionable by removing most of it's tack [sticking it on your pants a few times works nicely])


Step 3) Stitch your pierced outline

The Cardstocks:
The metallic cardstock I used to mat the image is a lovely shimmery blue from Paper Temptress called Plasma Blue & I added Lemon Drop Pop Tones cardstock for a hit of hot colour in the tiny mat behind it, with some Ridinghood Red from Stampin' Up!

And that's all she wrote... Hope you're all doing very very very well,