


A little bit of digital trickiness...
...
...some printing on patterned paper...
and a solid image can become
paper piecing:
...
...some printing on patterned paper...
and a solid image can become
paper piecing:


as well as an image to stick those paper pieces onto
or simply one to colour in. :o)
or simply one to colour in. :o)

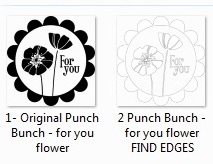
...make solid Stampin' Up digital images into Outline images
...convert Stampin' Up digital image PNGs into colour (using Photoshop)

If you've been checking out the Stampin Up salebration catalogue,
you might recognize this image
(or it's Mommy the solid image version)...
(or it's Mommy the solid image version)...
This image comes in a stamp as well, but this post is all about
how it comes in the saleabration digital freebie
(along with digi files of all the sets in the SAB catty)
and how you can do LOTs of thing with all that stuff...
how it comes in the saleabration digital freebie
(along with digi files of all the sets in the SAB catty)
and how you can do LOTs of thing with all that stuff...
Little note: I don't sell S.U. and this obviously isn't a finished card, but since saleabration only goes until the 31st of March, I thought I'd post this digital tutorial right away--in case it might help some people decide whether they want that digital image kit with all the images in the Salebration catty or not.
Here's some more of that set altered in a few different ways:


make Solid Stampin' Up Digital Images
into Outline images
(in Photoshop):
This tutorial uses the flourish from
the digital version of the Bliss set:
into Outline images
(in Photoshop):
This tutorial uses the flourish from
the digital version of the Bliss set:

Step 2) Select Stylize then choose Find Edges:

This is what Find Edges will do for you:

...at least it will do with these Stampin' Up solid images;
it doesn't always work with every image out there).
Step 3) If you want to make your image darker or lighter,
you can alter the brightness or contrast.
Click the Image tab, then select Adjustments and choose Brightness/Contrast:
it doesn't always work with every image out there).
Step 3) If you want to make your image darker or lighter,
you can alter the brightness or contrast.
Click the Image tab, then select Adjustments and choose Brightness/Contrast:

Then slide the scale to where you would like it.
I made the lines darker here by reducing the brightness:

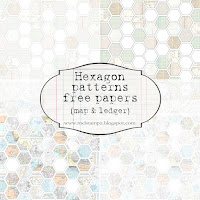
You can also make the image into a Photoshop brush
and make a patterned paper with it
(There's a tutorial for how to do that in this older post of mine).
Here's one patterned digital paper I made:
and make a patterned paper with it
(There's a tutorial for how to do that in this older post of mine).
Here's one patterned digital paper I made:

I lightened the Photoshop brush that I made by reducing the opacity
It made a grey pattern that takes very little ink to print & is nice and soft...
You can also change the size of the brush (smaller or larger):
It made a grey pattern that takes very little ink to print & is nice and soft...
You can also change the size of the brush (smaller or larger):

If you want you can even make coloured papers.
However, these S.U. images seem to require converting before they will
make coloured patterns (or let you change the colours of them at all).
Here's one way to do that...
However, these S.U. images seem to require converting before they will
make coloured patterns (or let you change the colours of them at all).
Here's one way to do that...
convert black & white digi into colour
(again using Photoshop):
Step 1) Open your file in Photoshop & choose the Edit tab
then choose Convert to Profile:
(again using Photoshop):
Step 1) Open your file in Photoshop & choose the Edit tab
then choose Convert to Profile:

It will open up a box. Select the profile you like.
I wasn't exactly sure which one to use, but
ColorMatch RGB worked just dandy...
...click okay to select the color profile:
I wasn't exactly sure which one to use, but
ColorMatch RGB worked just dandy...
...click okay to select the color profile:

It won't seem like much has happened since your image still appears black but...
if you go up to the Image tab, then choose Adjustments
and select Hue/Saturation you can lighten the image
if you go up to the Image tab, then choose Adjustments
and select Hue/Saturation you can lighten the image
(to allow the colour to show up):

Just slide the Lightness scale to the right to make
the image less saturated or lighter:
the image less saturated or lighter:

You could print the image gray, if that tickles your fancy or...
You can colour it.
Go up to the Image tab again and select Adjustments, then chose Colour Balance:
Go up to the Image tab again and select Adjustments, then chose Colour Balance:

Slide the scales to get the colours you want:

It is such a blast to slide the scales around
and change the colours! :o)
And this may be stating the obvious, but you
could colour the outline in the same way as I coloured this
solid version of the flourish.
If you want to use a photoshop brush in colour,
simply convert it to colour before you make it.
and change the colours! :o)
And this may be stating the obvious, but you
could colour the outline in the same way as I coloured this
solid version of the flourish.
If you want to use a photoshop brush in colour,
simply convert it to colour before you make it.
Happy Crafting!

P.S. No photoshop? Here's another method of recolouring
P.P.S. Gimp is a great free/open source alternative to Photoshop (I use Photoshop since I have it I find it easy to try & fuddle my way through.) ;o)
P.P.S.This post is unsolicited & I'm not affiliated with Stampin Up, or any company here, in any way. I just thought this would be something nifty to share with ya.


.JPG)
+working+in+batches+is+handy+for+avoiding+that..JPG)


+(2).JPG)


.JPG)
.JPG)


.JPG)


.JPG)


.JPG)


+melstampz.jpg)


+melstampz.JPG)


.jpg)


.JPG)
.JPG)
+melstampz.JPG)


.JPG)

.JPG)
+melstampz+FRONT.JPG)
+Mat+the+faux+gatefold+front+%26+adhere+to+a+card+Angel's+Landing+Ho+Ho+Holidays+melstampz.JPG)

.jpg)


.JPG)

.JPG)
+melstampz.jpg)


.JPG)


.jpg)
.JPG)

INSIDE.jpg)
+copy.jpg)


.jpg)
.JPG)

.JPG)
.JPG)

.JPG)
.JPG)
BIGroundCDgiftBOX.JPG)
.JPG)

.jpg)


.JPG)


.JPG)
.JPG)

.JPG)
.JPG)


.jpg)
.JPG)


+Adhere+squares+in+center.JPG)


.JPG)


.JPG)


+pierce+a+pilot+hole+in+each+side+of+box.JPG)


.JPG)


+put+in+a+perty+container+(that+you+can+fit+your+hand+into).JPG)


.JPG)


.JPG)


.JPG)


.JPG)


.jpg)


